rsync+crontab(rsync+inotify)
一.rsync介紹
rsync全稱remote sync,是一種更高效、可以本地或遠程同步的命令,之所以高效是因為rsync會對需要同步的源和目的進度行對比,只同步有改變的部分,所以比scp命令更高效,但是rsync本身是一種非加密的傳輸,可以借助-e選項來設置具備加密功能的承載工具進行加密傳輸
二.rsync的工作模式
1、shell模式,也稱作本地模式
如:rsync -av dir1 /tmp/
2、遠程shell模式,此時可以利用ssh協議承載其數據傳輸過程
如:rsync -av dir1 [email protected]:/root
註:shell模式默認不需要配置
3、服務器模式
三.企業案列: 搭建遠程容災備份系統
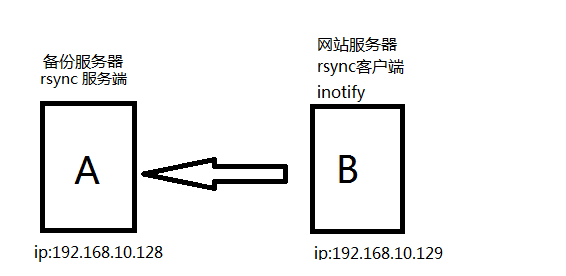
為了保證數據安全,需要建立一個遠程容災系統,將網站數據在每天淩晨2點備份到遠程的容災服務器上,由於數量很大,每天只能進行增量備份,僅僅備份當天增加的數據,當網站出現故障後,可以通過備份最大程度的恢復數據。
1.解決方案(rsync+crontab定時備份)

1)服務端A配置
[[email protected] ~]# cat /etc/redhat-release
CentOS release 6.6 (Final)
[[email protected] ~]# /etc/init.d/iptables stop
[[email protected] ~]# setenforce 0
[[email protected] ~]# yum install -y rsync
[[email protected] ~]# cat /etc/rsyncd.conf
######全局參數
uid = rsync
gid = rsync
use chroot = no
max connections = 10
timeout = 300
log file = /var/log/rsyncd.log
pid file = /var/run/rsyncd.pid
lock file = /var/run/rsync.lock
######模塊,類似於nfs中的共享目錄
[fengxiaoli]
path = /cx/####備份路徑最好和模塊名一致,這裏只是為了測試一下路徑名和模塊名區別
ignore errors
read only = false ##可寫
list = false ##是否允許列出模塊內容
hosts allow = 192.168.10.0/24
hosts deny = 0.0.0.0/32
auth users = rsyncuser #虛擬的用戶
secrets file = /etc/rsync.password####用戶對應的密碼文件
註意:我做的時候裏面的中文好不刪的話同步文件的時候會出錯
創建rsync用戶且指定/cx/目錄所屬
[[email protected] ~]# useradd rsync -s /sbin/nologin
[[email protected] ~]# mkdir /cx
[[email protected] ~]# chown -R rsync.rsync /cx/
創建rsync密碼文件
[[email protected] ~]# echo "rsyncuser:pass" >/etc/rsync.password#將用戶名和密碼輸入rsync密碼文件rsync虛擬用戶名:密碼
[[email protected] ~]# chmod 600 /etc/rsync.password 註意這裏的密碼文件權限必須給600
2)rsync客戶端B配置
[[email protected] ~]# rpm -qa rsync只需下載該軟件,不需要其它配置
rsync-3.0.6-12.el6.x86_64
[[email protected] ~]# echo "pass" >/etc/rsync.password
[[email protected] ~]# chmod 600 /etc/rsync.password
3)編寫腳本創建定時任務
[[email protected] ~]# cat 002.sh
#!/bin/bash
rsync -avz --delete /data1/ [email protected]::fengxiaoli --password-file=/etc/rsync.password
[[email protected] ~]# crontab -e
0 2 * * * /bin/bash /root/002.sh
到此該企業案例rsync+crontab結束
四.Rsync備註
1.無差異同步--delete
1)把文件從服務器拉到客戶端(應用場景:代碼發布,下載)
[[email protected] ~]# rsync -avz --delete [email protected]::fengxiaoli /data1 --password-file=/etc/rsync.password
2)把文件從客戶端推服務器(應用場景:備份)
[[email protected] data1]#rsync -avz --delete /data1/ [email protected]::fengxiaoli --password-file=/etc/rsync.password
2.--delete參數說明(慎用)
如果把文件從服務器拉到客戶端時不加--delete參數,客戶端原有文件不會改變,加了--delete後變成無差異同步,服務器有什麽客戶端就有什麽,本地客戶端目錄數據可能丟失,有一定風險
如果把文件從客戶端推服務器不加--delete參數,服務器原有文件不會改變,加了--delete後變成無差異同步,客戶端有什麽服務器就有什麽,服務器端的目錄數據可能丟失,有一定風險
五.Rsync+inotify(實現實時備份)

1.inotify簡介
Inotify 是基於inode級別的文件系統監控技術,是一種強大的、細粒度的、異步的機制,它滿足各種各樣的文件監控需要,不僅限於安全和性能,內核要求2.6.13以上,inotify能監控非常多的文件系統事件,通過監控這些事件來監控文件是否發生變更,然後通過rsync來更新發生變更的文件
2.inotify配置之前準備
在rsync daemon服務器模式配置成功,可以進行客戶端推送拉取數據(也就上面第三步配置成功),然後才能配置inotify,註意在rsync客戶端配置inotify(內核達到2.6.13)
[[email protected] ~]# uname -r
2.6.32-504.el6.x86
[[email protected] ~]# ls -l /proc/sys/fs/inotify/(查看一下是否有這三個文件)
total 0
-rw-r--r-- 1 root root 0 Jul 17 22:47 max_queued_events
-rw-r--r-- 1 root root 0 Jul 17 22:47 max_user_instances
-rw-r--r-- 1 root root 0 Jul 17 22:47 max_user_watches
3.inotify配置
[[email protected] tools]# wget http://github.com/downloads/rvoicilas/inotify-tools/inotify-tools-3.14.tar.gz
[[email protected] tools]# tar xvf inotify-tools-3.14.tar.gz
[[email protected] tools]# cd inotify-tools-3.14
[[email protected] inotify-tools-3.14]# ./configure --prefix=/usr/local/inotify-tools-3.14
[[email protected] inotify-tools-3.14]# make && make install
[[email protected] tools]# ln -s /usr/local/inotify-tools-3.14/ /usr/local/inotify
[[email protected] tools]# ll /usr/local/inotify
4.測試inotify
終端1:
[[email protected] data1]# /usr/local/inotify/bin/inotifywait -mrq --timefmt ‘%d/%m/%y %H:%M‘ --format ‘%T %w%f‘ -e create,delete /data1/
終端2:
[[email protected] ~]# cd /data1
[[email protected] data1]# mkdir file
終端1顯示:
[[email protected] data1]# /usr/local/inotify/bin/inotifywait -mrq --timefmt ‘%d/%m/%y %H:%M‘ --format ‘%T %w%f‘ -e create,delete /data1/
20/07/17 08:24 /data1/file
5.inotify監控腳本
#!/bin/bash
#para
host01=192.168.10.128 #inotify-slave的ip地址
src=/data 1 #本地監控的目錄
dst=fengxiaoli #inotify-slave的rsync服務的模塊名
user=rsyncuser #inotify-slave的rsync服務的虛擬用戶
rsync_passfile=/etc/rsync.password #本地調用rsync服務的密碼文件
inotify_home=/usr/local/inotify/ #inotify的安裝目錄
#judge
if [ ! -e "$src" ] \
|| [ ! -e "${rsync_passfile}" ] \
|| [ ! -e "${inotify_home}/bin/inotifywait" ] \
|| [ ! -e "/usr/bin/rsync" ];
then
echo "Check File and Folder"
exit 9
fi
${inotify_home}/bin/inotifywait -mrq --timefmt ‘%d/%m/%y %H:%M‘ --format ‘%T %w%f‘ -e close_write,delete,create,attrib $src \
| while read file
do
# rsync -avzP --delete --timeout=100 --password-file=${rsync_passfile} $src $user@$host01::$dst >/dev/null 2>&1
cd $src && rsync -aruz -R --delete ./ --timeout=100 $user@$host01::$dst --password-file=${rsync_passfile} >/dev/null 2>&1
done
exit 0
6.測試inotify+rsync
[[email protected] ~]# sh -x 001.sh
[[email protected] ~]# cd /data1
[[email protected] data1]# touch {1..1000}
[[email protected] ~]# cd /data1
[[email protected] data1]# rm -rf {1..1000}
7.生產環境中可以將這幾個參數調大一點
[[email protected] ~]# ll /proc/sys/fs/inotify/
total 0
-rw-r--r-- 1 root root 0 Jul 20 02:30 max_queued_events
327679
-rw-r--r-- 1 root root 0 Jul 20 02:30 max_user_instances
-rw-r--r-- 1 root root 0 Jul 20 02:30 max_user_watches
50000000
8.inotify缺點
並發不能大於200(10-100K)個文件
前面的腳本每次都是全部推送一次
本文出自 “feng” 博客,請務必保留此出處http://fengxiaoli.blog.51cto.com/12104465/1951847
rsync+crontab(rsync+inotify)
