
LAMPW網站搭建(一)
環境介紹
L:Linux操作系統CentOS 7.2 64位
A:web服務器Apache httpd-2.4.27
M:數據庫mysql-5.7.19
P:後臺腳本語言php-7.1.7
W:後臺管理系統wordpress-4.8
Step 0:準備工作
apache及相關下載: https://www.apache.org/index.html#projects-list
在這個地址裏面找到HTTP Server下載httpd,找到APR下載apr和apr-util。在上面也可以看到關於apache http server的介紹:
The Apache HTTP Server Project is an effort to develop and maintain an open-source HTTP server for modern operating systems including UNIX and Windows. The goal of this project is to provide a secure, efficient and extensible server that provides HTTP services in sync with the current HTTP standards.
Apache HTTP Server項目著力為現代操作系統(包括UNIX和Windows)發展和維護一個開源的HTTP服務器。它的目標是提供一種安全的、有效的、可擴展的服務器,提供與當前HTTP標準同步的HTTP服務。。
pcre庫下載地址: http://www.pcre.org
PCRE - Perl Compatible Regular Expressions庫簡介
The PCRE library is a set of functions that implement regular expression pattern matching using the same syntax and semantics as Perl 5. PCRE has its own native API, as well as a set of wrapper functions that correspond to the POSIX regular expression API. The PCRE library is free, even for building proprietary software.
PCRE庫是一組函數,使用與Perl 5相同的語法和語義來實現正則表達式模式匹配。PCRE有它自己的本地API,以及一組與POSIX正則表達式API相對應的包裝器函數。PCRE庫是免費的,即使是用於構建專有軟件。
mysql下載地址: https://dev.mysql.com/downloads/mysql/
php下載地址: http://php.net/downloads.php
PHP is a popular general-purpose scripting language that is especially suited to web development.
PHP是一種流行的通用腳本語言,特別適合於web開發。

下載完成會得到如上圖這些文件,把它們全部上傳到你的服務器。
推薦使用免費開源的Filezilla傳輸。
這裏我全部上傳至/usr/local/tar目錄下。

簡單使用到的Linux命令:
yum(全稱為 Yellow dog Updater, Modified)是一個在Fedora和RedHat以及SUSE中的Shell前端軟件包管理器。基於RPM包管理,能夠從指定的服務器自動下載RPM包並且安裝,可以自動處理依賴性關系,並且一次安裝所有依賴的軟體包,無須繁瑣地一次次下載、安裝。yum提供了查找、安裝、刪除某一個、一組甚至全部軟件包的命令。
mkdir:創建目錄。參數-p:若上層(parent)目錄不存在則創建。
tar:解壓或壓縮。參數-c:壓縮,-x:解壓,-v:tar過程中顯示文件,-f使用檔名, -z:通過gzip的支持進行壓縮/解壓縮:此時檔案名最好為*.tar.gz。
cd:進入目錄。
./configure:用來檢測你的安裝平臺的目標特征的。比如它會檢測你是不是有CC或GCC,並不是需要CC或GCC,它是個shell腳本, 生成 Makefile,為下一步的編譯做準備,你可以通過在 configure 後加上參數來對安裝進行控制,比如代碼:./configure –prefix=/usr 意思是將該軟件安裝在 /usr 下面,執行文件就會安裝在 /usr/bin (而不是默認的 /usr/local/bin),資源文件就會安裝在 /usr/share(而不是默認的/usr/local/share),同時一些軟件的配置文件你可以通過指定 –sys-config= 參數進行設定。有一些軟件還可以加上 –with、–enable、–without、–disable 等等參數對編譯加以控制,你可以通過允許 ./configure –help 察看詳細的說明幫助。
make:是用來編譯的,它從Makefile中讀取指令,然後編譯。
make install:是用來安裝的,它也從Makefile中讀取指令,安裝到指定的位置。
vim命令模式下: /:向下查找 ?:向上查找
Step 1:安裝apache2.4
進入/usr/local/tar目錄
1、首先安裝gcc編譯器
# yum install gcc gcc-c++
2、解壓&安裝apr-1.5.2.tar.gz
# tar -zxvf apr-1.5.2.tar.gz

# cd apr-1.5.2

# ./configure --prefix=/usr/local/apr

# make && make install

# cd ..
安裝成功:

3、解壓&安裝apr-util-1.5.4.tar.gz
# tar -zxvf apr-util-1.5.4.tar.gz

# cd apr-util-1.5.4

# ./configure --prefix=/usr/local/apr-util -with-apr=/usr/local/apr/bin/apr-1-config

# make && make install

# cd ..
安裝成功:

4、解壓&安裝pcre-8.41.tar.gz
# tar -zxvf pcre-8.41.tar.gz

# cd pcre-8.41

# ./configure --prefix=/usr/local/pcre

# make && make install

# cd ..
安裝成功:

5、解壓&安裝httpd-2.4.27
# tar -zxvf httpd-2.4.27.tar.gz

# cd httpd-2.4.27

# ./configure --prefix=/usr/local/apache --with-pcre=/usr/local/pcre --with-apr=/usr/local/apr --with-apr-util=/usr/local/apr-util

# make && make install

# cd ..
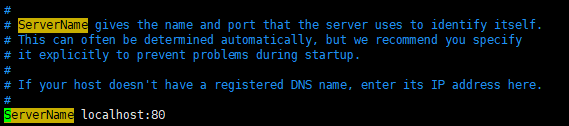
6、配置apache:打開httpd.conf
# vim /usr/local/apache/conf/httpd.conf
/查找ServerName並更改為localhost:80.
7、啟動apache服務
# /usr/local/apache/bin/apachectl start
此時,若你已經弄好域名並解析到該服務主機,在瀏覽器輸入你的域名便會看到

說明你的apache已經安裝完成,可以工作了。
8、錯誤及解決方案:
8.1.configure: error: no acceptable cc found in $PATH
解決方案:安裝編譯器yum install gcc gcc-c++
8.2.configure: error: APR not found. Please read the documentation.
解決方案:安裝apr-1.5.2.tar.gz
8.3.configure: error: APR-util not found. Please read the documentation
解決方案:安裝apr-util-1.5.4.tar.gz
8.4.configure: error: APR version 1.3.0 or later is required
主要是因為apr版本過低造成的,應該卸載相關舊版本
8.5.啟動時報錯:
AH00558: httpd: Could not reliably determine the server‘s fully qualified domain name, using 127.0.0.1. Set the ‘ServerName‘ directive globally to suppress this message
解決方案:在httpd.conf中找到ServerName,將其設置為localhost:80,並將前面的井號刪除
8.6.安裝完apache時,訪問時Index of /,不是it works
讓別人知道你的網站目錄結構直接查看你目錄下的所有文件是很危險的一個事情。
解決方法:在httpd.conf找到:Options indexes FollowSymLinks改為:Options FollowSymLinks
8.7.重啟apache時,報:DocumentRoot must be a directory
原因:在 httpd.conf裏面有DocumentRoot配置文件,但實際目錄中又沒有這個目錄,註釋此配置即可。
8.8.[[email protected] conf]# /usr/local/apache/bin/apachectl start
AH00558: httpd: Could not reliably determine the server‘s fully qualified domain name, using localhost.localdomain. Set the ‘ServerName‘ directive globally to suppress this message
(98)Address already in use: AH00072: make_sock: could not bind to address [::]:80
(98)Address already in use: AH00072: make_sock: could not bind to address 0.0.0.0:80
no listening sockets available, shutting down
AH00015: Unable to open logs
解決方案:在httpd.conf中將Listener 80改為其它的端口號即可。
Step 2:安裝mysql5.7
進入/usr/local/tar目錄
1、解壓mysql5.7
# tar -zxvf mysql-5.7.19-linux-glibc2.12-x86_64.tar.gz

# mv mysql-5.7.19-linux-glibc2.12-x86_64 /usr/local/mysql

# cd /usr/local/mysql
2、創建data目錄,作為數據倉庫
# mkdir data
3、創建mysql用戶和修改軟件的權限
# groupadd mysql

# useradd -r -g mysql mysql -s /sbin/nologin (創建mysql用戶並設置不可登錄)

# chown -R mysql.mysql /usr/local/mysql/
4、初始化數據(切換當前目錄到/usr/local/mysql)
# bin/mysqld --initiaize --user=mysql --basedir=/usr/local/mysql --datadir=/usr/local/mysql/data

(請註意這裏會生成一個臨時密碼,等會登陸時要用。)
這裏可能出現錯誤
bin/mysqld: error while loading shared libraries: libnuma.so.1: cannot open shared object file: No such file or directory
解決方案:
yum install numactl -y
yum install libaio -y
yum install perl -y
5、自動創建證書開啟SSL驗證
# bin/mysql_ssl_rsa_setup --datadir=/usr/local/mysql/data
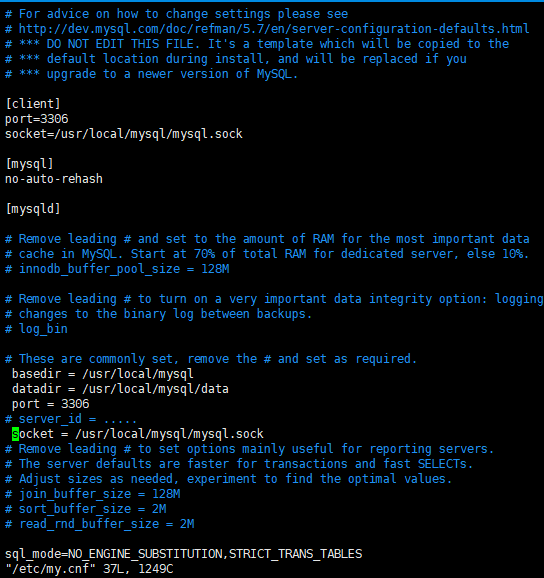
6、修改mysql系統配置文件(問是否替換選y)
# cp support-files/my-default.cnf  /etc/my.cnf              (如果沒有my-default.cnf文件則直接執行下一句)

# vim /etc/my.cnf
7、mysql的服務腳本放到系統服務中(問是否替換選y)
# cp support-files/mysql.server /etc/init.d/mysql
8、啟動mysql
# bin/mysqld_safe --user=mysql &

# bin/mysql --user=root –p
輸出剛才得到的臨時密碼即可進入。
修改密碼
mysql> set password for [email protected] = password(‘yourpassword‘);
9、將mysql添加到環境變量
方法一:直接運行命令
export PATH=$PATH:/usr/local/mysql/bin
使用這種方法,只會對當前會話有效,也就是說每當登出或註銷系統以後,PATH 設置就會失效,只是臨時生效。
方法二:執行vi ~/.bash_profile修改文件中的PATH
將/usr/local /mysql/bin 加入到PATH=$PATH:$HOME/bin一行之後。
這種方法只對當前登錄用戶生效
方法三:修改/etc/profile文件使其永久性生效,並對所有系統用戶生效
在文件末尾加上如下兩行代碼 export PATH=$PATH:/usr/local/mysql/bin
最後:執行命令source /etc/profile或 執行點命令 ./profile使其修改生效,執行完可通過echo $PATH命令查看是否添加成功。
10、配置mysql自動啟動(未驗證)
# chmod 755 /etc/init.d/mysql
# chkconfig --add mysql
# chkconfig --level 345 mysql on
Step 3:安裝php7
進入/usr/local/tar目錄,首先安裝所需的擴展庫
yum -y install libxml2 libxml2-devel openssl openssl-devel curl-devel libjpeg-devel libpng-devel freetype-devel libmcrypt-devel
1、解壓&安裝php7
# tar -zxvf php-7.1.7.tar.gz

# cd php-7.1.7

# ./configure --prefix=/usr/local/php --with-apxs2=/usr/local/apache/bin/apxs --enable-mysqlnd --with-mysqli=mysqlnd --with-pdo-mysql=mysqlnd --disable-fileinfo

# make && make install
輕車熟路,至此php安裝完成。
2、配置php
# cp php.ini-production /usr/local/php/lib/php.ini
讓apache支持php
在httpd.conf中
# vim /usr/local/apache/conf/httpd.conf
找到DirectoryIndex,在index.html後添加
index.php
找到AddType,在之後添加一行
AddType application/x-httpd-php .php
3、重啟apache
/usr/local/apache/bin/apachectl restart
4、測試
# cd /usr/local/apache/htdocs/

# vim index.php
在index.php中寫如下代碼:
<?php
phpinfo();
?>
保存退出。
刪除index.html
rm –rf index.html
刷新網頁就可以看到php版本及配置信息
至此LAMP環境就安裝好了。
LAMPW網站搭建(一)