
spring啟動加載過程源碼分析
我們知道啟動spring容器兩常見的兩種方式(其實都是加載spring容器的xml配置文件時啟動的):
1.在應用程序下加載
ApplicationContext ctx = new ClassPathXmlApplicationContext("spring-context.xml");
2.web模式下加載
<context-param> <param-name>contextConfigLocation</param-name> <param-value>classpath:spring-context.xml</param-value> </context-param> <listener> <listener-class>org.springframework.web.context.ContextLoaderListener</listener-class> </listener>
可以發現,執行new ClassPathXmlApplicationContext()的時候會打印以下日誌:
2017-5-15 12:48:48 org.springframework.context.support.AbstractApplicationContext prepareRefresh
即調用AbstractApplicationContext類的prepareRefresh方法,我們去看AbstractApplicationContext類: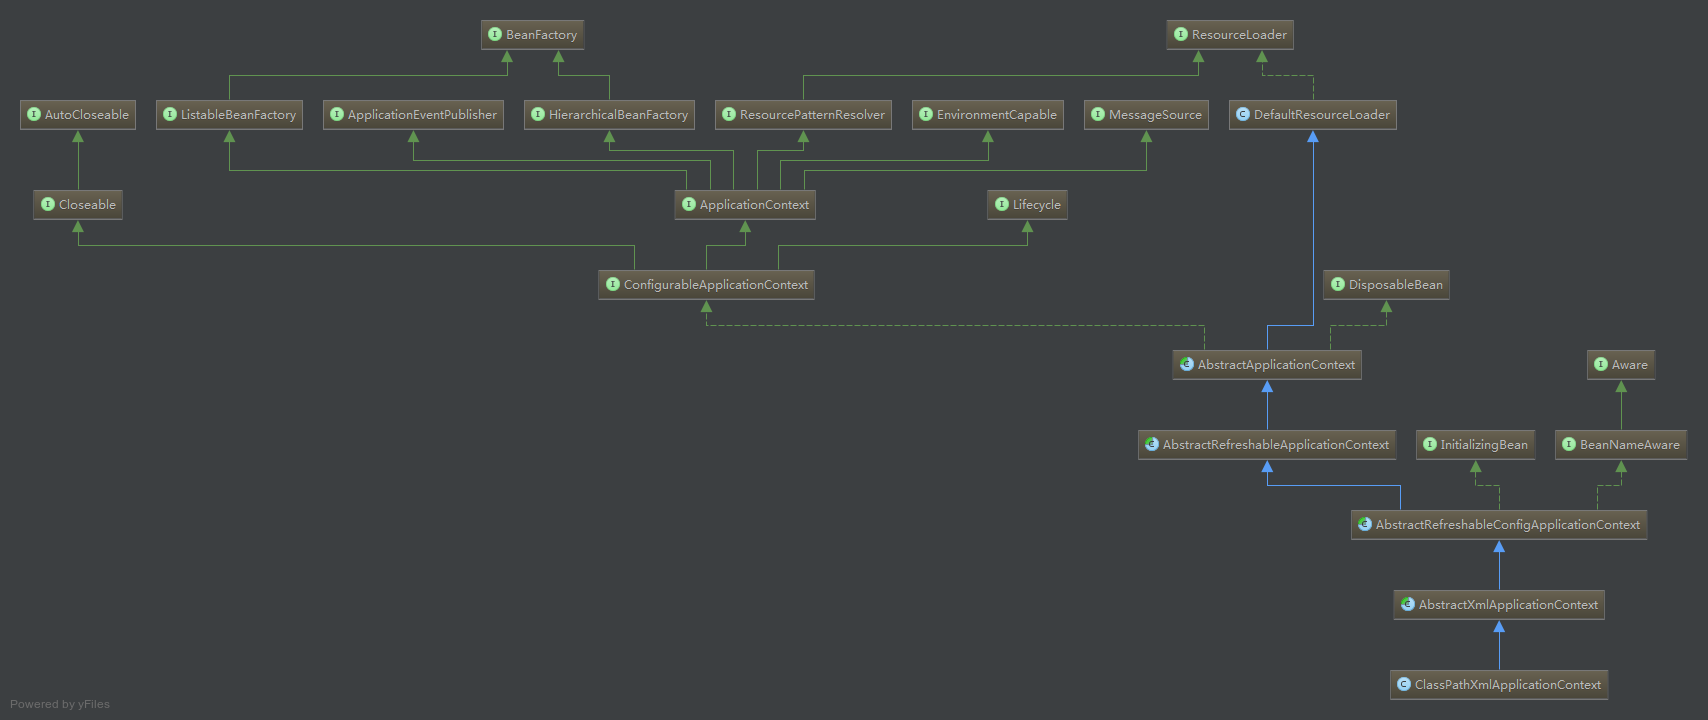
通過類圖可以發現AbstractApplicationContext是一個抽象類,也屬於BeanFactory體系,實現了ApplicationContext,再往下找到他的子類ClassPathXmlApplicationContext,來看它的具體實現
類裏有很多重載的構造函數,到最後都是調用這個:
public ClassPathXmlApplicationContext(String[] paths, Class clazz, ApplicationContext parent)throws BeansException { super(parent); Assert.notNull(paths, "Path array must not be null"); Assert.notNull(clazz, "Class argument must not be null"); this.configResources = new Resource[paths.length]; for (int i = 0; i < paths.length; i++) { this.configResources[i] = new ClassPathResource(paths[i], clazz); }
//IOC初始化過程 refresh(); }
這裏就到重點了,refresh方法定義了ioc容器啟動的整個過程,來看源碼
public void refresh() throws BeansException, IllegalStateException {
    synchronized (this.startupShutdownMonitor) {
        // 1.Prepare this context for refreshing.
        prepareRefresh();

        // 2.Tell the subclass to refresh the internal bean factory.
        ConfigurableListableBeanFactory beanFactory = obtainFreshBeanFactory();

        // 3.Prepare the bean factory for use in this context.
        prepareBeanFactory(beanFactory);

        try {
            4.// Allows post-processing of the bean factory in context subclasses.
            postProcessBeanFactory(beanFactory);

            5.// Invoke factory processors registered as beans in the context.
                invokeBeanFactoryPostProcessors(beanFactory);

            6.// Register bean processors that intercept bean creation.
            registerBeanPostProcessors(beanFactory);

            7.// Initialize message source for this context.
            initMessageSource();

            8.// Initialize event multicaster for this context.
            initApplicationEventMulticaster();

            9.// Initialize other special beans in specific context subclasses.
            onRefresh();

            10.// Check for listener beans and register them.
            registerListeners();

            11.// Instantiate all remaining (non-lazy-init) singletons.
            finishBeanFactoryInitialization(beanFactory);

            //12. Last step: publish corresponding event.
            finishRefresh();
        }

        catch (BeansException ex) {
            // 13.Destroy already created singletons to avoid dangling resources.
            destroyBeans();

            // 14.Reset ‘active‘ flag.
            cancelRefresh(ex);

            // 15.Propagate exception to caller.
            throw ex;
        }
    }
}
接下來,一步一步分析spring幹了哪些事
1.初始化BeanFactory:根據配置文件實例化BeanFactory,getBeanFactory()方法由具體子類實現。在這一步裏,Spring將配置文件的信息解析成為一個個的BeanDefinition對象並裝入到容器的Bean定義註冊表(BeanDefinitionRegistry)中,但此時Bean還未初始化;obtainFreshBeanFactory()會調用自身的refreshBeanFactory(),而refreshBeanFactory()方法由子類AbstractRefreshableApplicationContext實現,該方法返回了一個創建的DefaultListableBeanFactory對象,這個對象就是由ApplicationContext管理的BeanFactory容器對象。這一步的操作相當於,如果我們在自己的應用代碼中不用ApplicationContext而直接用BeanFactory時創建BeanFactory對象的操作,核心代碼如下:
reader.loadBeanDefinitions(configLocations);
2.調用工廠後處理器,根據反射機制從BeanDefinitionRegistry中找出所有BeanFactoryPostProcessor類型的Bean,並調用其postProcessBeanFactory()接口方法。經過第一步加載配置文件,已經把配置文件中定義的所有bean裝載到BeanDefinitionRegistry這個Beanfactory中,對於ApplicationContext應用來說這個BeanDefinitionRegistry類型的BeanFactory就是Spring默認的DefaultListableBeanFactory
public class DefaultListableBeanFactory extends AbstractAutowireCapableBeanFactory implements ConfigurableListableBeanFactory, BeanDefinitionRegistry{}
在這些被裝載的bean中,若有類型為BeanFactoryPostProcessor的bean(配置文件中配置的),則將對應的BeanDefinition生成BeanFactoryPostProcessor對象容器掃描BeanDefinitionRegistry中的BeanDefinition,使用java反射自動識別出Bean工廠後處理器(實現BeanFactoryPostProcessor接口)的bean,然後調用這些bean工廠後處理器對BeanDefinitionRegistry中的BeanDefinition進行加工處理,可以完成以下兩項工作(當然也可以有其他的操作,用戶自己定義):
1).對使用到占位符的<bean>元素標簽進行解析,得到最終的配置值,這意味著對一些半成品式的BeanDefinition對象進行加工處理並取得成品的BeanDefinition對象。
2).對BeanDefinitionRegistry中的BeanDefinition進行掃描,通過Java反射機制找出所有屬性編輯器的Bean(實現java.beans.PropertyEditor接口的Bean),並自動將它們註冊到Spring容器的屬性編輯器註冊表中(PropertyEditorRegistry),這個Spring提供了實現:CustomEditorConfigurer,它實現了BeanFactoryPostProcessor,用它來在此註冊自定義屬性編輯器,核心代碼如下:
protected void invokeBeanFactoryPostProcessors(ConfigurableListableBeanFactory beanFactory) {

        // Invoke factory processors registered with the context instance.
        for (Iterator it = getBeanFactoryPostProcessors().iterator(); it.hasNext();) {
            BeanFactoryPostProcessor factoryProcessor = (BeanFactoryPostProcessor) it.next();
            factoryProcessor.postProcessBeanFactory(beanFactory);
        }

        // Do not initialize FactoryBeans here: We need to leave all regular beans
        // 通過ApplicatinContext管理的beanfactory獲取已經註冊的BeanFactoryPostProcessor類型的bean的名字

        String[] factoryProcessorNames =
                beanFactory.getBeanNamesForType(BeanFactoryPostProcessor.class, true, false);

        // Separate between BeanFactoryPostProcessors that implement the Ordered
        // interface and those that do not.
        List orderedFactoryProcessors = new ArrayList();
        List nonOrderedFactoryProcessorNames = new ArrayList();
        for (int i = 0; i < factoryProcessorNames.length; i++) {
            if (isTypeMatch(factoryProcessorNames[i], Ordered.class)) {

                // 調用beanfactory的getBean取得所有的BeanFactoryPostProcessor對象
                orderedFactoryProcessors.add(beanFactory.getBean(factoryProcessorNames[i]));
            }
            else {
                nonOrderedFactoryProcessorNames.add(factoryProcessorNames[i]);
            }
        }

        // First, invoke the BeanFactoryPostProcessors that implement Ordered.
        Collections.sort(orderedFactoryProcessors, new OrderComparator());
        for (Iterator it = orderedFactoryProcessors.iterator(); it.hasNext();) {
            BeanFactoryPostProcessor factoryProcessor = (BeanFactoryPostProcessor) it.next();

        // 執行BeanFactoryPostProcessor的方法,傳入當前持有的beanfactory對象,以獲取要操作的

        // BeanDefinition
            factoryProcessor.postProcessBeanFactory(beanFactory);
        }
        // Second, invoke all other BeanFactoryPostProcessors, one by one.
        for (Iterator it = nonOrderedFactoryProcessorNames.iterator(); it.hasNext();) {
            String factoryProcessorName = (String) it.next();
            ((BeanFactoryPostProcessor) getBean(factoryProcessorName)).

                    postProcessBeanFactory(beanFactory);
        }
    }
BeanFactoryPostProcessor接口代碼如下,實際的操作由用戶擴展並配置:
public interface BeanFactoryPostProcessor {

        /**
         * Modify the application context‘s internal bean factory after its standard
         */
        void postProcessBeanFactory(ConfigurableListableBeanFactory beanFactory) throws BeansException;

    }
3.註冊Bean後處理器,根據反射機制從BeanDefinitionRegistry中找出所有BeanPostProcessor類型的Bean,並將它們註冊到容器Bean後處理器的註冊表中,AbstractApplicatinContext中對應代碼如下:
protected void registerBeanPostProcessors(ConfigurableListableBeanFactory beanFactory) {
        String[] processorNames = beanFactory.getBeanNamesForType(BeanPostProcessor.class, true, false);

        // Register BeanPostProcessorChecker that logs an info message when
        int beanProcessorTargetCount = beanFactory.getBeanPostProcessorCount() + 1 +

                processorNames.length;
        beanFactory.addBeanPostProcessor(new BeanPostProcessorChecker(beanFactory,

                beanProcessorTargetCount));
        List orderedProcessors = new ArrayList();
        List nonOrderedProcessorNames = new ArrayList();

        for (int i = 0; i < processorNames.length; i++) {
            if (isTypeMatch(processorNames[i], Ordered.class)) {
                orderedProcessors.add(getBean(processorNames[i]));
            }
            else {
                nonOrderedProcessorNames.add(processorNames[i]);
            }
        }

        // First, register the BeanPostProcessors that implement Ordered.
        Collections.sort(orderedProcessors, new OrderComparator());
        for (Iterator it = orderedProcessors.iterator(); it.hasNext();) {

        // 註冊bean後處理器,該方法定義於ConfigurableBeanFactory接口
            beanFactory.addBeanPostProcessor((BeanPostProcessor) it.next());
        }
        // Second, register all other BeanPostProcessors, one by one.
        for (Iterator it = nonOrderedProcessorNames.iterator(); it.hasNext();) {
            String processorName = (String) it.next();
            beanFactory.addBeanPostProcessor((BeanPostProcessor) getBean(processorName));
        }
    }
整段代碼類似於第三步的調用工廠後處理器,區別之處在於,工廠後處理器在獲取後立即調用,而Bean後處理器在獲取後註冊到上下文持有的beanfactory中,供以後操作調用(在用戶獲取bean的過程中,對已經完成屬性設置工作的Bean進行後續加工,他加工的是bean,而工廠後處理器加工的是BeanDefinition)BeanPostProcessor 接口代碼如下,實際的操作由用戶擴展並配置:
public interface BeanPostProcessor {
    Object postProcessBeforeInitialization(Object bean, String beanName) throws BeansException;
    Object postProcessAfterInitialization(Object bean, String beanName) throws BeansException;
}
4.初始化消息源,初始化容器的國際化信息資源,源代碼如下:
protected void initMessageSource() {
    // 具體實現
}
5.初始化應用上下文事件廣播器;(觀察者模式中的具體主題角色,持有觀察者角色的集合,稱為註冊表)AbstractApplciationContext擁有一個applicationEventMulticaster 成員變量,applicationEventMulticaster 提供了容器監聽器的註冊表,成其為事件廣播器。在第七步中將會將事件監聽器裝入其中,AbstractApplicationContext中的代碼如下:
protected void initApplicationEventMulticaster() {

        // "applicationEventMulticaster",先看配置文件中有無配置該類型類(用戶擴展 擴展點,如何擴展)
        if (containsLocalBean(APPLICATION_EVENT_MULTICASTER_BEAN_NAME)) {
            this.applicationEventMulticaster = (ApplicationEventMulticaster)
                    getBean(APPLICATION_EVENT_MULTICASTER_BEAN_NAME, ApplicationEventMulticaster.class);
        }
        else {

            // 若沒有,則應用Spring框架提供的事件廣播器實例
            this.applicationEventMulticaster = new SimpleApplicationEventMulticaster();
        }
    }
    public boolean containsLocalBean(String name) {
        return getBeanFactory().containsLocalBean(name);
    }

    public Object getBean(String name, Class requiredType) throws BeansException {
        return getBeanFactory().getBean(name, requiredType);
    }
Spring初始化事件廣播器,用戶可以在配置文件中為容器定義一個自定義的事件廣播器(bean的名稱要為"applicationEventMulticaster"),只要實現ApplicationEventMulticaster就可以了,Spring在此會根據beanfactory自動獲取。如果沒有找到外部配置的事件廣播器,Spring使用SimpleApplicationEventMulticaster作為事件廣播器。
6.初始化其他特殊的Bean:這是一個鉤子方法,子類可以借助這個鉤子方法執行一些特殊的操作,如AbstractRefreshableWebApplicationContext就使用該鉤子方法執行初始化ThemeSource的操作;
protected void onRefresh() throws BeansException {
        // For subclasses: do nothing by default.
}
7.註冊事件監聽器;(觀察者模式中的觀察者角色)
Spring根據上下文持有的beanfactory對象,從它的BeanDefinitionRegistry中找出所有實現org.springfamework.context.ApplicationListener的bean,將BeanDefinition對象生成bean,註冊為容器的事件監聽器,實際的操作就是將其添加到事件廣播器所提供的監聽器註冊表中
AbstractApplicationContext中的代碼如下:
/** Statically specified listeners */

    private List applicationListeners = new ArrayList();

    public List getApplicationListeners() {
        return this.applicationListeners;
    }

    protected void registerListeners() {
        // Register statically specified listeners first.
        for (Iterator it = getApplicationListeners().iterator(); it.hasNext();) {
            addListener((ApplicationListener) it.next());
        }
        // 獲取ApplicationListener類型的所有bean,即事件監聽器
        // uninitialized to let post-processors apply to them!
        Collection listenerBeans = getBeansOfType(ApplicationListener.class, true, false).values();
        for (Iterator it = listenerBeans.iterator(); it.hasNext();) {

            // 將事件監聽器裝入第五步初始化的事件廣播器
            addListener((ApplicationListener) it.next());
        }
    }

    public Map getBeansOfType(Class type, boolean includePrototypes, boolean allowEagerInit)
            throws BeansException {

        return getBeanFactory().getBeansOfType(type, includePrototypes, allowEagerInit);
    }

    protected void addListener(ApplicationListener listener) {
        getApplicationEventMulticaster().addApplicationListener(listener);
    }
ApplicationListener 的源代碼如下:
/**
     * Interface to be implemented by application event listeners.
     * @see org.springframework.context.event.ApplicationEventMulticaster
     */
    public interface ApplicationListener extends EventListener {
        void onApplicationEvent(ApplicationEvent event);

    }
8.初始化singleton的Bean:實例化所有singleton的Bean,並將它們放入Spring容器的緩存中;這就是和直接在應用中使用BeanFactory的區別之處,在創建ApplicationContext對象時,不僅創建了一個BeanFactory對象,並且還應用它實例化所有單實例的bean。(在spring的配置文件中,bean默認為單例,除非在bean的配置中顯式指定scope="prototype")
AbstractApplicationContext中的代碼如下:
beanFactory.preInstantiateSingletons();
9.發布上下文刷新事件:在此處時容器已經啟動完成,發布容器refresh事件(ContextRefreshedEvent)
創建上下文刷新事件,事件廣播器負責將些事件廣播到每個註冊的事件監聽器中。
publishEvent(new ContextRefreshedEvent(this));

    public void publishEvent(ApplicationEvent event) {
        Assert.notNull(event, "Event must not be null");

        // 在此獲取事件廣播器,並調用其方法發布事件:調用所有註冊的監聽器的方法
        getApplicationEventMulticaster().multicastEvent(event);
        if (this.parent != null) {
            this.parent.publishEvent(event);
        }
    }
至此,ApplicationContext對象就完成了初始化工作:創建BeanFactory來裝配BeanDefiniton,加工處理BeanDefiniton,註冊了bean後處理器,初始化了消息資源,初始化了應用上下文事件廣播器,註冊了事件監聽器,初始化了所有singleton的bean,最後發布上下文刷新事件。
spring啟動加載過程源碼分析