1. 程式人生 > >centos7.3 編譯安裝lamp,利用wordpress實現個人博客搭建

centos7.3 編譯安裝lamp,利用wordpress實現個人博客搭建

編譯安裝apache、編譯安裝mariadb、編譯安裝php   搭建個人博客

軟件環境:centos7.3

軟件包:

apr-1.5.2.tar.bz2

apr-util-1.5.4.tar.bz2

httpd-2.4.27.tar.bz2

mariadb-10.2.7-linux-x86_64.tar.gz

php-7.1.7.tar.bz2

wordpress-4.8-zh_CN.tar.gz

xcache-3.2.0.tar.gz


準備工作:

[[email protected] ~]# mkdir /app                      #創建/app目錄,我們把軟件包安裝到/app裏
[[email protected] ~]# mkdir data                      #創建data文件夾,把我們下載的軟件包傳入
[[email protected]
/* */ ~]# ls data [[email protected] ~]# cd data/ [[email protected] data]# rz [[email protected] data]# rz [[email protected] data]# rz [[email protected] data]# rz [[email protected] data]# rz [[email protected] data]# rz [[email protected]
/* */ data]# rz [[email protected] data]# ls #顯示我們所有的軟件包 apr-1.5.2.tar.bz2 httpd-2.4.27.tar.bz2 php-7.1.7.tar.bz2 xcache-3.2.0.tar.gz apr-util-1.5.4.tar.bz2 mariadb-10.2.7-linux-x86_64.tar.gz wordpress-4.8-zh_CN.tar.gz [[email protected]
/* */ ~]# yum -y groupinstall ‘development tools‘ #提前安裝開發包組 Loaded plugins: fastestmirror There is no installed groups file. Maybe run: yum groups mark convert (see man yum) base ………… Dependency Installed: apr.x86_64 0:1.4.8-3.el7 apr-util.x86_64 0:1.5.2-6.el7 boost-system.x86_64 0:1.53.0-26.el7 boost-thread.x86_64 0:1.53.0-26.el7 bzip2.x86_64 0:1.0.6-13.el7 dwz.x86_64 0:0.11-3.el7 dyninst.x86_64 0:8.2.0-2.el7 emacs-filesystem.noarch 1:24.3-19.el7_3 gdb.x86_64 0:7.6.1-94.el7 gettext-common-devel.noarch 0:0.18.2.1-4.el7 gettext-devel.x86_64 0:0.18.2.1-4.el7 kernel-devel.x86_64 0:3.10.0-514.26.2.el7 libdwarf.x86_64 0:20130207-4.el7 libgfortran.x86_64 0:4.8.5-11.el7 libgnome-keyring.x86_64 0:3.8.0-3.el7 libquadmath.x86_64 0:4.8.5-11.el7 libquadmath-devel.x86_64 0:4.8.5-11.el7 libstdc++-devel.x86_64 0:4.8.5-11.el7 mokutil.x86_64 0:0.9-2.el7 neon.x86_64 0:0.30.0-3.el7 pakchois.x86_64 0:0.4-10.el7 perl-Data-Dumper.x86_64 0:2.145-3.el7 perl-Error.noarch 1:0.17020-2.el7 perl-Git.noarch 0:1.8.3.1-6.el7_2.1 perl-TermReadKey.x86_64 0:2.30-20.el7 perl-Test-Harness.noarch 0:3.28-3.el7 perl-Thread-Queue.noarch 0:3.02-2.el7 perl-XML-Parser.x86_64 0:2.41-10.el7 perl-srpm-macros.noarch 0:1-8.el7 rsync.x86_64 0:3.0.9-17.el7 subversion-libs.x86_64 0:1.7.14-10.el7 systemtap-client.x86_64 0:3.0-7.el7 systemtap-devel.x86_64 0:3.0-7.el7 systemtap-runtime.x86_64 0:3.0-7.el7 unzip.x86_64 0:6.0-16.el7 zip.x86_64 0:3.0-11.el7 Complete! [[email protected] ~]# yum remove -y apr #上面包組有老版的apr,可以卸載了 Loaded plugins: fastestmirror Resolving Dependencies --> Running transaction check ---> Package apr.x86_64 0:1.4.8-3.el7 will be erased ………… Removed: apr.x86_64 0:1.4.8-3.el7 Dependency Removed: apr-util.x86_64 0:1.5.2-6.el7 subversion.x86_64 0:1.7.14-10.el7 subversion-libs.x86_64 0:1.7.14-10.el7 Complete! [[email protected] ~]# yum install pcre-devel openssl-devel #安裝需要的包 Loaded plugins: fastestmirror Loading mirror speeds from cached hostfile Resolving Dependencies --> Running transaction check ………… Installed: openssl-devel.x86_64 1:1.0.1e-60.el7_3.1 pcre-devel.x86_64 0:8.32-15.el7_2.1 Dependency Installed: keyutils-libs-devel.x86_64 0:1.5.8-3.el7 krb5-devel.x86_64 0:1.14.1-27.el7_3 libcom_err-devel.x86_64 0:1.42.9-9.el7 libkadm5.x86_64 0:1.14.1-27.el7_3 libselinux-devel.x86_64 0:2.5-6.el7 libsepol-devel.x86_64 0:2.5-6.el7 libverto-devel.x86_64 0:0.2.5-4.el7 zlib-devel.x86_64 0:1.2.7-17.el7 Complete!


1、httpd2.4.27編譯安裝


[[email protected] data]# tar xf apr-1.5.2.tar.bz2                  #解壓文件
[[email protected] data]# tar xf apr-util-1.5.4.tar.bz2 
[[email protected] data]# tar xf httpd-2.4.27.tar.bz2 
[[email protected] data]# mv apr-1.5.2  httpd-2.4.27/srclib/apr           #將apr的文件放進httpd文件夾裏面一起安裝
[[email protected] data]# mv apr-util-1.5.4  httpd-2.4.27/srclib/apr-util
[[email protected] data]# cd httpd-2.4.27
[[email protected] httpd-2.4.27]# ./configure --prefix=/app/httpd24 --enable-so --enable-ssl --enable-cgi --enable-rewrite --with-zlib 
--with-pcre --with-included-apr --enable-modules=most --enable-mpms-shared=all --with-mpm=prefork #自定義安裝的一些設置
……
config.status: executing default commands
configure: summary of build options:

    Server Version: 2.4.27
    Install prefix: /app/httpd24
    C compiler:     gcc -std=gnu99
    CFLAGS:          -g -O2 -pthread
    LDFLAGS:         
    LIBS:           
    CPPFLAGS:        -DLINUX -D_REENTRANT -D_GNU_SOURCE
    C preprocessor: gcc -E
    
[[email protected] httpd-2.4.27]# make && make install                   #正式安裝
………… 
Installing configuration files
mkdir /app/httpd24/conf
mkdir /app/httpd24/conf/extra
mkdir /app/httpd24/conf/original
mkdir /app/httpd24/conf/original/extra
Installing HTML documents
mkdir /app/httpd24/htdocs
Installing error documents
mkdir /app/httpd24/error
Installing icons
mkdir /app/httpd24/icons
mkdir /app/httpd24/logs
Installing CGIs
mkdir /app/httpd24/cgi-bin
Installing header files
Installing build system files
Installing man pages and online manual
mkdir /app/httpd24/man
mkdir /app/httpd24/man/man1
mkdir /app/httpd24/man/man8
mkdir /app/httpd24/manual
make[1]: Leaving directory `/root/data/httpd-2.4.27‘
[[email protected] ~]# vim /etc/profile.d/app.sh                  #寫一個腳本,把httpd、mariadb放進bin下

export PATH=/app/httpd24/bin:/usr/local/mysql/bin:$PATH

[[email protected] httpd-2.4.27]# .  /etc/profile.d/app.sh             #執行一下
[[email protected] httpd-2.4.27]# ss -ntl                      #查看80端口對否開啟
State      Recv-Q Send-Q                Local Address:Port                               Peer Address:Port              
LISTEN     0      128                               *:22                                            *:*                  
[[email protected] httpd-2.4.27]# apachectl                     #用apache自帶的程序啟動
AH00558: httpd: Could not reliably determine the server‘s fully qualified domain name, using 127.0.0.1. Set the ‘ServerName‘ directive globally to suppress this message
[[email protected] mysql]# ss -ntl                                                  #確認服務啟動成功
State      Recv-Q Send-Q                                      Local Address:Port                                                     Peer Address:Port              
LISTEN     0      128                                                     *:80                                                                  *:*                  
LISTEN     0      128                                                     *:22                                                                  *:*                  
LISTEN     0      80                                    *:22                                            *:*                  
[[email protected] httpd-2.4.27]# curl 39.108.126.131                 #用字符瀏覽器看一下,這樣就ok啦
<html><body><h1>It works!</h1></body></html>

註解:
AH00558: 這個只是一個提示,算不上報錯
在配置文件/app/httpd24/conf/httpd.conf裏面改一下ServerName localhost:80重啟就不會有了


2、二進制安裝mariadb

[[email protected] data]# rpm -qa ‘mariadb*‘                    #檢查是否存在舊版本
mariadb-libs-5.5.52-1.el7.x86_64
[[email protected] data]# yum remove mariadb-libs                  #刪除舊版本
Loaded plugins: fastestmirror
Resolving Dependencies
--> Running transaction check
---> Package mariadb-libs.x86_64 1:5.5.52-1.el7 will be erased
…………
Removed:
  mariadb-libs.x86_64 1:5.5.52-1.el7                                                                                      

Dependency Removed:
  postfix.x86_64 2:2.10.1-6.el7                        redhat-lsb-core.x86_64 0:4.1-27.el7.centos.1                       

Complete!
[[email protected] bin]# cd /root/data                       #進入存放軟件包的文件夾
[[email protected] data]# ls
apr-1.5.2.tar.bz2       httpd-2.4.27          mariadb-10.2.7-linux-x86_64.tar.gz  wordpress-4.8-zh_CN.tar.gz
apr-util-1.5.4.tar.bz2  httpd-2.4.27.tar.bz2  php-7.1.7.tar.bz2                   xcache-3.2.0.tar.gz
[[email protected] data]# tar xf mariadb-10.2.7-linux-x86_64.tar.gz -C /usr/local/    #解壓到/usr/local
[[email protected] data]# cd /usr/local/                                         #進入解壓數據庫的文件夾 
[[email protected] local]# ls
aegis  bin  etc  games  include  lib  lib64  libexec  mariadb-10.2.7-linux-x86_64  sbin  share  src
[[email protected] local]# ln -s mariadb-10.2.7-linux-x86_64/  mysql            #寫個軟連接
[[email protected] local]# useradd -r mysql -s /sbin/nologin -d /app/mysqldb -m         #創建mysql用戶並指定家目錄
[[email protected] local]# cd mysql/
[[email protected] mysql]# scripts/mysql_install_db    --user=mysql --datadir=/app/mysqldb/ #運行生成數據庫的腳本
Installing MariaDB/MySQL system tables in ‘/app/mysqldb/‘ ...
…………
The latest information about mysql_install_db is available at
https://mariadb.com/kb/en/installing-system-tables-mysql_install_db
MariaDB is hosted on launchpad; You can find the latest source and
email lists at http://launchpad.net/maria

Please check all of the above before submitting a bug report
at 
[[email protected] mysql]# mkdir /etc/mysql                        #創建配置目錄
[[email protected] mysql]# cp support-files/my-huge.cnf  /etc/mysql/my.cnf       #復制自帶的配置模板
[[email protected] mysql]# vim /etc/mysql/my.cnf                     #修改模板 
……
# The MySQL server
[mysqld]
datadir         = /app/mysqldb                      #存放位置
innodb_file_per_table = ON
skip_name_resolve = ON
port            = 3306
……
[[email protected] mysql]# cp support-files/mysql.server  /etc/init.d/mysqld       #復制啟動服務模板
[[email protected] mysql]# chkconfig   --add  mysqld                  #加入啟動項 
[[email protected] mysql]# chkconfig   --list mysqld                  #查看啟動項

Note: This output shows SysV services only and does not include native
      systemd services. SysV configuration data might be overridden by native
      systemd configuration.

      If you want to list systemd services use ‘systemctl list-unit-files‘.
      To see services enabled on particular target use
      ‘systemctl list-dependencies [target]‘.

mysqld         	0:off	1:off	2:on	3:on	4:on	5:on	6:off
[[email protected] mysql]# service mysqld start                       #啟動的時候如果失敗檢查/etc/mysql/my.cnf路徑有沒寫錯,可以參考/app/mysqldb/主機名.err文件排錯
Starting mysqld (via systemctl):  Job for mysqld.service failed because the control process exited with error code. See "systemctl status mysqld.service" and "journalctl -xe" for details.
                                                           [FAILED]
[[email protected] mysql]# service mysqld start                       #啟動服務,
Starting mysqld (via systemctl):                           [  OK  ]
[[email protected] mysql]# ss -ntl                              #確認服務啟動成功
State      Recv-Q Send-Q                                      Local Address:Port                                                     Peer Address:Port              
LISTEN     0      128                                                     *:80                                                                  *:*                  
LISTEN     0      128                                                     *:22                                                                  *:*                  
LISTEN     0      80                                                     :::3306                                                               :::*  
[[email protected] mysql]# mysql_secure_installation                      #執行mariadb自帶的腳本配置安全選項

NOTE: RUNNING ALL PARTS OF THIS SCRIPT IS RECOMMENDED FOR ALL MariaDB
      SERVERS IN PRODUCTION USE!  PLEASE READ EACH STEP CAREFULLY!

In order to log into MariaDB to secure it, we‘ll need the current
password for the root user.  If you‘ve just installed MariaDB, and
you haven‘t set the root password yet, the password will be blank,
so you should just press enter here.

Enter current password for root (enter for none):                 #根據提示完成下列選項
OK, successfully used password, moving on...

Setting the root password ensures that nobody can log into the MariaDB
root user without the proper authorisation.
……
Reload privilege tables now? [Y/n] y
 ... Success!

Cleaning up...

All done!  If you‘ve completed all of the above steps, your MariaDB
installation should now be secure.

Thanks for using MariaDB!
[[email protected] mysql]# mysql -uroot -pXXXXX                          #登錄mariadb
Welcome to the MariaDB monitor.  Commands end with ; or \g.
Your MariaDB connection id is 17
Server version: 10.2.7-MariaDB-log MariaDB Server

Copyright (c) 2000, 2017, Oracle, MariaDB Corporation Ab and others.

Type ‘help;‘ or ‘\h‘ for help. Type ‘\c‘ to clear the current input statement.

MariaDB [(none)]> create database wpdb;                         #創建數據庫
Query OK, 1 row affected (0.00 sec)

MariaDB [(none)]> grant all on  wpdb.* to [email protected]%‘ identified by ‘XXXXX.‘; #創建新的用戶和密碼並分配權限
Query OK, 0 rows affected (0.00 sec)

MariaDB [(none)]> exit                                   #退出
Bye

3、編譯安裝php

[[email protected] mysql]# cd /root/data/                                   #進入放軟件包的文件夾
[[email protected] data]# tar xf php-7.1.7.tar.bz2                          #解壓文件
[[email protected] data]# cd php-7.1.7
[[email protected] php-7.1.7]# yum -y install libxml2-devel bzip-devel libmcrypt-devel bzip2-deve  #安裝需要的包
…………
  Verifying  : libxml2-devel-2.9.1-6.el7_2.3.x86_64                                                                                                               4/4 

Installed:
  libmcrypt-devel.x86_64 0:2.5.8-13.el7                                             libxml2-devel.x86_64 0:2.9.1-6.el7_2.3                                            

Dependency Installed:
  libmcrypt.x86_64 0:2.5.8-13.el7                                                    xz-devel.x86_64 0:5.2.2-1.el7                                                   

Complete!
[[email protected] php-7.1.7]# ./configure --prefix=/app/php --enable-mysqlnd  --with-mysqli=mysqlnd   --with-openssl --enable-mbstring --with-png-dir --with-jpeg-dir --with-freetype-dir --with-zlib --with-libxml-dir=/usr --enable-xml --enable-sockets --with-apxs2=/app/httpd24/bin/apxs --with-mcrypt --with-config-file-path=/etc --with-config-file-scan-dir=/etc/php.d --with-bz2
checking for grep that handles long lines and -e... /usr/bin/grep   #自定義一些模塊的設置
checking for egrep... /usr/bin/grep -E
checking for a sed that does not truncate output... /usr/bin/sed
…………
Thank you for using PHP.

config.status: creating php7.spec
config.status: creating main/build-defs.h
config.status: creating scripts/phpize
config.status: creating scripts/man1/phpize.1
config.status: creating scripts/php-config
config.status: creating scripts/man1/php-config.1
config.status: creating sapi/cli/php.1
config.status: creating sapi/cgi/php-cgi.1
config.status: creating ext/phar/phar.1
config.status: creating ext/phar/phar.phar.1
config.status: creating main/php_config.h
config.status: executing default commands
[[email protected] php-7.1.7]# make && make install                       #編譯安裝
…………
Installing PEAR environment:      /app/php/lib/php/
[PEAR] Archive_Tar    - installed: 1.4.3
[PEAR] Console_Getopt - installed: 1.4.1
[PEAR] Structures_Graph- installed: 1.1.1
[PEAR] XML_Util       - installed: 1.4.2
[PEAR] PEAR           - installed: 1.10.5
Wrote PEAR system config file at: /app/php/etc/pear.conf
You may want to add: /app/php/lib/php to your php.ini include_path
/root/data/php-7.1.7/build/shtool install -c ext/phar/phar.phar /app/php/bin
ln -s -f phar.phar /app/php/bin/phar
Installing PDO headers:           /app/php/include/php/ext/pdo/
[[email protected] php-7.1.7]# cp php.ini-production  /etc/php.ini       #復制一份配置文件去修改
[[email protected] php-7.1.7]# vim /app/httpd24/conf/httpd.conf           #修改apache的配置文件,允許php文件
……
    AddType application/x-compress .Z
    AddType application/x-gzip .gz .tgz
    AddType application/x-httpd-php .php
    AddType application/x-httpd-php-source .phps
……
<IfModule dir_module>
    DirectoryIndex  index.php  index.html
</IfModule>
[[email protected] php-7.1.7]# apachectl stop                   #關閉服務
[[email protected] php-7.1.7]# apachectl start                   #啟動服務

4、測試連接

[[email protected] php-7.1.7]# vim /app/httpd24/htdocs/index.php            #寫一個測試數據庫是否聯通的小文件

<?php
$mysqli=new mysqli("127.0.0.1","root","XXXXX");
if(mysqli_connect_errno()){
echo "連接數據庫失敗!";
$mysqli=null;
exit;
}
echo "連接數據庫成功!";
$mysqli->close();
?>

5、解壓WordPress、根據提示做一下基本的配置

[[email protected] ~]# cd /root/data/                          #進入放軟件包的文件夾
[[email protected] data]# tar xf wordpress-4.8-zh_CN.tar.gz                #解壓WordPress
[[email protected] data]# mv wordpress /app/httpd24/htdocs/blog             #把WordPress移動到apache目錄下並更名blog
[[email protected] data]# cd /app/httpd24/htdocs/blog/                   #進入blog
[[email protected] blog]# cp wp-config-sample.php wp-config.php                     #復制一份配置文件來修改
[[email protected] blog]# vim wp-config.php                        #修改配置文件,根據中文提示
……
// ** MySQL 設置 - 具體信息來自您正在使用的主機 ** //
/** WordPress數據庫的名稱 */
define(‘DB_NAME‘, ‘wpdb‘);

/** MySQL數據庫用戶名 */
define(‘DB_USER‘, ‘root‘);

/** MySQL數據庫密碼 */
define(‘DB_PASSWORD‘, ‘XXXXXX‘);

/** MySQL主機 */
define(‘DB_HOST‘, ‘localhost‘);
……

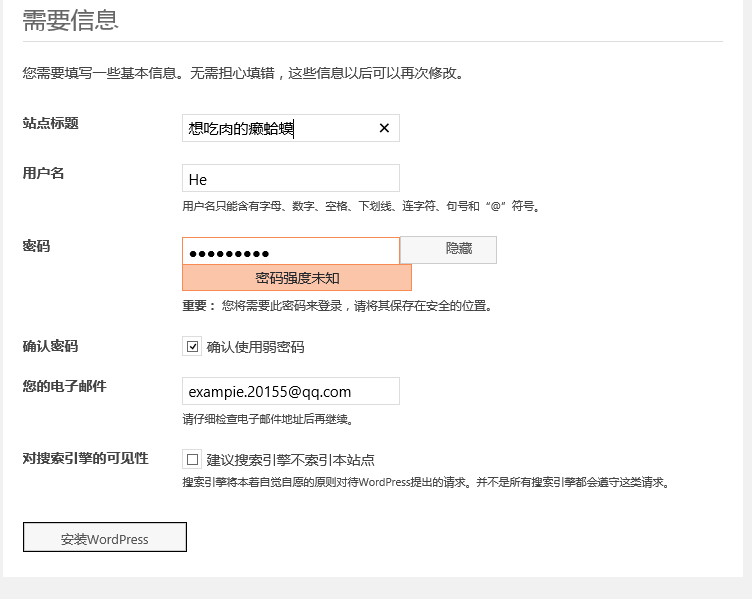
6、接下來要做的就是用瀏覽器訪問http://172.16.252.250/blog ,根據系統的中文提示來完成個人博客的搭建

一、填寫你登錄自己博客的基本信息

技術分享

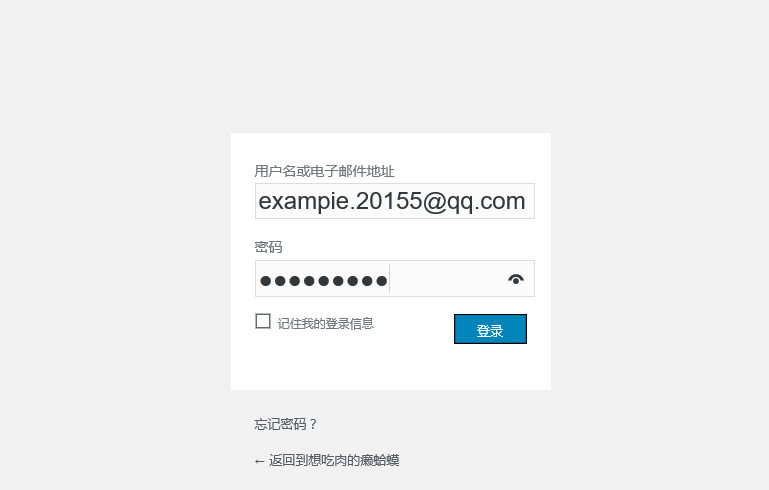
二、跳轉到設置成功的頁面,你點擊登錄就可以進入自己的博客


技術分享

技術分享

三、登錄成功,可以盡情的設置你想要的一些東西。

技術分享


好了、搭建自己的博客我們就說說到這裏啦,講解描述得不清楚的地方請見諒。

本文出自 “11986114” 博客,請務必保留此出處http://11996114.blog.51cto.com/11986114/1954015

centos7.3 編譯安裝lamp,利用wordpress實現個人博客搭建

相關推薦

centos7.3 編譯安裝lamp,利用wordpress實現個人搭建

編譯安裝apache、編譯安裝mariadb、編譯安裝php   搭建個人博客軟件環境:centos7.3軟件包:apr-1.5.2.tar.bz2apr-util-1.5.4.tar.bz2httpd-2.4.27.tar.bz2mariadb-10.2.7-linux-x86_64.tar.gz

LAMP基於php模塊實現個人搭建

數據庫 個人博客 wordpress 1、完成LAMP基本實現 http://guanm.blog.51cto.com/13126952/1974839 需要管理博客數據庫的管理員,之前創建的test用戶權限不夠,給test用戶加權限 grant all on *

centos7.3實現基於原始碼編譯安裝LAMPwordpress應用

WordPress應用    是一款基於PHP開發的部落格釋出平臺。使用者可以在支援PHP和MySql的系統上,輕鬆地搭建WordPress部落格系統,並在上面釋出自己的部落格文章。    關於LAMP,之前的文章中已經有過很多的介

centos7實現基於源碼編譯安裝LAMPwordpress應用

centos7 編譯安裝 最新版 lamp 的 wordpress計劃:host1 安裝 httpd , phphost2 安裝 mariadb 準備軟件:apr-1.6.2.tar.gz httpd-2.4.27.tar.bz2 php-7.1.10.tar.xz

centos7.3編譯安裝php-7.1.10

編譯 php實驗環境:centos7.3主機一臺apache服務配置結束http://php.net/ 官網下載最新版php源碼包實驗前準備]#yum install libxml2-devel -y ]#yum install bzip2-devel -y ]#yum install libmcrypt-d

CentOS7.3編譯安裝MariaDB10.2.12

創建 open sta mysql lin ack cli tex 最小化 在CentOS7.3編譯安裝MariaDB10.2.12詳細教程1. 刪除CentOS7.3默認數據庫配置文件查看默認數據庫配置文件[root@localhost ~]# find -H /etc/

centos7.4編譯安裝lamp

lampcentos7.4編譯安裝lamp lamp簡介 Linux+Apache+Mysql/MariaDB+PHP一組常用來搭建動態網站或者服務器的開源軟件,本身都是各自獨立的程序,但是因為常被放在一起使用,擁有了越來越高的兼容度,共同組成了一個強大的Web應用程序平臺。apache相對nginx來說更加

centos7編譯安裝lamp環境

1.   輔助軟體的安裝 (1)   所需軟體包 apr-1.5.2.tar.gz apr-util-1.5.4.tar.gz curl-7.52.1.tar.gz freetype-2.7.tar.gz httpd-2.4.25.tar.gz jpegs

CentOS7.3編譯安裝NodeJS6.10.0

在CentOS下采用編譯node二進位制原碼包的方式安裝nodejs。 1.去官網下載nodejs的安裝包 OR 直接通過wget命令下載。 2.直接官網下載的安裝包需要先上傳到伺服器,

centos7原始碼編譯安裝LAMP

LAMP用到的軟體版本: httpd-2.4.27.tar.gz mariadb-10.2.8-linux-x86_64.tar.gz php-7.1.10.tar.xz 安裝順序: 順序: mariadb–>httpd–>php htt

CentOS7.3編譯安裝NodeJS6.10

概述 在CentOS7下采用編譯NodeJS二進位制原始碼包的方式安裝NodeJS 下載NodeJS安裝包 你可以先下載NodeJS二進位制原始碼安裝包檔案然後上傳到CentO

CentOS7.3編譯安裝PHP7.1

CentOS7.3編譯安裝PHP7.1 說明 安裝依賴包 建立使用者及使用者組 下載php71並解壓 下載並安裝php依賴 PHP語法分析器re2c 加密支援擴充套件庫libmcrypt 加密方式擴充套件庫mhash 加密方式擴充套

centos7.3編譯安裝OpenSSL1.1.1b

開發十年,就只剩下這套架構體系了! >>>   

CentOS7.3編譯安裝PHP

req ati mysql- centos7 文件 sts Opens mod curl 系統:CentOS Linux release 7.3.1611內核:3.10.0-514.el7.x86_64PHP:php-5.3.27.tar.gz 步驟:#yum instal

WordPress個人搭建

rdp mysql bre 搭建lnmp環境 extra 配置 base 個人 soc 搭建LNMP環境 請參考前面的博文自行搭建 部署WordPress #創建數據庫和用戶mysql -uroot -p123456 -S /data/3306/mysql.sock cr

Python利用sphinx構建個人「文末含shell筆記」

開發語言 實現 就是 特殊 系統 自動 iar 版本控制系統 template 一、基礎概念 利用sphinx+pandoc+github+readthedocs構建個人博客 Sphinx: 是一個基於ReStructuredText的文檔生成工具,可以令人輕松的撰寫出清

CentOS6基於源碼編譯安裝LAMP實現WordPress功能和xcache功能

lamp、wordpress、php-xcache前言:APR(Apache portable Run-time libraries,Apache可移植運行庫)的目的如其名稱一樣,主要為上層的應用程序提供一個可以跨越多操作系統平臺使用的底層支持接口庫。php的加速器xcache:基於PHP的特殊擴展機制如op

CentOS6編譯安裝 LAMP+Wordpress--搭建自己的

lamp、wordpressCentOS6安裝LAMP+Wordpress--搭建自己的博客 背景: LAMP也就是Linux+Apache+Mysql(Mariadb)+PHP(Python...),這是個基本的網站架構,在學會了編譯安裝LAMP環境後,在加上Wordpress就可以搭建屬於自己

Centos6編譯安裝LAMP(FPM模塊方式)加速的WordPress應用

centos6 編譯安裝 lam p( fpm 模塊方式 ) 加速的 wordpress 應用準備軟件版本:apr-1.5.2.tar.bz2 apr-util-1.5.4.tar.bz2 httpd-2.4.27.tar.bz2 mariadb-5.5.57-linux-x86_64.tar

三臺主機CentOS7 編譯安裝lamp

servers 啟動 figure tor dex tab .cn freetype firewalld 作業題:三臺主機編譯安裝http、php,二進制源碼安裝mariadb環境:A主機:192.166.0.161,編譯安裝httpdB主機:192.166.0.162,編