sersync實時復制工具實踐
在nfs服務器上面操作
(一)工具下載sersync_installdir_64bit網上很多。在本文附件也提供了。
nfs服務器新建目錄/application
[[email protected] ~]# mkdir /application -p
[[email protected] ~]# cd /application/
[[email protected] application]# rz -y 上傳sersync_installdir_64bit.zip軟件到nfs服務器裏面
[[email protected] application]# unzip sersync_installdir_64bit.zip #加壓zip軟件
[[email protected] application]# mv sersync_installdir_64bit/sersync/ . #把sersync_installdir_64bit/sersync/目錄移動到/application中
然後再刪除[[email protected] application]# rm -fr sersync_installdir_64bit目錄
[[email protected] application]# ls
sersync sersync_installdir_64bit.zip
[[email protected]
.
├── sersync
│ ├── bin
│ │ └── sersync #啟動文件
│ ├── conf
│ │ └── confxml.xml #配置文件
│ └── logs
└── sersync_installdir_64bit.zip
4 directories, 3 files
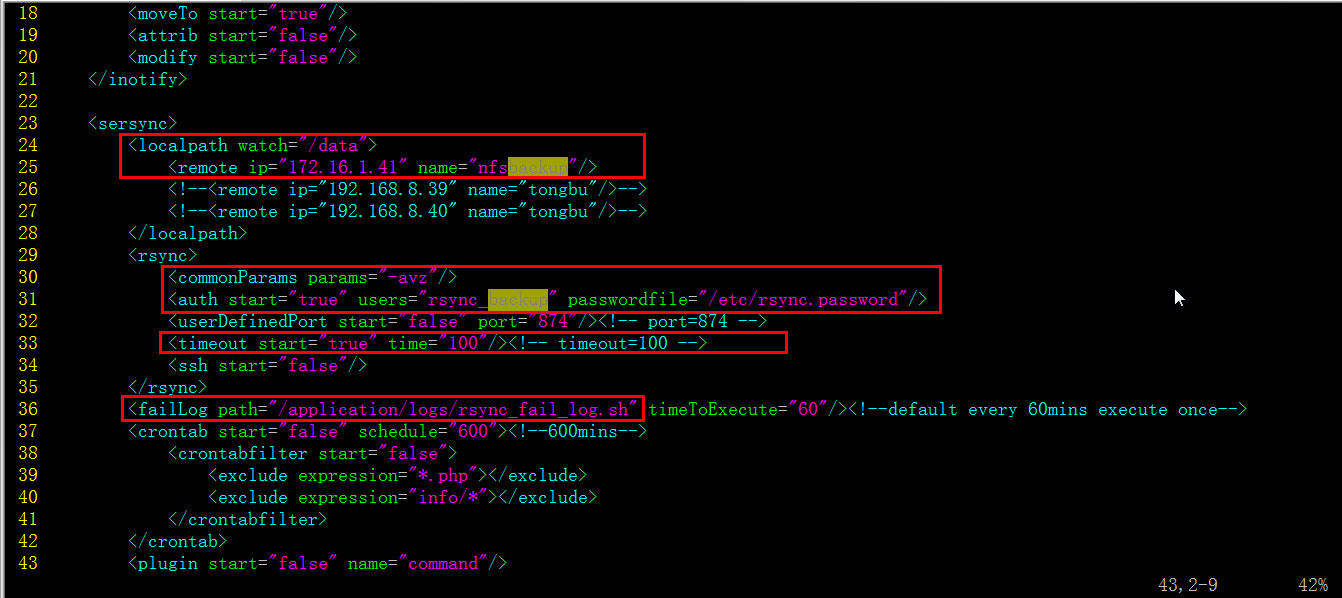
[[email protected] conf]# vim confxml.xml
修改內容下圖所示:

[[email protected] sersync]# pwd
/application/sersync
[[email protected] sersync]# chmod +x bin/sersync
[[email protected] sersync]# /application/sersync/bin/sersync -h
set the system param
execute:echo 50000000 > /proc/sys/fs/inotify/max_user_watches
execute:echo 327679 > /proc/sys/fs/inotify/max_queued_events
parse the command param
_______________________________________________________
參數-d:啟用守護進程模式
參數-r:在監控前,將監控目錄與遠程主機用rsync命令推送一遍
c參數-n: 指定開啟守護線程的數量,默認為10個
參數-o:指定配置文件,默認使用confxml.xml文件
參數-m:單獨啟用其他模塊,使用 -m refreshCDN 開啟刷新CDN模塊
參數-m:單獨啟用其他模塊,使用 -m socket 開啟socket模塊
參數-m:單獨啟用其他模塊,使用 -m http 開啟http模塊
不加-m參數,則默認執行同步程序
[[email protected] sersync]# /application/sersync/bin/sersync -d -r -n 8 -o /application/sersync/conf/confxml.xml
[[email protected] sersync]# ps -ef|grep sersync
root 2005 1 0 14:04 ? 00:00:00 /application/sersync/bin/sersync -d -r -n 8 -o /application/sersync/conf/confxml.xml
root 2036 1 0 14:05 ? 00:00:00 /application/sersync/bin/sersync -d -r -n 8 -o /application/sersync/conf/confxml.xml
root 2050 1895 0 14:06 pts/0 00:00:00 grep sersync
cd /data目錄,刪除/data目錄下面所有文件
[[email protected] data]# rm -f *
[[email protected] data]# ll
total 0
新建stu{01..100}這100個文件
[[email protected] data]# touch stu{01..100}
以下內容是在rsync(backup)服務器上面操作的:
[[email protected] ~]# cd /nfsbackup/
[[email protected] nfsbackup]# ls|wc -l
100
[[email protected] nfsbackup]# ls
stu001 stu011 stu021 stu031 stu041 stu051 stu061 stu071 stu081 stu091
stu002 stu012 stu022 stu032 stu042 stu052 stu062 stu072 stu082 stu092
stu003 stu013 stu023 stu033 stu043 stu053 stu063 stu073 stu083 stu093
stu004 stu014 stu024 stu034 stu044 stu054 stu064 stu074 stu084 stu094
stu005 stu015 stu025 stu035 stu045 stu055 stu065 stu075 stu085 stu095
stu006 stu016 stu026 stu036 stu046 stu056 stu066 stu076 stu086 stu096
stu007 stu017 stu027 stu037 stu047 stu057 stu067 stu077 stu087 stu097
stu008 stu018 stu028 stu038 stu048 stu058 stu068 stu078 stu088 stu098
stu009 stu019 stu029 stu039 stu049 stu059 stu069 stu079 stu089 stu099
stu010 stu020 stu030 stu040 stu050 stu060 stu070 stu080 stu090 stu100
上面內容可以驗證了在nfs上面創建文件後,再rsync(backup)服務器上面會同步
驗證文件刪除:
在nfs服務器上面刪除
[[email protected] data]# rm -f *
然後再到rsync(backup)服務器上面查看
[[email protected] nfsbackup]# ls|wc -l
0
[[email protected] nfsbackup]# ll
total 0
驗證了刪除也是同步的。
在nfs服務器上面操作:
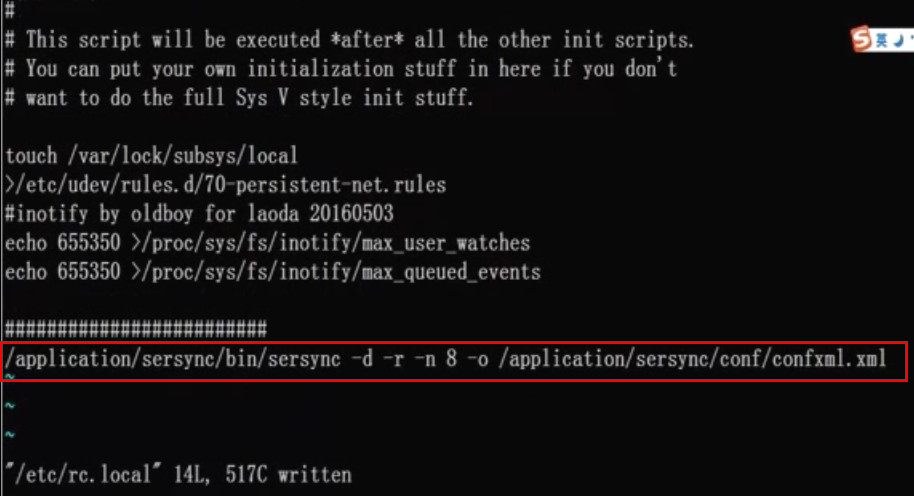
加入開機啟動
把/application/sersync/bin/sersync -d -r -n 8 -o /application/sersync/conf/confxml.xml
追加到/etc/rc.local文件裏面。
[[email protected] ~]# cat /etc/rc.local
#!/bin/sh
#
# This script will be executed *after* all the other init scripts.
# You can put your own initialization stuff in here if you don‘t
# want to do the full Sys V style init stuff.
touch /var/lock/subsys/local
>/etc/udev/rules.d/70-persistent-net.rules
###########################
/application/sersync/bin/sersync -d -r -n 8 -o /application/sersync/conf/confxml.xml

本文出自 “sandshell” 博客,請務必保留此出處http://sandshell.blog.51cto.com/9055959/1955739
sersync實時復制工具實踐
