CentOS7部署ELK5.2
原文發表於cu:2017-02-10
參考文檔:
- Elasticsearchyum文檔:https://www.elastic.co/guide/en/elasticsearch/reference/current/rpm.html
- Logstashyum文檔:https://www.elastic.co/guide/en/logstash/current/installing-logstash.html
- Kibanayum文檔:https://www.elastic.co/guide/en/kibana/current/rpm.html
-
es5.x版本head插件安裝:http://renzhiyuan.blog.51cto.com/10433137/1888862
本文通過yum的方式安裝ELK Stack各套件,並做簡單配置。
一.環境準備
1. 操作系統
CentOS-7-x86_64-Everything-1511
2. JDK版本
官方文檔寫得很明確:elasticsearch與logstash至少需要java 8支持,其中logstash5.x版本也不支持java 9,這裏部署openjdk,使用"yum provides java"命令選取合適的版本進行安裝。
[[email protected] ~]# yum install java-1.8.0-openjdk-1.8.0.121-0.b13.el7_3.x86_64
[[email protected] ~]# java -version
openjdk version "1.8.0_121"
OpenJDK Runtime Environment (build 1.8.0_121-b13)
OpenJDK 64-Bit Server VM (build 25.121-b13, mixed mode)
3. ELK版本
Elasticsearch 5.2: https://www.elastic.co/downloads/elasticsearch
Logstash 5.2:https://www.elastic.co/downloads/logstash
Kibana 5.2:https://www.elastic.co/downloads/kibana
4. 拓撲圖
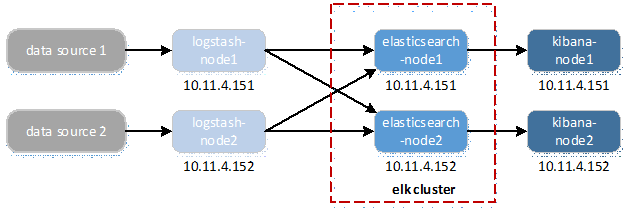
1) 物理拓撲

- 驗證環境部署2臺設備,均為VMware ESXi虛擬出的vm,部署在相同網段;
- 每臺vm上均部署elk的3個組件,只是配置文件根據節點不同而略有不同(以下部署配置過程只針對node1,node2安裝配置可參照node1)。
2) 邏輯流程

- 數據源只需要輸入到某1個logstash節點;
- 經過logstash處理的數據需要輸出到elasticsearch集群中的所有節點,elasticsearch分布式集群通過自身處理,每個節點均能獲取全部數據;
- kibana展示只需要從本機所在elasticsearch節點即可獲取全部數據。
二.Elasticsearch部署
1. 導入elasticsearch PGP key
[[email protected] ~]# rpm --import https://artifacts.elastic.co/GPG-KEY-elasticsearch
2. 創建yum源文件
[[email protected] ~]# vim /etc/yum.repos.d/elasticsearch.repo
[elasticsearch-5.x]
name=Elasticsearch repository for5.x packages
baseurl=https://artifacts.elastic.co/packages/5.x/yum
gpgcheck=1
gpgkey=https://artifacts.elastic.co/GPG-KEY-elasticsearch
enabled=1
autorefresh=1
type=rpm-md
3. 安裝elasticsearch
[[email protected] ~]# yum install elasticsearch -y
4. 設置開機啟動
[[email protected] ~]# systemctl daemon-reload
[[email protected] ~]# systemctl enable elasticsearch.service
Created symlink from /etc/systemd/system/multi-user.target.wants/elasticsearch.service to /usr/lib/systemd/system/elasticsearch.service.
5. 配置hosts文件
根據實際環境配置,將節點主機名加入hosts文件。
[[email protected] ~]# echo "10.11.4.151 elk-node1" >> /etc/hosts
[[email protected] ~]# echo "10.11.4.152 elk-node2" >> /etc/host
6. 配置elasticsearch.yml
[[email protected] src]# cat /etc/elasticsearch/elasticsearch.yml | grep -v "#"
cluster.name: elk #自定義集群名,相同集群內的節點設置相同的集群名
node.name: elk-node1 #自定義節點名,建議統一采用節點hostname
path.data: /var/lib/elasticsearch #data存儲路徑,可不取消註釋,默認即此路徑
path.logs: /var/log/elasticsearch #log存儲路徑,可不取消註釋,默認即此路徑
network.host: 0.0.0.0 #es監聽地址,采用"0.0.0.0",允許所有設備訪問
http.port: 9200 #es監聽端口,可不取消註釋,默認即此端口
discovery.zen.ping.unicast.hosts: ["elk-node1", "elk-node2"]
#集群節點發現列表,也可采用ip的形式
discovery.zen.minimum_master_nodes: 2 #集群可做master的最小節點數
#以下兩項設置es5.x版本的head插件可以訪問es
http.cors.enabled: true #開啟跨域訪問支持,默認為false
http.cors.allow-origin: "*" #跨域訪問允許的域名地址,使用正則表達式
7. 配置head插件
elasticsearch5.x版本沒有提供直接安裝head插件的方法,作者在github上給出了方法:
https://github.com/mobz/elasticsearch-head
1)下載並配置nodejs
nodejs官網:https://nodejs.org/en/
如果國內通過wget下載較慢,可通過第三方工具下載後上傳至服務器。
[[email protected] ~]# cd /usr/local/src/
[[email protected] src]# wget https://nodejs.org/dist/v6.9.5/node-v6.9.5-linux-x64.tar.xz
[[email protected] src]# xz -d node-v6.9.5-linux-x64.tar.xz
[[email protected] src]# tar -xvf node-v6.9.5-linux-x64.tar -C /usr/local/
[[email protected] src]# cd ~
[[email protected] ~]# ln -s /usr/local/node-v6.9.5-linux-x64/bin/node /usr/bin/node
[[email protected] ~]# ln -s /usr/local/node-v6.9.5-linux-x64/bin/npm /usr/bin/npm
[[email protected] ~]# node -v
v6.9.5
[[email protected] ~]# npm -v
3.10.10
# NPM的全稱是Node Package Manager,是隨同NodeJS一起安裝的包管理和分發工具,方便讓JavaScript開發者下載、安裝、上傳以及管理已經安裝的包。
2)安裝head插件
安裝grunt
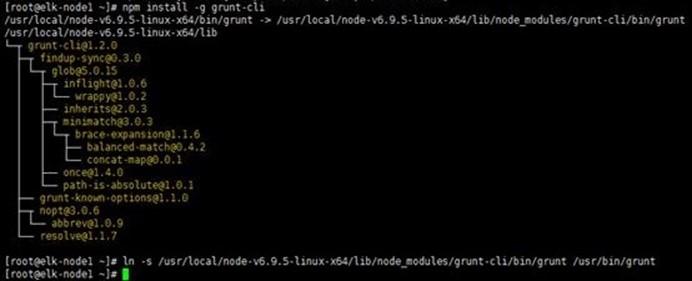
[[email protected] ~]# npm install -g grunt-cli
[[email protected] ~]# ln -s /usr/local/node-v6.9.5-linux-x64/lib/node_modules/grunt-cli/bin/grunt /usr/bin/grunt

#grunt是一個方便的構建工具,可以進行打包壓縮、測試、執行等等的工作,5.x裏的head插件就是通過grunt啟動的;
#"-g"參數代表全局安裝,一般安裝到nodejs的"lib/node_modules"目錄下;不帶參數"-g",則是本地安裝,一般安裝到運行npm命令時所在的目錄,這裏就需要安裝到head插件目錄;
#為grunt命令建軟鏈接,方便全局執行,或加入環境變量;
#如果鏡像速度不理想,可提前切到國內的鏡像,在安裝grunt-cli前執行:npm config set registry https://registry.npm.taobao.org。
下載並配置head
[[email protected] ~]# cd /var/lib/elasticsearch
[[email protected] elasticsearch]# git clone git://github.com/mobz/elasticsearch-head.git
[[email protected] elasticsearch]# chown -R elasticsearch:elasticsearch elasticsearch-head/
#配置elasticsearch.yml文件允許head插件跨域訪問es,請見上述章節。
安裝head
[[email protected] ~]# cd /var/lib/elasticsearch/elasticsearch-head/
[[email protected] elasticsearch]# npm install


#安裝完成後可能有一些報錯,不影響使用,報錯原因未知,本人對nodejs不了解,github上有相近的問題,但並未解決。解決方法如下:
- 查看報錯信息"Error: Cannot find module ‘/var/lib/elasticsearch/elasticsearch-head/node_modules/phantomjs-prebuilt/install.js‘",未找到" phantomjs-prebuilt/install.js"文件;
- 采取比較土的辦法,將完整的"phantomjs-prebuilt/"目錄上傳到相應位置,重新執行"npm install",無報錯。
- 或者:npm install [email protected] --ignore-scripts

#同時有3個警告信息,忽略即可,其中"npm WARN [email protected] license should be a valid SPDX license expression"警告信息可做如下處理:http://www.itdadao.com/articles/c15a1031952p0.html
即修改"./ elasticsearch-head"目錄下"package.json"文件第17行的""Apache2" "為"Apache-2.0",涉及到開源軟件與其他合作類軟件的使用聲明。
#如果沒有全局安裝grunt二進制程序,可在"elasticsearch-head"目錄下執行"npm install grunt --save"或" npm install grunt-cli"。
配置head文件
-
app.js
[[email protected] ~]# cd /var/lib/elasticsearch/elasticsearch-head/
[[email protected] elasticsearch-head]# cd _site/
[[email protected] _site]# cp app.js app.js.bak

#在4328行將原"http://localhost:9200"修改為"http://10.11.4.151:9200",否則head插件不能獲取節點狀態信息。
-
Gruntfile.js
[[email protected] ~]# cd /var/lib/elasticsearch/elasticsearch-head/
[[email protected] elasticsearch-head]# cp Gruntfile.js Gruntfile.js.bak
[[email protected] elasticsearch-head]# vim Gruntfile.js

#在93行新增"hostname: 0.0.0.0‘, ",確保能被訪問。
8. iptables設置
[[email protected] ~]# vim /etc/sysconfig/iptables
-A INPUT -p tcp -m state --state NEW -m tcp -m multiport --dports 9000:9600 -j ACCEPT
-A INPUT -m pkttype --pkt-type multicast -j ACCEPT
-A INPUT -p tcp -m state --state NEW -m tcp --dport 5601 -j ACCEPT
[[email protected] ~]# systemctl restart iptables

#打開tcp 9000~9600多個端口,9100訪問head插件,9200是節點事務通信端口,9300是集群節點之間選舉/狀態同步端口,9600~9700是默認的logstash數據輸入端口;
#允許多播協議,es是一個基於p2p的系統,其先通過廣播尋找存在的節點,再通過多播協議來進行節點之間的通信,同時也支持點對點的交互;
#tcp5601端口是kibana的默認訪問端口。
9. 啟動並驗證
[[email protected] ~]# systemctl start elasticsearch.service
[[email protected] ~]# cd /var/lib/elasticsearch/elasticsearch-head/
[[email protected] elasticsearch-head]# grunt server &

#啟動head插件,需要到head目錄下
1)啟動過程驗證
[[email protected] ~]# journalctl --unit elasticsearch

2)端口驗證
[[email protected] ~]# netstat –tunlp

3)集群/節點狀態信息
節點狀態信息
[[email protected] ~]# curl -XGET ‘http://10.11.4.151:9200/?pretty‘

節點數信息
[[email protected] ~]# curl -XGET ‘http://10.11.4.151:9200/_cat/nodes?v‘

#其中帶"*"的節點表示被選舉為master。
節點分片信息
[[email protected] ~]# curl -XGET ‘http://10.11.4.151:9200/_cat/indices?v‘

#這裏已經有分片信息,因kibana已安裝並啟動,默認無信息。
集群健康狀態信息
[[email protected] ~]# curl -XGET ‘http://10.11.4.151:9200/_cluster/health?pretty‘

4)日誌
日誌文件默認在" /var/log/elasticsearch/elasticsearch.log",可在elasticsearch.yml文件中更改。
[[email protected] ~]# tail -f /var/log/elasticsearch/elk.log

#這裏查看elk-node2節點的日誌,elk-node2被選舉成為master,且集群狀態正常。
5)瀏覽器訪問
節點狀態信息(類curl)

可視化展示(head插件)

#同樣有節點信息,master選舉結果信息,節點分片信息,集群健康狀態信息等。
三.Logstash部署
yum源同elasticsearch,這裏不再創建yum文件,直接安裝即可;如果一定要創建則另取1個名字,如logstash.repo。
1. 安裝logstash
[[email protected] ~]# yum install logstash –y
2. 設置開機啟動
[[email protected] elasticsearch]# systemctl enable logstash.service
Created symlink from /etc/systemd/system/multi-user.target.wants/logstash.service to /etc/systemd/system/logstash.service.
3. 配置logstash
1)配置文件
默認配置文件:/etc/logstash/logstash.yml
[[email protected] ~]# cd /etc/logstash/
[[email protected] logstash]# cat logstash.yml | grep -v "#"
path.data: /var/lib/logstash
path.config: /etc/logstash/conf.d
path.logs: /var/log/logstash
#其中默認配置已經明確數據,日誌,logstash pipeline實例文件的存儲位置,保持默認即可;
#其中"http.host"參數指定數據輸入主機,默認為localhost;"http.port"參數指定數據輸入端口,默認為9600~9700(每實例占用1個),此驗證暫時不做變更。
2)pipeline文件
根據默認配置,pipeline實例文件默認應放置於/etc/logstash/conf.d目錄,此時目錄下無實例文件,可根據實際情況新建實例,以處理本機messages信息為例,如下:
[[email protected] ~]# cd /etc/logstash/conf.d/
[[email protected] conf.d]# vim messages.conf
input {
file {
path => "/var/log/messages"
}
}
output {
elasticsearch {
hosts => ["10.11.4.151:9200","10.11.4.152:9200"]
index => "messages-%{+YYYY.MM.dd}"
}
stdout {
# codec => rubydebug
}
}
[[email protected] conf.d]# cd ..
[[email protected] logstash]# chown -R logstash:logstash conf.d/
[[email protected] ~]# chmod 644 /var/log/messages
#pipeline實例文件以"input","output","filter"等區域組成,前兩者為必選項;
#"input"與"output"利用插件進行數據輸入與輸出,如這裏"file"即輸入插件,"elasticseach"與"stdout"即輸出插件;
#在各插件內再具體定義行為,如"input"定義了數據源,"elasticseach"定義了輸出節點與數據輸出的索引與格式;
#"codec => rubydebug"會產生大量的debug文件至message(也可重定向到其他位置),此處註釋掉;
#請註意權限,這裏message常規權限是400,logstash無法讀取,如果無法調用,在logstash的啟動日誌中會有相應的記錄。
4. 啟動並驗證
1)啟動測試
[[email protected] ~]# cd /usr/share/logstash/
[[email protected] logstash]# bin/logstash -e ‘input { stdin { } } output { stdout {} }‘

#logstash可以啟動,但此種驗證方式會有告警,可以提示方式處理,在"$LS_HOME"下建立"config"目錄,並將"/etc/logstash/"下的文件建軟鏈接到"config"目錄,再次執行即可,如下:
[[email protected] ~]# mkdir -p /usr/share/logstash/config/
[[email protected] ~]# ln -s /etc/logstash/* /usr/share/logstash/config
[[email protected] ~]# chown -R logstash:logstash /usr/share/logstash/config/

2)啟動測試pipeline實例啟動測試
[[email protected] ~]# cd /usr/share/logstash/
[[email protected] logstash]# /usr/share/logstash/bin/logstash -f /etc/logstash/conf.d/messages.conf -t

3)啟動並驗證
[[email protected] ~]# systemctl start logstash
netstat
[[email protected] ~]# netstat -tunlp 
日誌
[[email protected] ~]# tailf /var/log/logstash/logstash-plain.log

head
瀏覽器訪問:http://10.11.4.151:9100

四.Kibana部署
yum源同elasticsearch,這裏不再創建yum文件,直接安裝即可;如果一定要創建則另取1個名字,如kibana.repo。
1. 安裝kibana
[[email protected] ~]# yum install kibana -y
2. 設置開機啟動
[[email protected] ~]# systemctl daemon-reload
[[email protected] ~]# systemctl enable kibana.service
Created symlink from /etc/systemd/system/multi-user.target.wants/kibana.service to /etc/systemd/system/kibana.service.
3. 配置kibana
默認配置文件:/etc/kibana/kibana.yml
[[email protected] ~]# cd /etc/kibana/
[[email protected] kibana]# vim /etc/kibana/kibana.yml
[[email protected] kibana]# cat /etc/kibana/kibana.yml | grep -v "^$" | grep -v "#"
server.port: 5601 #默認即5601
server.host: "0.0.0.0" #允許被訪問
elasticsearch.url: "http://10.11.4.151:9200" #es地址與端口
4. 啟動並驗證
[[email protected] ~]# systemctl restart kibana
[[email protected] ~]# netstat -tunlp | grep 5601

五.Kibana展示
1)瀏覽器訪問:http://10.11.4.151:5601或者http://10.11.4.152:5601

2)需要在"Index name or pattern"處創建索引名,elassticsearch中並沒有以"logstash-*"命名的索引,則不能創建,新建索引對應logstash的pipeline輸出插件定義的"index",即"messages-*",如下:

3)在"Index name or pattern"處填寫入正確的索引名字,"@timestamp"會自動填充,點擊"create"創建,見到如下界面即索引創建完成;

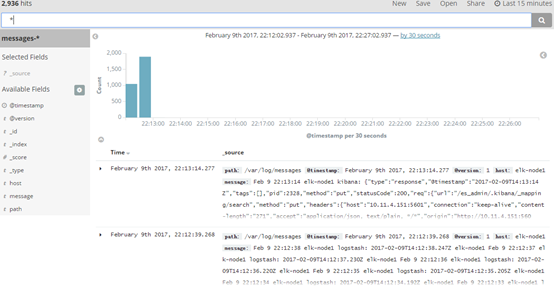
4)在"Discover"頁面,可以搜索與瀏覽Elasticsearch中的數據,默認搜索的是最近15分鐘的數據,可以自定義選擇時間。

CentOS7部署ELK5.2
