自制linux小系統
阿新 • • 發佈:2017-09-20
linux
自制linux
今天說一說怎麽自制一個linux,也就是用一塊新硬盤來自己搞一個linux。硬盤拆掉撞到其他機器上可以照常使用,需要什麽東西都是自己添加的哦。
那我就在虛擬機裏進行了嘿嘿嘿。。。
1.在我的centos裏加了一塊新的硬盤並順便分了個區,並且格式化了一下。
[[email protected] ~]# fdisk /dev/sdb

WARNING: DOS-compatible mode is deprecated. It‘s strongly recom
mended to
         switch off the mode (command ‘c‘) and change display u
nits to
         sectors (command ‘u‘).

Command (m for help): n
Command action
   e   extended
   p   primary partition (1-4)
p
Partition number (1-4): 1
First cylinder (1-2610, default 1):
Using default value 1
Last cylinder, +cylinders or +size{K,M,G} (1-2610, default 2610
): +10G

Command (m for help): n
Command action
   e   extended
   p   primary partition (1-4)
p
Partition number (1-4): 2
First cylinder (1307-2610, default 1307):
Using default value 1307
Last cylinder, +cylinders or +size{K,M,G} (1307-2610, default 2
610):
Using default value 2610

Command (m for help): w
The partition table has been altered!

Calling ioctl() to re-read partition table.
Syncing disks.
[[email protected] ~]# lsblk
NAME   MAJ:MIN RM  SIZE RO TYPE MOUNTPOINT
sr0     11:0    1  3.7G  0 rom  /media/CentOS_6.9_Final
sda      8:0    0  200G  0 disk
├─sda1   8:1    0    1G  0 part /boot
├─sda2   8:2    0   50G  0 part /
├─sda3   8:3    0   50G  0 part /app
├─sda4   8:4    0    1K  0 part
└─sda5   8:5    0    2G  0 part [SWAP]
sdb      8:16   0   20G  0 disk
├─sdb1   8:17   0   10G  0 part
└─sdb2   8:18   0   10G  0 part         =》sdb就是我新硬盤,分了兩個10G的分區。
[[email protected] ~]#
接下來就是兩個分區的文件系統(另一個分區一樣)
[[email protected] ~]# mkfs.ext4 /dev/sdb1
mke2fs 1.41.12 (17-May-2010)
Filesystem label=
OS type: Linux
Block size=4096 (log=2)
Fragment size=4096 (log=2)
Stride=0 blocks, Stripe width=0 blocks
655776 inodes, 2622603 blocks
131130 blocks (5.00%) reserved for the super user
First data block=0
Maximum filesystem blocks=2688548864
81 block groups
32768 blocks per group, 32768 fragments per group
8096 inodes per group
Superblock backups stored on blocks:
	32768, 98304, 163840, 229376, 294912, 819200, 884736, 1605632

Writing inode tables: done
Creating journal (32768 blocks): done
Writing superblocks and filesystem accounting information: done

This filesystem will be automatically checked every 20 mounts or
180 days, whichever comes first.  Use tune2fs -c or -i to override.
[[email protected] ~]#
創建兩個分區一個是為根目錄掛載,另一個是為了boot掛載。
2.在自己的linux下創建/media/boot(該boot是制作的boot),之後把/dev/sda1掛載到/media/boot,這個就不做演示了。
3.之後安裝grub:grub-install --root-directory=/media /dev/sdb(不能是sdb{1,2},grub安裝是安裝前446字節還不到分區)
[[email protected] ~]# grub-install --root-directory=/media/ /dev/sdb
Probing devices to guess BIOS drives. This may take a long time.
Installation finished. No error reported.
This is the contents of the device map /media//boot/grub/device.map.
Check if this is correct or not. If any of the lines is incorrect,
fix it and re-run the script `grub-install‘.

(fd0)	/dev/fd0
(hd0)	/dev/sda
(hd1)	/dev/sdb
[[email protected] ~]#
[[email protected] ~]#
[[email protected] grub]# pwd
/media/boot/grub
[[email protected] grub]# ls
device.map        jfs_stage1_5       ufs2_stage1_5
e2fs_stage1_5     minix_stage1_5     vstafs_stage1_5
fat_stage1_5      reiserfs_stage1_5  xfs_stage1_5
ffs_stage1_5      stage1
iso9660_stage1_5  stage2
[[email protected] grub]#        ===》現在grub下已經有基本的文件了
4.拷貝一些重要文件。在本人機器上vm,init文件名稱是我自己定義的,和其他版本可能不一樣。
[[email protected] ~]# cp /boot/vmlinuz /media/boot/
[[email protected] ~]# cp /boot/initramfs.img /media/boot/
[[email protected] ~]#
5.創建編輯grub.conf文件
[[email protected] ~]# vim /media/boot/grub/grub.conf
default=0
timeout=5
title cnetos 8.8
        kernel /vmlinuz root=/dev/sda2 init=/bin/bash
        initrd /initramfs.img
~
kernel和initrd添加的是我第四部拷貝的兩個文件,所以文件名是一樣的。
6.本人是提前做了個腳本,腳本功能是輸入命令,把命令和關聯的庫都cp到某一個目錄下(也就是現在新創建的boot下),用這個腳本來實現自己小Linux裏面的命令功能。
[[email protected] ~]# copycmd31.sh
please input command(q或quit退出) : ls
請輸入一個目標路徑(絕對路徑): /media
/bin/ls  ======> /media/bin
/lib64/libselinux.so.1 ======> /media/lib64/libselinux.so.1
/lib64/librt.so.1 ======> /media/lib64/librt.so.1
/lib64/libcap.so.2 ======> /media/lib64/libcap.so.2
/lib64/libacl.so.1 ======> /media/lib64/libacl.so.1
/lib64/libc.so.6 ======> /media/lib64/libc.so.6
/lib64/libdl.so.2 ======> /media/lib64/libdl.so.2
/lib64/ld-linux-x86-64.so.2 ======> /media/lib64/ld-linux-x86-64.so.2
/lib64/libpthread.so.0 ======> /media/lib64/libpthread.so.0
/lib64/libattr.so.1 ======> /media/lib64/libattr.so.1
功能如上,拷貝完需要的重要命令之後在把該創建的目錄都創建一遍這個簡單的linux就差不多完成了。
[[email protected] media]# mkdir {etc,root,sys,usr,var,proc}
[[email protected] media]# ls
bin   dev  home  lib64       proc  sbin  tmp  var
boot  etc  lib   lost+found  root  sys   usr
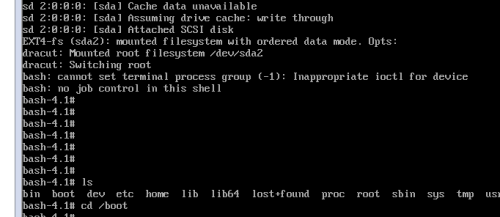
現在就差不多像個簡單的linux了。
現在可以把這個自己制作的硬盤安裝到其他機器上看看效果了

本文出自 “mlon客” 博客,請務必保留此出處http://13154101.blog.51cto.com/13144101/1966953
自制linux小系統
