
web前端一
阿新 • • 發佈:2017-09-22
and print div標簽 set 換行 Coding ash 500px 上下
先進行前端的訓練測試,在測試之前首先先寫一個socket程序用來做服務端,頁面下一章會提到,在這裏我用的自己本機的8081端口做的服務端,代碼如下:
import socket def main(): sock = socket.socket(socket.AF_INET, socket.SOCK_STREAM) sock.bind((‘localhost‘,8081)) sock.listen(5) while True: print("server is working.....") conn, address = sock.accept() request= conn.recv(1024) with open ("test.html","r",encoding=‘utf-8‘)as read_f: conn.sendall(bytes("HTTP/1.1 201 OK\r\n\r\n%s"%read_f.read(),"utf8")) conn.close() if __name__ == ‘__main__‘: main()
很簡單的代碼,上面的代碼寫了個循環,sock.bind後面接的localhost表示本機ip,8081表示端口.
重點介紹下前端的html文件,首先可以新建一個新的html文件,它會默認的有一些代碼:
<!DOCTYPE html>
<html lang="en">
<head>
    <meta charset="UTF-8">
    <title>Title</title>
</head>
<body>

</body>
</html>
這些默認代碼含義如下所示:
- <!DOCTYPE html> 告訴瀏覽器使用什麽樣的html或者xhtml來解析html文檔
- <html></html>是文檔的開始標記和結束標記。此元素告訴瀏覽器其自身是一個 HTML 文檔,在它們之間是文檔的頭部<head>和主體<body>。
- <head></head>元素出現在文檔的開頭部分。<head>與</head>之間的內容不會在瀏覽器的文檔窗口顯示,但是其間的元素有特殊重要的意義。
- <title></title>定義網頁標題,在瀏覽器標題欄顯示。
- <body></body>之間的文本是可見的網頁主體
通常寫css的時候在body處寫主體頁面,在head處可以定義類。
下面介紹幾種常用標簽:
<hn>: n的取值範圍是1~6; 從大到小. 用來表示標題.

<p>: 段落標簽. 包裹的內容被換行.並且也上下內容之間有一行空白.

<b> <strong>: 加粗標簽.

<strike>: 為文字加上一條中線.

<em>: 文字變成斜體.

<sup>和<sub>: 上角標 和 下角表.

<br>:換行.

<hr>:水平線
塊級標簽:一個標簽占用一行的叫塊級標簽,反過來就是內聯標簽
div標簽是常用的塊級標簽。
比如本周的作業,在head處的定義:
<!DOCTYPE html>
<html lang="en">
<head>
    <meta charset="UTF-8">
    <title>Title</title>
    <style>
     .dingyi{
            width: 500px;
            height: 30px;
            background: #ccd;
            float: left;
            text-align:center
        }
     .dingyi2{
            width: 500px;
            height: 30px;
            background: #ccd;
            float: right;
            text-align:center
        }
     .dingyi3{
            width: 500px;
            height: 500px;
            border-color: #ccd;
            float: right;
            text-align:center
        }
     .dingyi4{
            width: 1400px;
            height:700px;
            border: 1px solid #e1e1e1;
            <!--border-radius: 15%;-->
            padding-left: 200px;
            float: center;
            margin-left:220px;
       }
     .dingyi5{
            width: 800px;
            height:600px;
            border-right: 1px dashed #e1e1e2;
            padding-left: 100px;
            float: left;
            margin-left: 50px;
            margin-top: 50px;
       }
     .dingyi6{
            width: 300px;
            height:600px;
            <!--border: 1px solid #e1e1e2;-->
            padding-left: 100px;
            float: right;
            margin-top: 50px;
       }
     </style>
</head>
head定義完成後就可以定義body了:
<body>
    <div style="height: 37px;background-color:#ccd">
        <div class="dingyi" style="margin-top:7px">
            <a href="https://www.baidu.com" style="height: 30px">*收藏本站</a>
        </div>
        <div class="dingyi2" style="margin-top:7px">
            <a href="http://www.baidu.com" style="height: 30px">登錄</a>
            <a href="http://www.baidu.com" style="height: 30px">免費註冊</a>
            <a href="http://www.baidu.com" style="height: 30px">我的訂單</a>
            <a href="http://www.baidu.com" style="height: 30px">VIP會員俱樂部</a>
        </div>
    </div>
    <div>
        <img src="https://ss3.bdstatic.com/70cFv8Sh_Q1YnxGkpoWK1HF6hhy/it/u=508710356,2971756153&fm=27&gp=0.jpg" style="height:100px;width:150px;margin-left:200px">
    </div>
    <!--<div style="height: 1000px">-->
    <div class="dingyi4">
        <div class="dingyi5">
            <h1>註冊新用戶</h1>
            <h3 style="margin-left: 20px">*用戶名:<input type="text" name="username"></h3>
            <h3 style="margin-left: 20px">*手機號:<input type="text" name="phone_number"></h3>
            <h3>*登錄密碼:<input type="text" name="password"></h3>
            <h3>*確認密碼:<input type="text" name="password2"></h3>
            <h3 style="margin-left: 20px">*驗證碼:<input type="text" name="yanzhengma"></h3>
            <p><input type="radio" >我已閱讀並同意 <a href=""><<用戶註冊協議>></a></p>
            <p><input type="submit" value="同意以上協議並註冊" style="background:red; margin-left: 70px "></p>
        </div>
        <div class="dingyi6">
            <div>我已經註冊,現在就 <a href="">登錄</a></div>
            <div><img src="https://timgsa.baidu.com/timg?image&quality=80&size=b9999_10000&sec=1506061552313&di=953a3881c5dfc92c9644a10b19a3859d&imgtype=0&src=http%3A%2F%2Fimg2.tiandaoedu.com%2Fwww%2Fueditor%2Fnet%2Fupload%2F2016-01-30%2Fc0f1f525-f618-41f3-88cd-cff99ff95f95.jpg" style="height:150px;width:200px;margin-top:30px"></img></div>
        </div>

    </div>
</body>
</html>
前端開發有個重要思想,盒子模型:
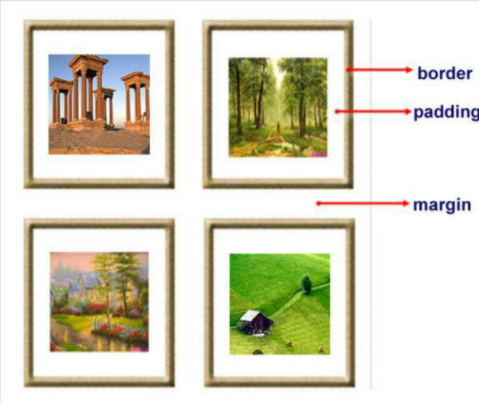
解釋如下:
- margin: 用於控制元素與元素之間的距離;margin的最基本用途就是控制元素周圍空間的間隔,從視覺角度上達到相互隔開的目的。
- padding: 用於控制內容與邊框之間的距離;
- Border(邊框): 圍繞在內邊距和內容外的邊框。
- Content(內容): 盒子的內容,顯示文本和圖像。
通過以上代碼就可以得到一個相應的頁面:
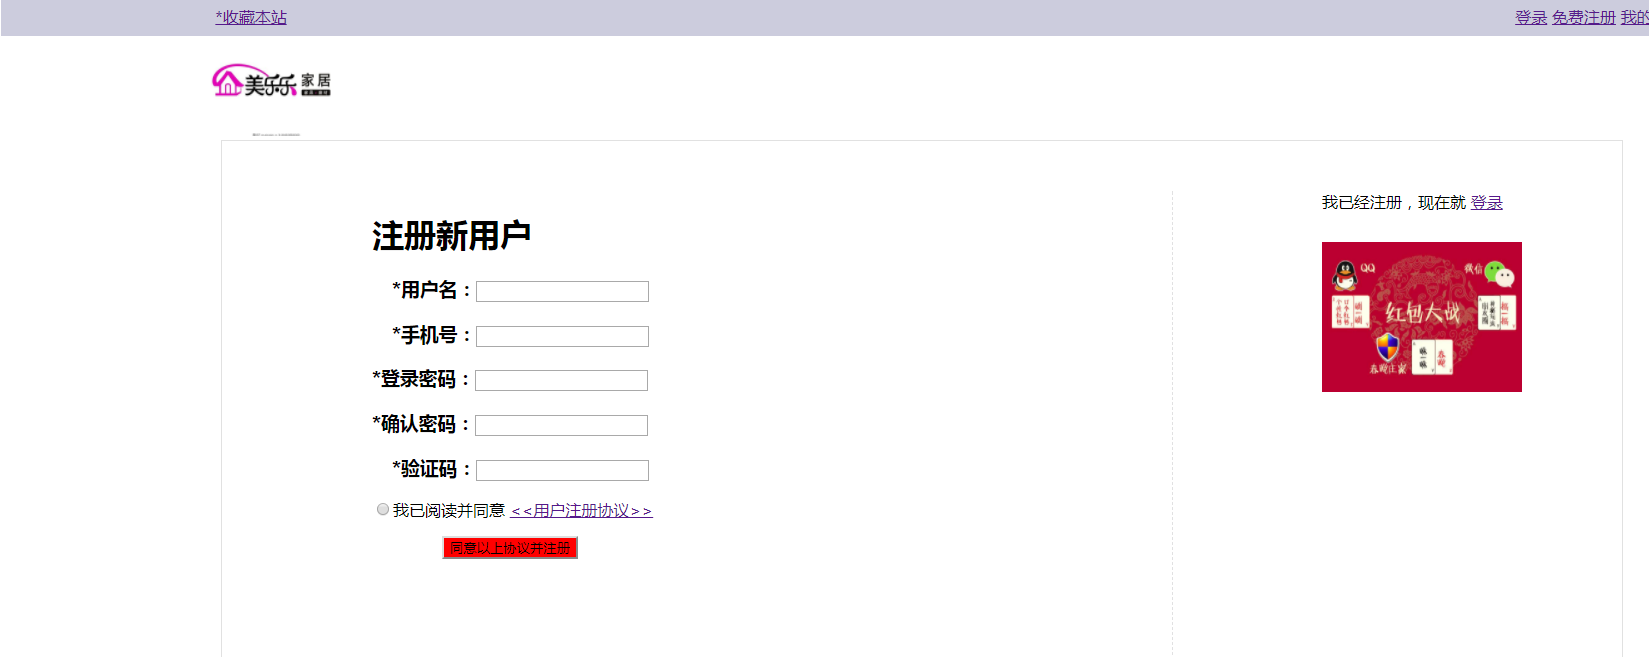
後期還可以進行優化!
web前端一