rsync數據鏡像備份工具
rsync簡介:
rsync(remote synchronize)是Liunx/Unix下的一個遠程數據同步工具。它可通過LAN/WAN快速同步多臺主機間的文件和目錄,並適當利用rsync算法(差分編碼,也就是差異傳輸)以減少數據的傳輸。因此同步兩端的數據很快,而且對同步的數據可以支持遞歸傳輸(可以使用tree查看發現兩邊目錄tree一致),還可以保持數據原本的屬性,也支持選擇性壓縮。(可本地也可異地傳輸)
rsync工作原理:
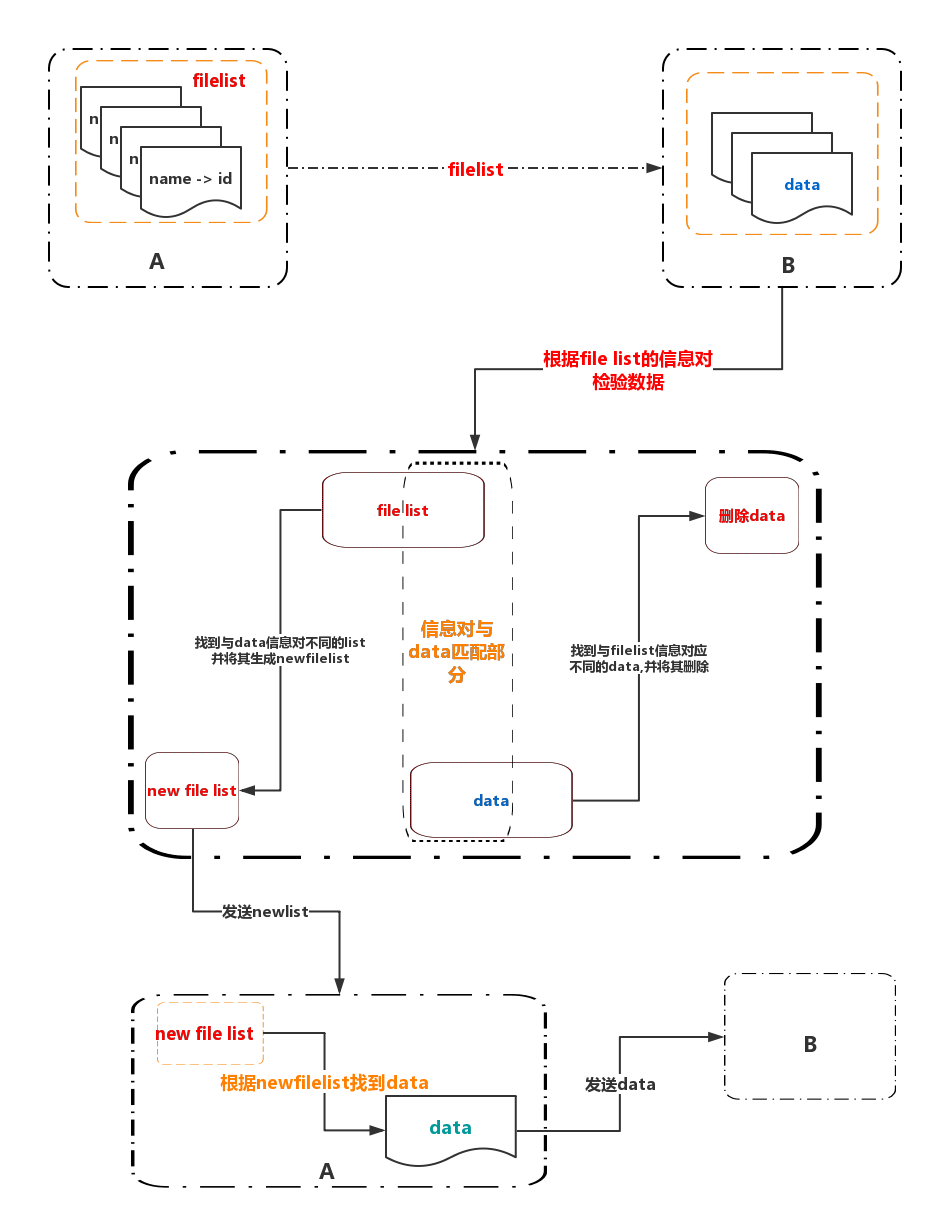
1.client構造filelist發送到server(filellist是包含了所有文件信息對:name->id,id用來代表唯一的文件,例MD5)
2.Server處理filelsit,將filelist中存在而本地不存在的對應數據構成newfilelist,將本地存在而filelist中不存在的數據刪除。
3.Server發送構造好的newfilelist至Client
4.Client接受newfilelist,並發送newfilelist中對應的數據至Server.

rsync同步數據模擬
京東雲主機為Server IP : AAA.AAA.AAA.AAA
阿裏雲主機為Client IP : BBB.BBB.BBB.BBB
首先安裝rsync,兩端都要安裝,筆者這都是已經默認安裝好了的:
[[email protected] ~]#  rpm -qa rsync
rsync-3.0.9-18.el7.x86_64
如果沒有安裝可以去官網下載安裝
[[email protected] ~]#  cd /usr/local/src
[[email protected] ~]#  wget https://download.samba.org/pub/rsync/src/rsync-3.0.9.tar.gz
tar
[[email protected] src]#  tar -zvxf rsync-3.0.9.tar.gz
[[email protected] src]# cd rsync-3.0.9
[[email protected] rsync-3.0.9]# ./configure
[[email protected] ]#  make $$ make install
搭建遠程服務之前先來小試一下rsync命令:
1 rsync [OPTION]... SRC [SRC]... DEST
2 rsync [OPTION]... SRC [SRC]... [[email protected]]HOST:DEST
3 rsync [OPTION]... SRC [SRC]... [[email protected]]HOST::DEST
4 rsync [OPTION]... SRC [SRC]... rsync://[[email protected]]HOST[:PORT]/DEST
5 rsync [OPTION]... [[email protected]]HOST:SRC [DEST]
6 rsync [OPTION]... [[email protected]]HOST::SRC [DEST]
7 rsync [OPTION]... rsync://[[email protected]]HOST[:PORT]/SRC [DEST]
可以看到一共有6種用法使用較多的是2,6
第一種:rsync [OPTION]... SRC [SRC]... DEST
是將指定本地數據傳輸到指定本地路徑,類似cp
[[email protected] rsynctest]# ll
total 4
drwxr-xr-x 2 root root 4096 Sep 24 15:34 test
-rw-r--r-- 1 root root    0 Sep 24 15:34 xad.test
[[email protected] rsynctest]# rsync -av xad.test test/
sending incremental file list
xad.test
sent 72 bytes  received 31 bytes  206.00 bytes/sec
total size is 0  speedup is 0.00
[[email protected] rsynctest]# ll test/xad.test
-rw-r--r-- 1 root root 0 Sep 24 15:34 test/xad.test
第二種: rsync [OPTION]... SRC [SRC]... [[email protected]]HOST:DEST
將本地數據傳輸到遠端路徑,且是使用遠端的用戶傳輸,需要密碼。
 [[email protected] ~]# rsync -av rsynctest/ [email protected] AAA.AAA.AAA.AAA:testrsync
The authenticity of host ‘ AAA.AAA.AAA.AAA ( AAA.AAA.AAA.AAA)‘ can‘t be established.
ECDSA key fingerprint is 6f:8c:32:66:d8:e4:91:78:e8:3a:4a:39:56:6f:1f:ec.
Are you sure you want to continue connecting (yes/no)? yes
Warning: Permanently added ‘AAA.AAA.AAA.AAA‘ (ECDSA) to the list of known hosts.
[email protected]‘s password:
sending incremental file list
./
xad.test
test/
test/xad.test
sent 179 bytes  received 57 bytes  22.48 bytes/sec
total size is 0  speedup is 0.00
傳輸完成可以去遠端檢驗
[[email protected] testrsync]# ll
total 0
drwxr-xr-x 2 root root 22 Sep 24 15:35 test
-rw-r--r-- 1 root root  0 Sep 24 15:34 xad.test
第六種:rsync [OPTION]... [[email protected]]HOST::SRC [DEST]##註意是"::"
以遠端的數據為基準同步到本地,屬於服務器模式,使rsync在後臺啟用一個守護進程,使之永久運行,用於接受文件傳輸請求。
京東雲主機為ServerIP :  AAA.AAA.AAA.AAA
阿裏雲主機為Client IP :  BBB.BBB.BBB.BBB
將server的數據同步到client

首先先找到配置文件/etc/rsync.conf
[[email protected] ~]# cat /etc/rsync.conf
 uid = nobody##使用匿名用戶執行守護進程
 gid = nobody
 use chroot = no
 max connections = 4##最大並發連接數
 strict modes = yes##檢驗口令文件的權限,若為yes,則密碼文件需要root權限
 pid file = /var/run/rsyncd.pid
 [XAD]##定義一個模塊名稱
path = /root/testrsync  ##需要傳輸的數據的路徑
comment = xadsrc file
read only = no
write only = no
hosts allow = *##允許連接的地址
#hosts deny = IP/NETMASK
uid = root
gid = root
auth users = backup
 ##使用此模塊的用戶,多個用戶用空格隔開,此用戶和linux用戶沒任何聯系
secrets file = /etc/server.pass
 ##密碼文件,格式是“user:pass”單獨一行,需要自己手動創建,文件名是什麽隨意。

創建/etc/server.pass
[[email protected] ~]#  cat /etc/server.pass
backup:xad123
[[email protected] ~]# chmod 600 /etc/server.pass

創建守護進程
[[email protected] ~]#  /usr/bin/rsync    --daemon
[[email protected] ~]# ps -ef | grep rsync
root     15862     1  0 Sep23 ?        00:00:00 /usr/bin/rsync --daemon
現在去cilent端配置執行rsync,在這只需添加密碼文件和執行傳輸操作就可以,什麽都不用設置。
創建/etc/client.pass
[[email protected] ~]#  cat /etc/client.pass
xad123
[[email protected] ~]# chmod 600 /etc/client.pass
[[email protected] ~]#  /usr/bin/rsync  -vzrtopg --delete --progress --exclude "*access*" --exclude "debug*" [email protected]::XAD  /root/rsynctest --password-file=/etc/client.pass
##命令中的參數
v是詳細輸出
z是壓縮後傳輸
r是遞歸傳輸,可以是用tree查看對比
t是保數據的原始時間信息
o是保持數據的所屬主
p是保持數據的文件權限
g是保持數據的屬組
exclude排除不需要傳輸的文件類型
delete是以服務器的數據為基準去鏡像數據的同步
progress顯示數據鏡像的過程
[email protected]::XAD 紅色標註的就是在服務器端設置的對應信息
/root/rsynctest 數據同步的保存路徑
 --password-file=/etc/client.pass數據使用的密碼文件!指的是backup用戶!
##
測試
為了測試先刪除/root/rsynctest中的文件後在執行
[[email protected] rsynctest]#  /usr/bin/rsync  -vzrtopg --delete --progress --exclude "*access*" --exclude "debug*" [email protected] AAA.AAA.AAA.AAA::XAD /root/rsynctest --password-file=/etc/client.pass
receiving incremental file list
./
xad.test
           0 100%    0.00kB/s    0:00:00 (xfer#1, to-check=2/4)
test/
test/xad.test
           0 100%    0.00kB/s    0:00:00 (xfer#2, to-check=0/4)
sent 126 bytes  received 232 bytes  716.00 bytes/sec
total size is 0  speedup is 0.00
[[email protected] rsynctest]# ll
total 4
drwxr-xr-x 2 root root 4096 Sep 24 15:35 test
-rw-r--r-- 1 root root    0 Sep 24 15:34 xad.test
設置定時備份
[[email protected] ~]# crontab -e
301***/usr/bin/rsync  -vzrtopg --delete --progress --exclude "*access*" --exclude "debug*" [email protected] AAA.AAA.AAA.AAA::XAD /root/rsynctest --password-file=/etc/client.pass
到此為止server端的數據就可以在淩晨1:30分開始同步到client了。
本文出自 “TOP-ONE” 博客,請務必保留此出處http://onenice.blog.51cto.com/13201315/1968210
rsync數據鏡像備份工具
