自動化運維工具Ansible學習筆記
一、簡介
1.1 基本概念:
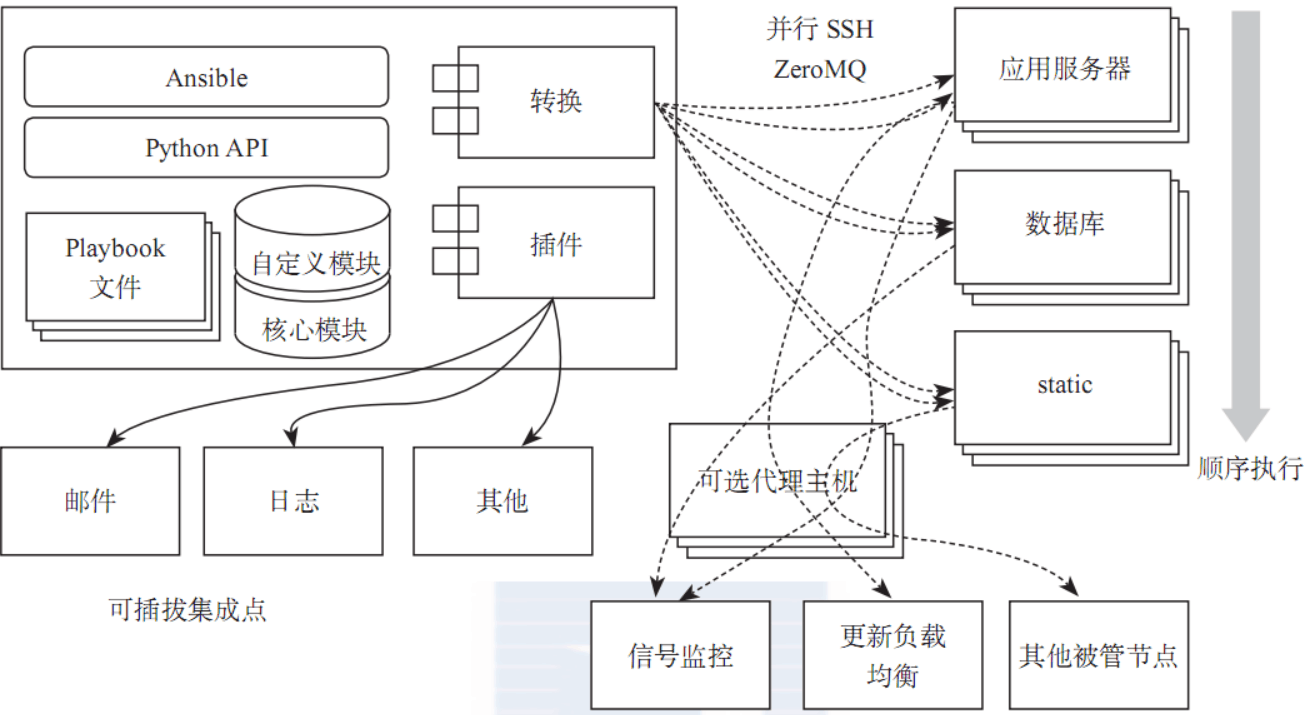
ansible是一個基於python開發的輕量級自動化運維管理工具,可以用來批量執行命令,安裝程序,支持playbook編排。它通過ssh協議來連接主機,去中心化,相對比puppet和saltstack無需安裝客戶即可實現文件傳輸、命令執行、應用部署、配置管理、任務編排等,顯得更為簡單與輕量。ansible只是提供一種框架,其基於模塊工作的,本身沒有批量部署。
1.2 核心組件:
(1)、連接插件connection plugins:負責和被監控端實現通信;
(2)、host inventory:指定操作的主機,是一個配置文件裏面定義監控的主機;
(3)、各種模塊核心模塊、command模塊、自定義模塊;
(4)、借助於插件完成記錄日誌郵件等功能;
(5)、playbook:劇本執行多個任務時,非必需可以讓節點一次性運行多個任務。
1.3 工具特性:
(1)、no agents:不需要在被管控主機上安裝任何客戶端;
(2)、no server:無服務器端,使用時直接運行命令即可;
(3)、modules in any languages:基於模塊工作,可使用任意語言開發模塊;
(4)、yaml,not code:使用yaml語言定制劇本playbook;
(5)、ssh by default:基於SSH工作;
(6)、strong multi-tier solution:可實現多級指揮。
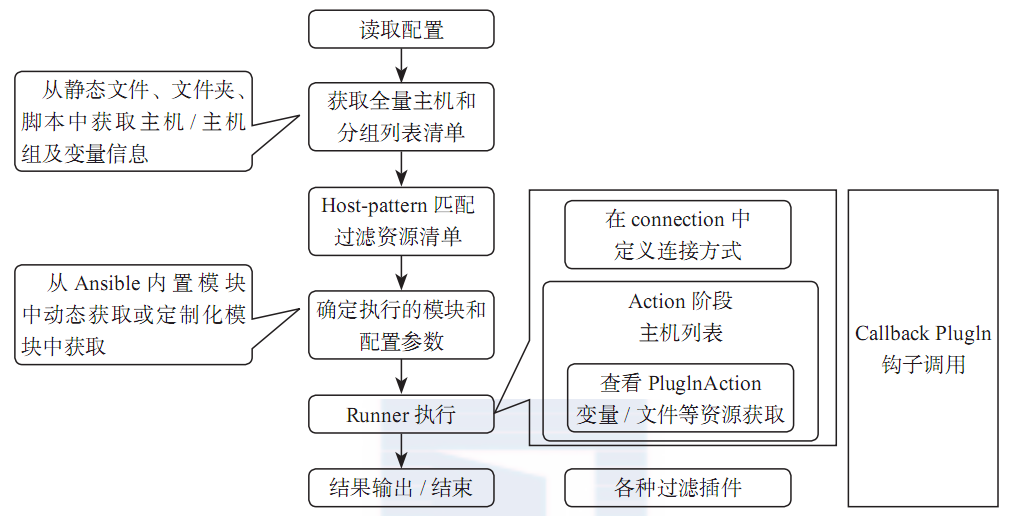
1.4 流程架構:


1.5 優缺點:
優點:
輕量級,無需在客戶端安裝agent,更新時,只需在操作機上進行一次更新即可;
批量任務執行可以寫成腳本,而且不用分發到遠程就可以執行;
使用python編寫,維護更簡單;
使用push方式,控制節點向其他節點推方式,可先測試變更,方便控制管理。
缺點:
基於ssh,串行,故超過500臺主機效率較低;
二、安裝部署
| 名稱 | 主機名 | IP地址 |
| A主機 | ansible-A | 172.20.4.10 |
| B主機 | ansible-B | 172.20.4.11 |
| C主機 | ansible-C | 172.20.4.12 |
2.1 Ansible安裝
安裝方式可使用源碼編譯安裝,也可以更新yum源後yum安裝,由於依賴較多模塊,編譯安裝易出現異常,此次采用yum安裝,Centos 6.x安裝epel源後,直接可以yum安裝,python版本2.6以上,在各個節點均需要安裝
rpm -ivh http://mirrors.sohu.com/fedora-epel/6/x86_64/epel-release-6-8.noarch.rpm
yum install ansible -y
2.2 各主機SSH互信
例如:在A主機執行以下命令,將公鑰發送到B主機
ssh-keygen -t rsa #創建公鑰與私鑰
ssh-copy-id -i ~/.ssh/id_rsa.pub [email protected] #將公鑰傳輸給對端服務器
此時A服務器可以免密碼登錄B服務器
![OT2V`%]C(8534FWSIF%DFKY.png 技術分享](https://s3.51cto.com/wyfs02/M01/A6/D4/wKioL1ncYvGgfSjkAACbI1nUyrk391.png)
同樣方式,可以做A到C主機,如果控制端為B主機,需要B反向將公鑰發布到A主機,實現互信。
2.3 命令參數介紹
Usage: ansible <host-pattern> [options]

Options:
-a MODULE_ARGS, --args=MODULE_ARGS		         #制定調用的模塊(ansible-doc查看模塊)
module arguments
--ask-vault-pass      ask for vault password	       #加密文件
-B SECONDS, --background=SECONDS			    #後臺等待多少秒
run asynchronously, failing after X seconds
(default=N/A)
-C, --check           don‘t make any changes; instead, try to predict some      #不執行命令,值執行命令檢查
of the changes that may occur
-D, --diff            when changing (small) files and templates, show the
differences in those files; works great with --check
-e EXTRA_VARS, --extra-vars=EXTRA_VARS		                          #調用外部變量
set additional variables as key=value or YAML/JSON
-f FORKS, --forks=FORKS						                  #一次執行並發的連接數
specify number of parallel processes to use
(default=5)
-h, --help            show this help message and exit
-i INVENTORY, --inventory-file=INVENTORY			                      #調用的hosts文件
specify inventory host path
(default=/etc/ansible/hosts) or comma separated host
list.
-l SUBSET, --limit=SUBSET			                              #限定主機列表中的某臺主機執行
further limit selected hosts to an additional pattern
--list-hosts          outputs a list of matching hosts; does not execute	      #列出直接列表中主機
anything else
-m MODULE_NAME, --module-name=MODULE_NAME		                          #調用執行模塊
module name to execute (default=command)
-M MODULE_PATH, --module-path=MODULE_PATH
specify path(s) to module library (default=None)
--new-vault-password-file=NEW_VAULT_PASSWORD_FILE
new vault password file for rekey
-o, --one-line        condense output
--output=OUTPUT_FILE  output file name for encrypt or decrypt; use - for
stdout
-P POLL_INTERVAL, --poll=POLL_INTERVAL
set the poll interval if using -B (default=15)
--syntax-check        perform a syntax check on the playbook, but do not
execute it
-t TREE, --tree=TREE  log output to this directory
--vault-password-file=VAULT_PASSWORD_FILE
vault password file
-v, --verbose         verbose mode (-vvv for more, -vvvv to enable		      #命令輸出詳細輸出
connection debugging)
--version             show program‘s version number and exit

Connection Options:
control as whom and how to connect to hosts

-k, --ask-pass      ask for connection password                          #需要安裝sshpass  輸入密碼
--private-key=PRIVATE_KEY_FILE, --key-file=PRIVATE_KEY_FILE
use this file to authenticate the connection
-u REMOTE_USER, --user=REMOTE_USER		                               #ssh執行命令的用戶,默認為當前執行ansible的用戶
connect as this user (default=None)
-c CONNECTION, --connection=CONNECTION
connection type to use (default=smart)
-T TIMEOUT, --timeout=TIMEOUT				                          #執行命令的超時時間 (default=10)
override the connection timeout in seconds
(default=10)
--ssh-common-args=SSH_COMMON_ARGS
specify common arguments to pass to sftp/scp/ssh (e.g.
ProxyCommand)
--sftp-extra-args=SFTP_EXTRA_ARGS
specify extra arguments to pass to sftp only (e.g. -f,
-l)
--scp-extra-args=SCP_EXTRA_ARGS
specify extra arguments to pass to scp only (e.g. -l)
--ssh-extra-args=SSH_EXTRA_ARGS
specify extra arguments to pass to ssh only (e.g. -R)

Privilege Escalation Options:
control how and which user you become as on target hosts

-s, --sudo          run operations with sudo (nopasswd) (deprecated, use
become)				#sudo
-U SUDO_USER, --sudo-user=SUDO_USER		#sudo
desired sudo user (default=root) (deprecated, use
become)
-S, --su            run operations with su (deprecated, use become)
-R SU_USER, --su-user=SU_USER				                           #su 的時候切換到那個用戶
run operations with su as this user (default=root)
(deprecated, use become)
2.4 配置相關文件
修改主機文件inventory:,此文件定義執行命令的主機列表
![H]S4Q(67CW)PL0DA5F0U%]6.png 技術分享](https://s4.51cto.com/wyfs02/M00/A6/D4/wKioL1ncY8bS-Ms9AAAojWh7jgg214.png)
設置ansible.cfg參數
inventory =/etc/ansible/hosts             #定義資源清單inventory文件的位置,一般保持默認
library =/usr/share/my_modules/           #library指向ansible模塊的目錄,一般保持默認
forks =10                                 #設置多少個進程同時工作
sudo_user=root                            #設置默認執行命令的用戶,也可在playbook中重新設置此參數
remote_port=22                            #制定連接被管理的管理端口,默認為22
timeout =10                               #設置SSH連接的超時時間間隔,單位為秒
2.5 測試
ansible agent -m command -a "touch /tmp/aaa" -vvv
#-m  使用command模塊  -a 使用command裏面支持的命令參數 -vvv 查看詳細過程
![$NK%QYC1Z$8R@QQM_ICB]]K.png 技術分享](https://s5.51cto.com/wyfs02/M02/A6/D6/wKioL1ncbXmA9xmVAAB-f9ZOtgs514.png)
三、模塊介紹
ansible模塊較多,對應可以查看相關文檔,此處列出一下日常工作中常用的模塊
【copy】模塊
ansible agent -m copy -a "src=/root/test.sh dest=/tmp"
【file】
調用-s 參數,需要客戶端能夠無密碼使用sudo命令;
ansible agent -m file -a "dest=/tmp/test.sh mode=755 owner=root group=root" -s
【script】
ansible agent -m script -a "/tmp/test.sh"
【shell】創建用戶
ansible agent -m shell -a "/tmp/test.sh"
【group】創建組
ansible agent -m group -a "name=test1 state=present" -s
【user】
ansible agent -m user -a "name=xuel home=/home/xuel state=present" -s
【yum】
可以提供的status:absent,present,installed,removed,latest
ansible agent -m yum -a "name=httpd state=latest" -s
【server】
可以提供的status:running,started,stopped,restarted,reloaded
【cron】
ansible agent -m cron -a ‘name="my job" minute=*/1 hour=* day=* month=* weekday=* job="/usr/sbin/ntpdate time1.aliyun.com"‘
【get_url】
ansible agent -m get_url -a "url=http://mirrors.sohu.com/fedora-epel/6/x86_64/epel-release-6-8.noarch.rpm dest=/tmp"
【synchronize】需要安裝rsync
ansible agent -m synchronize -a "src=/root/test.file dest=/tmp"
模塊默認使用的為推送push,如果想使用pull功能需添加mode=pull
ansible agent -m synchronize -a "mode=pull src=/tmp/test.file dest=/root/"
【ini_file】
ansible agent -m ini_file -a "dest=/tmp/test.ini section=Mongo option=Host value=127.0.0.1"
該模塊Python需要安裝ConfigParser
四、ansible-playbook介紹
4.1 核心組件
hosts             #執行的遠程主機列表
tasks             #任務集
varniables        #內置變量或自定義變量
templates         #可替換模版
handlers          #觸發操作
4.2 命令
Usage: ansible-playbook playbook.yml
ansible-playbook test1.yml	            #執行劇本
ansible-vault encrypt test1.yml         #加密劇本
ansible-vault decrypt test1.yml         #加密劇本
ansible-vault view test1.yml            #加密劇本
4.3 YAML語法
1.“---”頂行首寫
2.#代碼註釋
3.縮進統一,不可混用空格與tab
4.縮進級別椅子
5.區分大小寫
6.k/v值可以同行寫也可換行寫,同行使用:分割,換行需要-分割
7.一個網址的功能代碼需要最少的元素包括name:task
8.一個name只能包括一個task
4.4 安裝並啟動mysql playbook實例
---
- hosts: agent
  remote_user: root
  tasks:
  - name: install mysql-server
    yum: name=mysql-server state=present
  - name: start mysql-server
    service: name=mysqld state=started
  - name: check mysql service
    shell: ps -ef |grep mysqld
執行次playbook將mysql數據庫安裝到agent服務分組裏:
![6@]ID[GFOTDG}5DC{77{LMN.png 技術分享](https://s1.51cto.com/wyfs02/M00/08/25/wKiom1nc4kuhzrxQAAApekprQ-Y385.png)

本文出自 “KaliArch” 博客,請務必保留此出處http://kaliarch.blog.51cto.com/8966921/1971185
自動化運維工具Ansible學習筆記
