spring boot整合swagger ui (RESTFUL接口的文檔在線自動生成+功能測試功能軟件,前後端分離快速開發)
阿新 • • 發佈:2017-10-23
oot images user builder img iop spi update and
swagger ui可以通過來攔截controller層,生成請求API,並將其展示在瀏覽器當中。我們可以直接通過瀏覽器來查看和調試接口。
1 添加maven依賴
<!-- Swagger --> <dependency> <groupId>io.springfox</groupId> <artifactId>springfox-swagger-ui</artifactId> <version>2.6.0</version> </dependency> <dependency> <groupId>io.springfox</groupId> <artifactId>springfox-swagger2</artifactId> <version>2.6.0</version> </dependency>
2 增加swagger配置類
package com.springboot.config;import static springfox.documentation.builders.PathSelectors.regex; import org.springframework.context.annotation.Bean; import org.springframework.context.annotation.Configuration; import springfox.documentation.builders.RequestHandlerSelectors; import springfox.documentation.spi.DocumentationType;import springfox.documentation.spring.web.plugins.Docket; import springfox.documentation.swagger2.annotations.EnableSwagger2; /** * SwaggerConfig */ @Configuration @EnableSwagger2 public class Swagger2Configuration { /** * * @return */ @Bean public Docket accessHello() { return new Docket(DocumentationType.SWAGGER_2).groupName("hello")// 定義組 .select() // 選擇那些路徑和api會生成document .apis(RequestHandlerSelectors.basePackage("com.springboot.controller")) // 攔截的包路徑 .paths(regex("/hello/.*"))// 攔截的接口路徑 .build(); // 創建 //.apiInfo(apiInfo()); // 配置說明 } /** * * @return */ @Bean public Docket accessUser() { return new Docket(DocumentationType.SWAGGER_2).groupName("user")// 定義組 .select() // 選擇那些路徑和api會生成document .apis(RequestHandlerSelectors.basePackage("com.springboot.controller")) // 攔截的包路徑 .paths(regex("/user/.*"))// 攔截的接口路徑 .build(); // 創建 //.apiInfo(apiInfo()); // 配置說明 } }
3 增加測試controller層
package com.springboot.controller;

import java.util.HashMap;
import java.util.Map;

import org.springframework.web.bind.annotation.PathVariable;
import org.springframework.web.bind.annotation.PostMapping;
import org.springframework.web.bind.annotation.RequestBody;
import org.springframework.web.bind.annotation.RequestMapping;
import org.springframework.web.bind.annotation.RestController;

import com.springboot.model.User;
import com.springboot.util.ApiJSONUtil;
import com.springboot.util.JsonReturn;

import io.swagger.annotations.ApiOperation;

@RestController
@RequestMapping("/user")
public class UserController {

    Map<String,User> maps = new HashMap<String,User>();

    @ApiOperation(value="添加",notes="用戶添加操作")
    @PostMapping("/add")
    public String add(@RequestBody User user) throws Exception{
        maps.put(user.getUuid(), user);
        JsonReturn jsonReturn = new JsonReturn(true);
        return ApiJSONUtil.objectToJsonStr(jsonReturn);
    }


    @ApiOperation(value="刪除",notes="用戶添加操作")
    @PostMapping("/delete/{uuid}")
    public String add(@PathVariable String uuid)  throws Exception{
        maps.remove(uuid);
        JsonReturn jsonReturn = new JsonReturn(true);
        return ApiJSONUtil.objectToJsonStr(jsonReturn);
    }

    @ApiOperation(value="修改",notes="用戶添加操作")
    @PostMapping("/update")
    public String delete(@RequestBody  User user)  throws Exception{
        maps.put(user.getUuid(), user);
        JsonReturn jsonReturn = new JsonReturn(true);
        jsonReturn.setObj(user);
        return ApiJSONUtil.objectToJsonStr(jsonReturn);
    }

    @ApiOperation(value="查詢",notes="用戶添加操作")
    @PostMapping("/query")
    public String query(@RequestBody  Map<String,String> map)  throws Exception{
        User user = maps.get(map.get("uuid"));
        JsonReturn jsonReturn = new JsonReturn(true);
        jsonReturn.setObj(user);
        return ApiJSONUtil.objectToJsonStr(jsonReturn);
    }
}
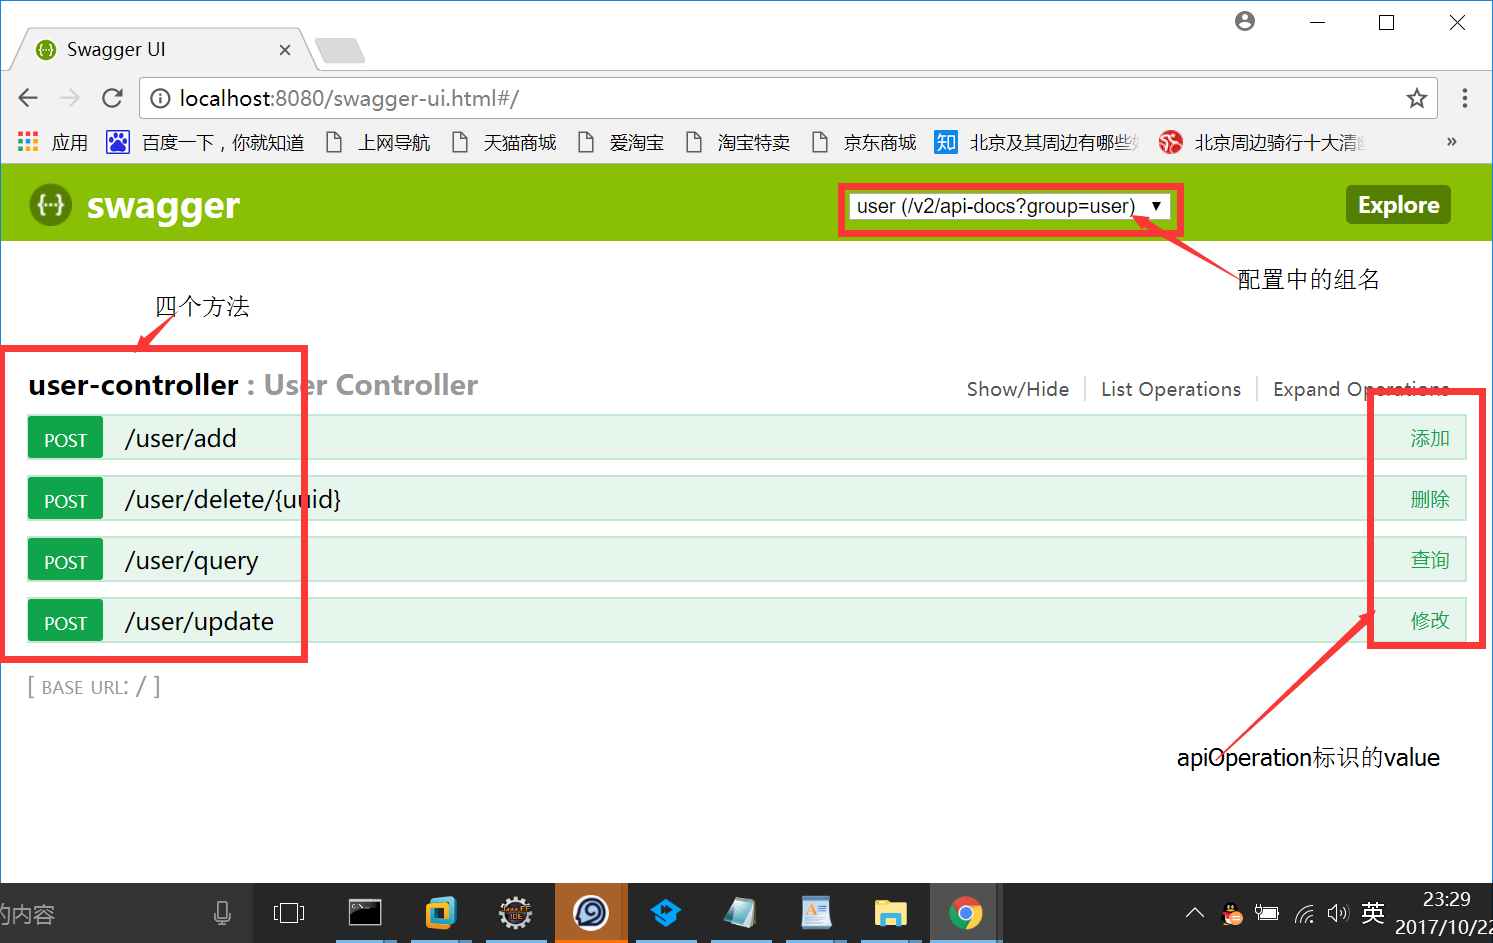
4 輸入 http://localhost:8080/swagger-ui.html#/查看效果


spring boot整合swagger ui (RESTFUL接口的文檔在線自動生成+功能測試功能軟件,前後端分離快速開發)
