
Centos7 配置subversion
阿新 • • 發佈:2017-10-27
rwx sas 域名 toolbar con rul systemctl eight location 
1. 安裝
CentOS通過yum安裝subversion。
$ sudo yum install subversion
subversion安裝在/bin目錄:
$ which svnserve/bin/svnserve
檢查一下subversion是否安裝成功。

$ svnserve --versionsvnserve, version 1.7.14 (r1542130) compiled Nov 20 2015, 19:25:09Copyright (C) 2013 The Apache Software Foundation.This software consists of contributions made by many people; see the NOTICEfile for more information.Subversion is open source software, see http://subversion.apache.org/The following repository back-end (FS) modules are available:* fs_base : Module for working with a Berkeley DB repository.* fs_fs : Module for working with a plain file (FSFS) repository.Cyrus SASL authentication is available.
2. 建立版本庫
subversion默認以/var/svn作為數據根目錄,可以通過/etc/sysconfig/svnserve修改這個默認位置。
$ systemctl cat svnserve.service# /usr/lib/systemd/system/svnserve.service[Unit]Description=Subversion protocol daemonAfter=syslog.target network.target[Service]Type=forkingEnvironmentFile=/etc/sysconfig/svnserveExecStart=/usr/bin/svnserve --daemon --pid-file=/run/svnserve/svnserve.pid $OPTIONS[Install]WantedBy=multi-user.target$ cat /etc/sysconfig/svnserve# OPTIONS is used to pass command-line arguments to svnserve.# # Specify the repository location in -r parameter:OPTIONS="-r /var/svn"
我們修改/etc/sysconfig/svnserver將默認目錄指定到/opt/svn。
$ cat /etc/sysconfig/svnserveOPTIONS="-r /opt/svn"
使用svnadmin建立版本庫spring-hello-world。
$ sudo mkdir -p /opt/svn$ sudo svnadmin create /opt/svn/spring-hello-world$ ll /opt/svn/drwxr-xr-x. 6 root root 80 Nov 10 14:42 spring-hello-world$ ll /opt/svn/spring-hello-world/drwxr-xr-x. 2 root root 51 Nov 10 14:42 confdrwxr-sr-x. 6 root root 4096 Nov 10 14:42 db-r--r--r--. 1 root root 2 Nov 10 14:42 formatdrwxr-xr-x. 2 root root 4096 Nov 10 14:42 hooksdrwxr-xr-x. 2 root root 39 Nov 10 14:42 locks-rw-r--r--. 1 root root 229 Nov 10 14:42 README.txt
3. 配置
編輯用戶文件passwd,新增兩個用戶:admin和guest。
$ cat /opt/svn/spring-hello-world/conf/passwd [users]admin = adminguest = guest
編輯權限文件authz,用戶admin設置可讀寫權限,guest設置只讀權限。
$ cat /opt/svn/spring-hello-world/conf/authz [/]admin = rwguest = r
編輯svnserve.conf:
$ cat /opt/svn/spring-hello-world/conf/svnserve.conf [general]anon-access = none #控制非鑒權用戶訪問版本庫的權限auth-access = write #控制鑒權用戶訪問版本庫的權限password-db = passwd #指定用戶名口令文件名authz-db = authz #指定權限配置文件名realm = spring-hello-world #指定版本庫的認證域,即在登錄時提示的認證域名稱
4. SVN服務
啟動SVN服務。
$ sudo systemctl start svnserve.service檢查服務是否啟動成功。
$ ps aux | grep svnroot 16349 0.0 0.1 162180 900 ? Ss 15:01 0:00 /usr/bin/svnserve --daemon --pid-file=/run/svnserve/svnserve.pid -r /opt/svn
通過netstat可以看到SVN打開了3690端口。
$ sudo netstat -tnlpProto Recv-Q Send-Q Local Address Foreign Address State PID/Program name tcp 0 0 0.0.0.0:3690 0.0.0.0:* LISTEN 16349/svnserve
設置成開機啟動。
$ sudo systemctl enable svnserve.service5. 客戶端測試
客戶端可以通過TortoriseSVN測試。
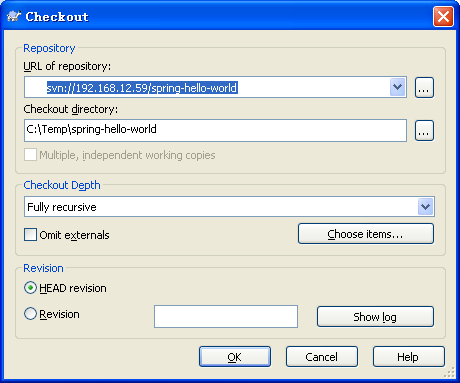
這時候可能會防火墻問題。如果是防火墻問題,會提示無法連接。
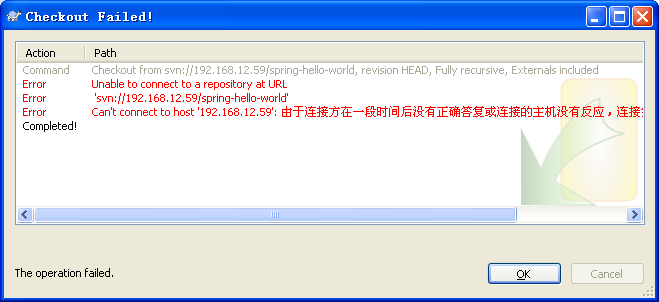
客戶端用telnet無法連接。
C:\Temp>telnet 192.168.12.59 360
用systemctl檢查服務器的防火墻配置:
$ firewall-cmd --list-allpublic (default, active) interfaces: eno16777736 eno33554984 sources: services: dhcpv6-client ssh ports: masquerade: no forward-ports: icmp-blocks: rich rules:
可以看到,沒有telnet服務和3690端口。增加telnet服務器和3690端口:
$ sudo firewall-cmd --permanent --add-service=telnet$ sudo firewall-cmd --permanent --add-port=3690/tcp$ sudo firewall-cmd --reload
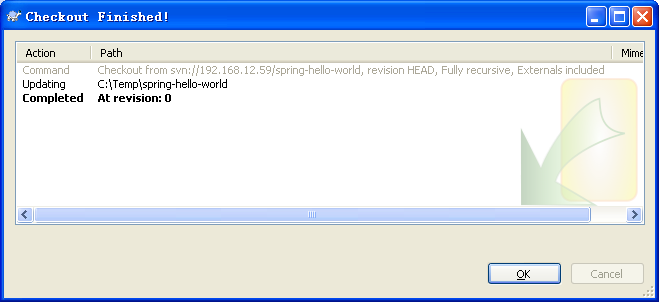
客戶端再用telnet,應該就可以了。
Centos7 配置subversion