用 Spring Boot 實現電商系統 Web API (二)創建多模塊項目
大型項目,需要將代碼按不同功能,分成不同模塊,這樣比較好管理和閱讀代碼,也有助於多人協作。
一、項目結構
1.1 模塊說明
項目分成5個模塊,分別如下:
| 模塊名稱 | 說明 |
| webapi | HTTP接口層,對外提供 restful api |
| service | 服務層 |
| repo | 數據訪問層 |
| common | 公用層 |
| util | 工具類層 |
1.2 創建模塊
模塊分層在實質是以文件目錄的形式實現的,新建一個名為“commerce”的目錄,然後在裏邊創建五跟文件夾,名字為“commerce-webapi”“commerce-service”、“commerce-repo”、“commerce-common”、“commerce-util”。在每個模塊名前加“commerce-”前綴,是為了更好的和他模塊區分,還有個一個是,每個模塊都會單獨生成一個jar包,加前綴也是為了避免和外部引用的jar包重名。
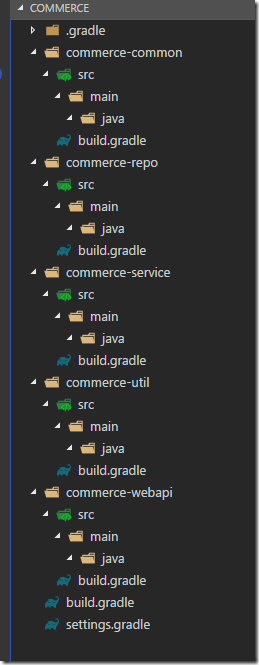
創建好上述的五個文件夾後,再在“commerce”目錄新建兩個名為 “settings.gradle”和“build.gradle”的純文本文件,在每個子目錄中都建一個名為“build.gradle”的純文本文件。
在“setting.gradle”加入如下內容:
rootProject.name=‘commerce‘

include ‘commerce-util‘
include ‘commerce-common‘
include ‘commerce-repo‘
include ‘commerce-service‘
include ‘commerce-webapi‘
第一行“rootProject.name=‘commerce‘”是可選,不加入也可,setting.gradle文件內容主要是為了說明項目中包含哪些模塊。所有的“build.gradle”文件都留空白,稍後我們再添加內容。最後,建立的文件和目錄如下:

這樣,一個多模塊的 Gradle 項目就建成了。
1.3 檢查模塊
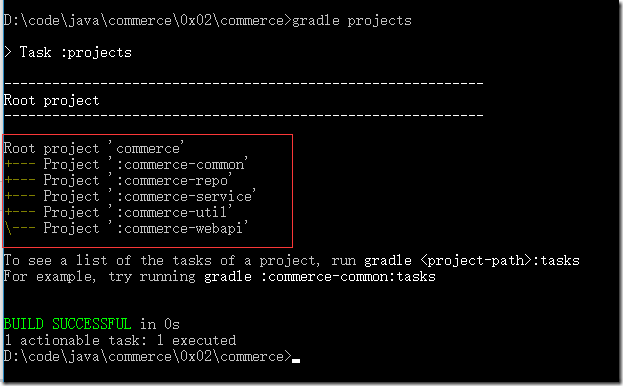
在“commerce”目錄中執行如下命令
gradle projects
如果顯示內容如下,說明我gradle已經認出我們創建的項目了。

二、添加代碼
2.1創建代碼目錄
在每個子模塊中,添加用於存放Java代碼的目錄,目錄統一為
src
  +-main
      +-java

2.2 包名規則
對於Java包名,我們統一規範為:頂級包名.項目名.模塊名,頂級包名可以隨意取,比如:hang.commerce.webapi。
2.3 各個模塊代碼
為了更清晰說明各個模塊是如何組織起來的,我們在每個模塊都加入代碼,然後讓他們互相引用。
我們假設要實現這樣一個API:通過GET請求接口,接口返回一個用戶的信息,用戶信息中包含用戶名和最後的登錄時間。
2.3.1 根目錄
在根目錄的 build.gradle 文件加入如下內容:
subprojects{
    apply plugin:‘java‘
    sourceCompatibility=1.8
    group=‘hang.commerce‘
    version=‘0.0.1‘

    repositories{
        jcenter();
        mavenCentral()
        maven { url "https://repo.spring.io/snapshot" }
        maven { url "https://repo.spring.io/milestone" }
    }

    dependencies{

    }

    sourceSets{
        main{
            resources{
                srcDirs=[‘src/main/resources‘, ‘src/main/java‘]
            }
        }
    }

    tasks.withType(JavaCompile) {
        options.encoding = ‘UTF-8‘
    }
}
這裏主要是對各個子項目(模塊)進行通用配置,避免在每個模塊中重復配置。
2.3.2 commerce-repo 模塊
添加 User.java作為數據層的實體類
commerce/commerce-repo/src/main/java/hang/commerce/repo/User.java
package hang.commerce.repo;

import org.springframework.stereotype.Component;

/**
 * 用戶類
 */
@Component
public class User {

    /**
     * 名稱
     */
    private String name;

    /**
     * 最後登錄時間
     */
    private String lastLoginTime;

    public String getName() {
        return name;
    }

    public void setName(String name) {
        this.name = name;
    }

    public String getLastLoginTime() {
        return lastLoginTime;
    }

    public void setLastLoginTime(String lastLoginTime) {
        this.lastLoginTime = lastLoginTime;
    }
}
在User類上,我使用了“@Component”註解,這樣就可以使用Spring Boot的依賴註入(IOC)功能,在使用的地方用“@Autowired”註解來註明要註入的地方。
由於要使用Component這個註解類,所以我們還需要在 commerce-repo 模塊中的 build.gradle 加入如下內容以引入JAR包。
commerce/commerce-repo/build.gradle
dependencies {
    compile "org.springframework:spring-context:5.0.0.RELEASE"
}
2.3.3 commerce-util 模塊
我們需要格式化用戶最後的登錄時間,在util模塊增加一個時間工具類。
commerce/commerce-util/src/main/java/hang/commerce/util/DateTimeTool.java
package hang.commerce.util;

import java.text.SimpleDateFormat;
import java.util.Date;

/**
 * 時間工具類
 */
public class DateTimeTool {

    /**
     * 日期格式化
     * @param time 日期
     * @return yyyy-MM-dd HH:mm:ss 格式的日期
     */
    public static String format(Date time){
        return new SimpleDateFormat("yyyy-MM-dd HH:mm:ss").format(time);
    }
}
commerce-util 模塊的 build.gradle 文件不需要增加任何內容。
2.3.4 commerce-service 模塊
服務模塊從 repo模塊取數據,然後給webapi模塊提供數據。在本示例中,我們只是簡單提供一個 get() 方法,返回User對象。為了指明這個是一個服務,我們在 UserService 類上加了 “@Service” 註解,這樣Spring會自動完成依賴註入,在需要 Service 的地方,通過 “@Autowired” 註解註入 ,比如,我們需要User對象時,不是直接 new 出來,而是通過 Autowired 註入。代碼中,設置用戶的最後登錄時間時,用到了 “commerce-util”的 “DateTimeTool”工具類中的方法。
commerce/commerce-service/src/main/java/hang/commerce/service/UserService.java
package hang.commerce.service;

import hang.commerce.repo.User;
import hang.commerce.util.DateTimeTool;
import org.springframework.beans.factory.annotation.Autowired;
import org.springframework.stereotype.Service;

import java.util.Date;

@Service
public class UserService {

    @Autowired
    private User user;

    public User get(){
        user.setName("Hello");
        user.setLastLoginTime(DateTimeTool.format(new Date()));
        return user;
    }

}
在 service 層,我們就使用到了 gradle 的模塊間引用功能。gradle 模塊間的引用只需要一行代碼就可以實現,
commpile project(‘:模塊名‘)
模塊名稱前的“:”是分隔符,相當於Linux系統中的文件路徑中 “/”,第一個“:”表示根目錄。
由於“commerce-service”模塊使用到了“commerce-repo”模塊和“commmerce-util”模塊中的代碼,所以,我們需要在 “build.gradle”加入依賴。
對外部Jar包的依賴,寫法如下
compile "org.springframework:spring-context:5.0.0.RELEASE"
規則是 compile “組織名稱:包名:版本號”,gradle 會自動根據 build.gradle 文件中的 repositories{} 的配置到網上下載Jar包,緩存到本地。
在 commerce-service 模塊中,buidl.gradle 的寫法如下:
commerce/commerce-service/build.gradle
dependencies {
    compile project(‘:commerce-repo‘)
    compile project(‘:commerce-util‘)
    compile "org.springframework:spring-context:5.0.0.RELEASE"
}
2.3.5 commerce-common 模塊
為了規範API的返回值格式,我們在 commerce-common 模塊增加了API返回值類
commerce/commerce-common/src/main/java/hang/commerce/common/ApiResult.java
package hang.commerce.common;

/**
 * API返回值對象
 * @param <T> 返回的數據類型
 */
public class ApiResult<T> {

    /**
     * 狀態碼
     */
    private ApiResultCode code;

    /**
     * 返回的消息字符串
     */
    private String message;

    /**
     * 返回的數據
     */
    private T data;

    /**
     * 異常名稱
     */
    private String exception;

    /**
     * 訪問路徑
     */
    private String path;

    public ApiResultCode getCode() {
        return code;
    }

    public void setCode(ApiResultCode code) {
        this.code = code;
    }

    public String getMessage() {
        return message;
    }

    public void setMessage(String message) {
        this.message = message;
    }

    public T getData() {
        return data;
    }

    public void setData(T data) {
        this.data = data;
    }

    public String getException() {
        return exception;
    }

    public void setException(String exception) {
        this.exception = exception;
    }

    public String getPath() {
        return path;
    }

    public void setPath(String path) {
        this.path = path;
    }
}
commerce/commerce-common/src/main/java/hang/commerce/common/ApiResultCode.java
package hang.commerce.common;

/**
 * API 返回值狀態碼
 */
public enum ApiResultCode {

    /**
     * 成功
     */
    OK,

    /**
     * 失敗
     */
    Failed,

    /**
     * 未找到資源
     */
    NotFound,

    /**
     * 未授權
     */
    NotAuth
}
由於 commerce-common 模塊沒有使用其他模塊或者外部的Jar包,所以 commerce-common模塊的 build.gradle 文件不需要增加任何內容。
2.3.6 commerce-webapi 模塊
commerce-webapi 模塊是入口模塊,需要配置 spring boot。由於我們使用了Spring Boot的依賴註入功能,所以我們需要在入口類上加上註解指明要IOC要掃描的包範圍,如下
@ComponentScan(value = "hang.commerce") // 依賴註入掃描
commerce/commerce-webapi/src/main/java/hang/commerce/webapi/WebApiApplication.java
package hang.commerce.webapi;

import org.springframework.boot.SpringApplication;
import org.springframework.boot.autoconfigure.SpringBootApplication;
import org.springframework.context.annotation.ComponentScan;

/**
 * spring boot 應用入口
 */
@ComponentScan(value = "hang.commerce") // 依賴註入掃描
@SpringBootApplication
public class WebApiApplication {
    public static void main(String[] args){
        SpringApplication.run(WebApiApplication.class, args);
    }
}
我們將所有的API統一放到 controller 包中。
使用
@RestController
指明,這是 restfule api。
使用
@RequestMapping("api/home")
指明 API的前綴。
在 Controller中,需要使用到服務層的服務時,只需要寫如下代碼即可,Spring Boot IOC 會自動幫我們處理余下的事情。
@Autowired
private UserService userService;
controller的代碼如下:
commerce/commerce-webapi/src/main/java/hang/commerce/webapi/controller/HomeController.java
package hang.commerce.webapi.controller;

import hang.commerce.common.ApiResult;
import hang.commerce.common.ApiResultCode;
import hang.commerce.repo.User;
import hang.commerce.service.UserService;
import org.springframework.beans.factory.annotation.Autowired;
import org.springframework.web.bind.annotation.GetMapping;
import org.springframework.web.bind.annotation.RequestMapping;
import org.springframework.web.bind.annotation.RestController;

@RequestMapping("api/home")
@RestController
public class HomeController {

    @Autowired
    private UserService userService;

    @GetMapping("/")
    public ApiResult<User> get(){
        User user = userService.get();
        ApiResult<User> result = new ApiResult<>();
        result.setCode(ApiResultCode.OK);
        result.setMessage("獲取成功");
        result.setData(user);

        return result;
    }
}
在commerce-webapi模塊中的 build.gradle 和正常的Spring Boot程序配置無異,只是增加了對項目中其他模塊的引用
compile project(‘:commerce-common‘)
compile project(‘:commerce-util‘)
compile project(‘:commerce-repo‘)
compile project(‘:commerce-service‘)
最後,build.gradle 的配置如下
commerce/commerce-webapi/build.gradle
buildscript {
    ext {
        springBootVersion = ‘2.0.0.M5‘
    }
    repositories {
        mavenCentral()
        maven { url "https://repo.spring.io/snapshot" }
        maven { url "https://repo.spring.io/milestone" }
    }
    dependencies {
        classpath("org.springframework.boot:spring-boot-gradle-plugin:${springBootVersion}")
    }
}

group = ‘hang.commerce‘
version = ‘0.0.1‘
sourceCompatibility = 1.8

apply plugin: ‘java‘
apply plugin: ‘eclipse‘
apply plugin: ‘org.springframework.boot‘
apply plugin: ‘io.spring.dependency-management‘

repositories {
    mavenCentral()
    maven { url "https://repo.spring.io/snapshot" }
    maven { url "https://repo.spring.io/milestone" }
}

dependencies{
    compile project(‘:commerce-common‘)
    compile project(‘:commerce-util‘)
    compile project(‘:commerce-repo‘)
    compile project(‘:commerce-service‘)
    compile(‘org.springframework.boot:spring-boot-starter-web‘)
}
至此,整個項目的代碼和配置已經全部完成。
三、編譯運行
3.1 編譯
在 commerce 目錄中執行
gradle build
即可進行編譯。
3.2 運行
在 commerce 目錄中執行
gradle bootRun
即可運行整個項目。
四、gradle wrapper
如果別人的電腦上沒裝有gradle,那麽就無法編譯和運行我們的程序,為了解決這個問題,我們可以把gradle附帶到代碼中。
在 commerce 目錄中執行
gradle wrapper
之後,gradle會在目錄中加入
commerce
  +--gradlew
  +--gradlew.bat
  +--gradle
     +--wrapper
        +--gradle-wrapper.jar
        +--gradle-wrapper.properties
這樣,當別人拿到我們的代碼後,不需要安裝 gradle 程序,只需要把之前的命令“gradle”改成 “gradlew”就可以了,比如
gradlew build
當執行 “gradlew”命令時,會根據 gradle/wrapper/gradlw-wrapper.properties文件中的配置,到網上下載 gradle 程序,存放在 用戶目錄/.gradle/wrapper/dists/gradle-x.x.x-bin 目錄,比如
distributionUrl=https\://services.gradle.org/distributions/gradle-4.2.1-bin.zip
會到網上下載 gradle-4.2.1-bin.zip 存放到 用戶目錄/.gradle/wrapper/dists/gradle-4.2.1-bin/隨機字符串/gradle-4.2.1/
五、總結
1、在根目錄中加入 settings.gradle 的文本文件,文件內容寫明子模塊(子文件夾名),比如
include ‘commerce-util‘
include ‘commerce-common‘
include ‘commerce-repo‘
include ‘commerce-service‘
include ‘commerce-webapi‘
2、根目錄加入 build.gradle 的文本文件,作為項目和各個子模塊的通用配置。
3、每個子模塊都加入 build.gradle 的文本文件,作為子模塊的配置。
4、各個模塊間的引用通過在 dependencies{} 中加入 compile project(“:子模塊名”),比如:
dependencies{
    compile project(‘:commerce-common‘)
    compile project(‘:commerce-util‘)
    compile project(‘:commerce-repo‘)
    compile project(‘:commerce-service‘)
    compile(‘org.springframework.boot:spring-boot-starter-web‘)
}
六、附錄
源碼 https://github.com/jinghang/commerce/tree/master/0x02/commerce
用 Spring Boot 實現電商系統 Web API (二)創建多模塊項目
