django-rest-framework快速入門
前言:第一次接觸django-rest-framework是在實習的時候。當時也不懂,看到視圖用類方法寫的感覺很牛逼的樣子。因為官網是英文的,這對我的學習還是有一點的阻力的,所以當時也沒怎麽學。真是太賤了。其實官網有耐心,以我六級410(雖然也沒過)的能力,肯定也是能搞懂的阿。追其原因,還是當時自己太浮躁了。

Django rest framework介紹
Django REST framework is a powerful and flexible toolkit for building Web APIs.
Some reasons you might want to use REST framework:
- The Web browsable API is a huge usability win for your developers.
- Authentication policies including packages for OAuth1a and OAuth2.
- Serialization that supports both ORM and non-ORM data sources.
- Customizable all the way down - just use regular function-based views if you don‘t need the more powerful features.
- Extensive documentation, and great community support.
- Used and trusted by internationally recognised companies including Mozilla, Red Hat, Heroku, and Eventbrite.
中文:
Django REST framework 是用於構建Web API 的強大而靈活的工具包。
我們可能想使用REST框架的一些原因:
- Web瀏覽API對於開發人員來說是一個巨大的可用性。
- 認證策略包括OAuth1a和OAuth2的包。
- 支持ORM和非ORM數據源的序列化。
- 如果你不需要更強大的功能,就可以使用常規的基於功能的視圖。
- 廣泛的文檔和良好的社區支持。
- 包括Mozilla、Red Hat、Heroku和Eventbrite在內的國際知名公司使用和信任。
Funding
REST framework is a collaboratively(合作地) funded project(基金項目). If you use REST framework commercially we strongly encourage you to invest(投資) in its continued development(可持續發展) by signing up for a paid plan.(註冊付費計劃)
Every single sign-up helps us make REST framework long-term financially sustainable(財務上可持續發展)
- Rover.com
- Sentry
- Stream
- Machinalis
- Rollbar
Many thanks to all our wonderful sponsors(贊助商), and in particular to our premium backers(優質的支持者), Rover, Sentry, Stream, Machinalis, and Rollbar.
Requirements
REST framework requires the following:
- Python (2.7, 3.2, 3.3, 3.4, 3.5, 3.6)
- Django (1.10, 1.11, 2.0 alpha)
The following packages are optional:
- coreapi (1.32.0+) - Schema generation support.
- Markdown (2.1.0+) - Markdown support for the browsable API.
- django-filter (1.0.1+) - Filtering support.
- django-crispy-forms - Improved HTML display for filtering.
- django-guardian (1.1.1+) - Object level permissions support.
以下軟件包是可選的:
- coreapi(1.32.0+) - 支持模式生成。
- Markdown(2.1.0+) - 可瀏覽API的Markdown支持。
- django-filter(1.0.1+) - 過濾支持。
- django-crispy-forms - 改進的HTML顯示過濾。
- django-guardian(1.1.1+) - 對象級權限支持。
Installation
Install using pip, including any optional packages you want...
pip install djangorestframework
pip install markdown       # Markdown support for the browsable API.
pip install django-filter  # Filtering support
...or clone the project from github.
git clone [email protected]:encode/django-rest-framework.git
Add ‘rest_framework‘ to your INSTALLED_APPS setting.(記得在setting文件裏面添加rest_framework,當然,你還得先安裝djangorestframework)
INSTALLED_APPS = (
    ...
    ‘rest_framework‘,
)
If you‘re intending to use the browsable API you‘ll probably also want to add REST framework‘s login and logout views. Add the following to your root urls.py file.
如果您打算使用可瀏覽的API,您可能還需要添加REST框架的登錄和註銷視圖。將以下內容添加到您的根urls.py文件中。
urlpatterns = [
    ...
    url(r‘^api-auth/‘, include(‘rest_framework.urls‘, namespace=‘rest_framework‘))
]
Note that the URL path can be whatever you want, but you must include ‘rest_framework.urls‘ with the ‘rest_framework‘ namespace. You may leave out the namespace in Django 1.9+, and REST framework will set it for you.
請註意,URL路徑可以是任何你想要的,但你必須包括‘rest_framework.urls‘與‘rest_framework‘命名空間。您可以在Django 1.9+中省略命名空間,REST框架將為您設置。
Quickstart
Can‘t wait to get started? The quickstart guide is the fastest way to get up and running, and building APIs with REST framework.
說了一堆,直接來個demo,快速上手,看看效果。官網請看:http://www.django-rest-framework.org/tutorial/quickstart/
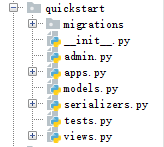
首先肯定得先創建django程序啦,接著創建APP,這裏我創建了一個quickstart的app。

Now sync your database for the first time:同步數據庫
python manage.py migrate
創建超級用戶用於登陸。We‘ll also create an initial user named admin with a password of password123. We‘ll authenticate as that user later in our example.
python manage.py createsuperuser
Serializers
首先我們要定義一些序列化程序。在quickstart這個APP下創建serializers文件,用於展示數據。
First up we‘re going to define some serializers. Let‘s create a new module named tutorial/quickstart/serializers.py that we‘ll use for our data representations.
from django.contrib.auth.models import User, Group
from rest_framework import serializers


class UserSerializer(serializers.HyperlinkedModelSerializer):
    class Meta:
        model = User
        fields = (‘url‘, ‘username‘, ‘email‘, ‘groups‘)


class GroupSerializer(serializers.HyperlinkedModelSerializer):
    class Meta:
        model = Group
        fields = (‘url‘, ‘name‘)
Notice that we‘re using hyperlinked relations in this case, with HyperlinkedModelSerializer. You can also use primary key and various other relationships, but hyperlinking is good RESTful design.
請註意,在這種情況下,我們正在使用超鏈接關系HyperlinkedModelSerializer。您還可以使用主鍵和各種其他關系,但超鏈接是好的RESTful設計。
Views
Right, we‘d better write some views then. Open tutorial/quickstart/views.py and get typing. 寫一些視圖,查詢數據。
from django.contrib.auth.models import User, Group
from rest_framework import viewsets
from tutorial.quickstart.serializers import UserSerializer, GroupSerializer


class UserViewSet(viewsets.ModelViewSet):
    """
    API endpoint that allows users to be viewed or edited.
    """
    queryset = User.objects.all().order_by(‘-date_joined‘)
    serializer_class = UserSerializer


class GroupViewSet(viewsets.ModelViewSet):
    """
    API endpoint that allows groups to be viewed or edited.
    """
    queryset = Group.objects.all()
    serializer_class = GroupSerializer
Rather than write multiple views we‘re grouping together all the common behavior into classes called ViewSets.
We can easily break these down into individual views if we need to, but using viewsets keeps the view logic nicely organized as well as being very concise.
我們不是編寫多個視圖,而是將所有常見的行為組合到一個名為viewset的類中。
如果需要的話,我們可以很容易地將它們分解為單獨的視圖,但是使用viewset使視圖邏輯組織得很好,並且非常簡潔。
URLs
Okay, now let‘s wire up the API URLs. On to tutorial/urls.py...
from django.conf.urls import url, include
from rest_framework import routers
from tutorial.quickstart import views


router = routers.DefaultRouter()
router.register(r‘users‘, views.UserViewSet)
router.register(r‘groups‘, views.GroupViewSet)

# Wire up our API using automatic URL routing.
# Additionally, we include login URLs for the browsable API.
urlpatterns = [
    url(r‘^‘, include(router.urls)),
    url(r‘^api-auth/‘, include(‘rest_framework.urls‘, namespace=‘rest_framework‘))
]
Because we‘re using viewsets instead of views, we can automatically generate the URL conf for our API, by simply registering the viewsets with a router class.
我們可以通過簡單地使用路由器類註冊該視圖來自動生成API的URL conf。
Again, if we need more control over the API URLs we can simply drop down to using regular class-based views, and writing the URL conf explicitly.
再次,如果我們需要對API URL的更多控制,我們可以簡單地將其下拉到使用常規的基於類的視圖,並明確地編寫URL conf。
Finally, we‘re including default login and logout views for use with the browsable API. That‘s optional, but useful if your API requires authentication and you want to use the browsable API.
最後,我們將包括默認登錄和註銷視圖,以便與可瀏覽的API一起使用。這是可選的,但如果您的API需要身份驗證,並且您想要使用可瀏覽的API,那麽這是非常有用的。
Settings
We‘d also like to set a few global settings. We‘d like to turn on pagination, and we want our API to only be accessible to admin users. The settings module will be in tutorial/settings.py
我們也想設置一些全局設置。我們想打開分頁,我們希望我們的API只能由管理員使用
INSTALLED_APPS = (
    ...
    ‘rest_framework‘,
)

REST_FRAMEWORK = {
    ‘DEFAULT_PERMISSION_CLASSES‘: [
        ‘rest_framework.permissions.IsAdminUser‘,
    ],
    ‘PAGE_SIZE‘: 10
}
Okay, we‘re done.
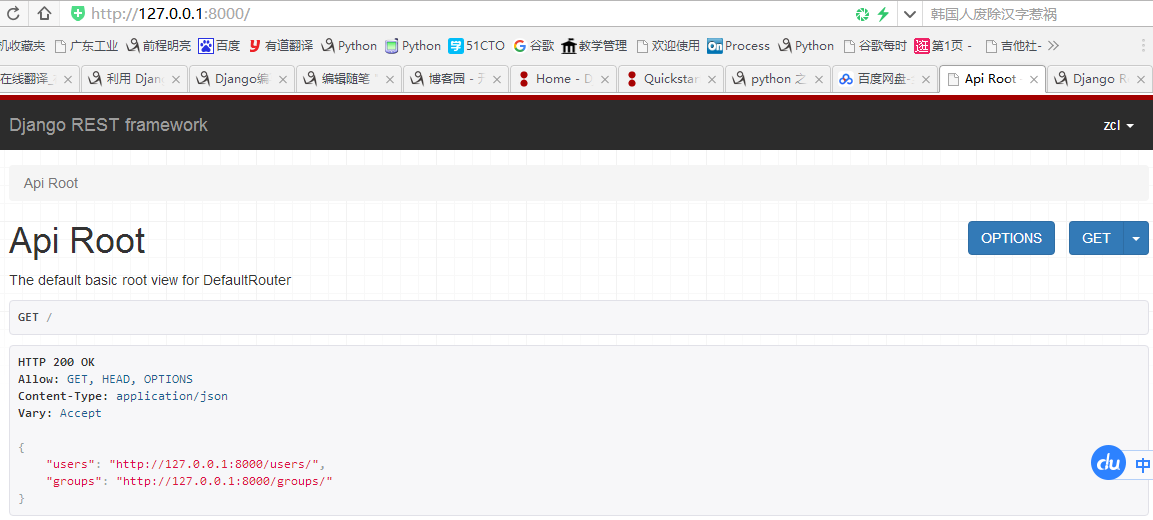
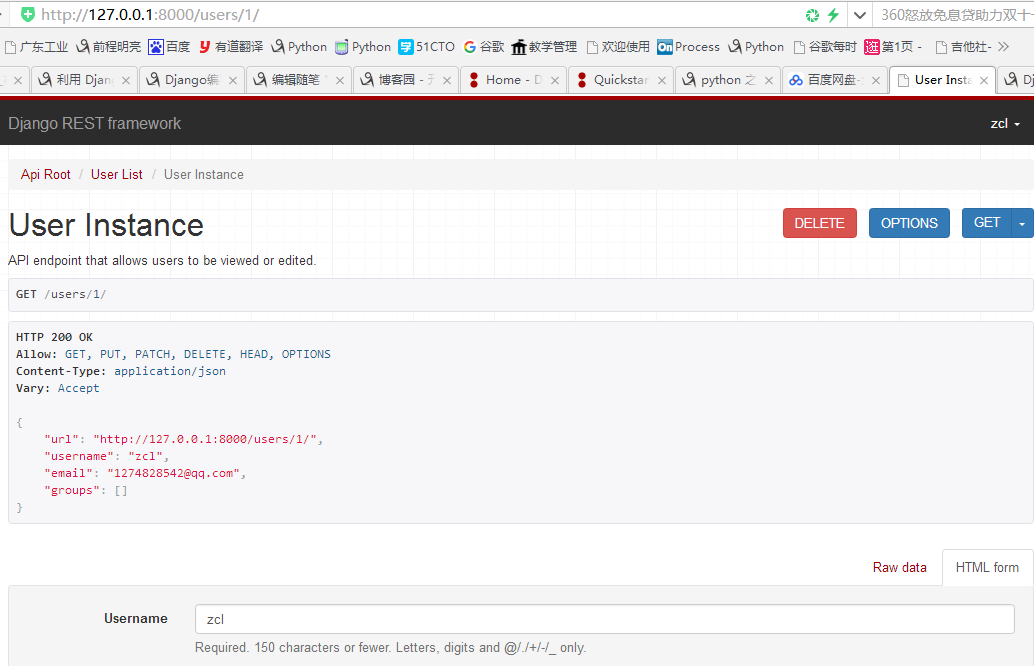
效果圖:
主界面,好像啥也沒有……

用超級用戶登陸後的界面。

有增刪改查的功能。

快速了解REST framework組件
接下來了解下rest framework 的所有組件,並且得知它們是如何組合在一起的,這是非常值得去學習的。
- 1 - Serialization 序列化
- 2 - Requests & Responses 請求 & 響應
- 3 - Class-based views 基於類的視圖
- 4 - Authentication & permissions 身份驗證 & 權限
- 5 - Relationships & hyperlinked APIs 這個貌似還沒用過,暫時留著吧,哈哈~
- 6 - Viewsets & routers 視圖和路由
- 7 - Schemas & client libraries 模式和客戶端庫(虛位以待~)
Serialization 序列化
這裏呢,不對普通的序列化作介紹。接下來我們使用下 ModelSerializers model序列化讓我們寫的代碼更少,更簡介。Django提供了form和modelform一樣,REST框架包括了序列化器類和模型序列化器類。
例如 models 文件中有一個關於文章的表:
class Article(models.Model):
    """文章資訊"""
    title = models.CharField(max_length=255, unique=True, db_index=True, verbose_name="標題")
    source = models.ForeignKey("ArticleSource", verbose_name="來源")
    article_type_choices = ((0, ‘資訊‘), (1, ‘視頻‘))
    article_type = models.SmallIntegerField(choices=article_type_choices, default=0)
    brief = models.TextField(max_length=512, verbose_name="摘要")
    head_img = models.CharField(max_length=255)
    content = models.TextField(verbose_name="文章正文")
    pub_date = models.DateTimeField(verbose_name="上架日期")
    offline_date = models.DateTimeField(verbose_name="下架日期")
    status_choices = ((0, ‘在線‘), (1, ‘下線‘))
    status = models.SmallIntegerField(choices=status_choices, default=0, verbose_name="狀態")
    order = models.SmallIntegerField(default=0, verbose_name="權重", help_text="文章想置頂,可以把數字調大")
    comment_num = models.SmallIntegerField(default=0, verbose_name="評論數")
    agree_num = models.SmallIntegerField(default=0, verbose_name="點贊數")
    view_num = models.SmallIntegerField(default=0, verbose_name="觀看數")
    collect_num = models.SmallIntegerField(default=0, verbose_name="收藏數")

    tags = models.ManyToManyField("Tags", blank=True, verbose_name="標簽")
    date = models.DateTimeField(auto_now_add=True, verbose_name="創建日期")

    def __str__(self):
        return "%s-%s" % (self.source, self.title)
接下來,只需要寫一個序列化器,便可以輕松對數據的進行獲取,而且代碼看起來特別簡潔。
# 在 serilallzer.py 文件可以這樣寫
# 如果想使用哪個model進行序列化,照此類推即可
# fields 如果想要獲取所有字段, 使用"__all__"
# fields 如果只是想要獲取一部分數據呢, 那麽在 fields 中加入所序列化的model的字段即可

from rest_framework.serializers import ModelSerializer


class ArticleSerializer(ModelSerializer):
    class Meta:
        model = models.Article
        fields = ("id", "title", "article_type", "content", ) or "__all__"
這樣算剛開始入門了吧,接下來會更深入的學習。
django-rest-framework快速入門
