ImageSharp一個專註於NetCore平臺圖像處理的開源項目
今天大家分享的是一個專註於NetCore平臺圖像處理的開源項目,老實說為這篇文章取名字想了5分鐘,可能是詞窮亦或是想更好的表達出這款開源項目的作用;這個項目在圖像處理方面有很多功能,如:縮放,裁剪,繪畫,組合圖片等;今天主要講的是用她怎麽來繪圖和生成驗證碼的實際例子。
- 簡單介紹ImageSharp
- 試試畫兩條線(實線和虛線)
- 生成個縮略圖
- 在圖片上畫字
- 制作一個驗證碼圖片
- 結合RazorPage模板,展示驗證碼圖片
簡單介紹ImageSharp
ImageSharp是對NetCore平臺擴展的一個圖像處理方案,在寫下本文為止它最新的nuget下載量為4,034次,作者團隊最近一個月剛更新的包;沒錯這裏說最新是因為她前身和之前的版本都很受歡迎下載量也超高;她的git項目地址:https://github.com/SixLabors/ImageSharp。如果您的項目和我一樣是2.0版本(2.0以前的略過),那麽直接可以通過vs的nuget控制臺下載對應的包,註意繪圖的話需要分別下載如下兩個包:
Install-Package SixLabors.ImageSharp -Version 1.0.0-beta0001
Install-Package SixLabors.ImageSharp.Drawing -Version 1.0.0-beta0001
ImageSharp用法有朋友之前寫過,不過都主要針對於之前的版本,本章主要用到的都是最新的,有部分寫法可能不相同。
試試畫兩條線(實線和虛線)
這裏將用她來畫兩條直線並保存成圖片,主要起到一個介紹作用,先來看實線如下代碼:

var path = @"D:\F\學習\vs2017\netcore\Study.AspNetCore\WebApp02-1\wwwroot\images";
            //默認實線
            using (Image<Rgba32> image = new Image<Rgba32>(500, 500))   //畫布大小
            {
                image.Mutate(x => x.
                        BackgroundColor(Rgba32.WhiteSmoke).   //畫布背景
                            DrawLines(
                            Rgba32.HotPink, //字體顏色
                            5,   //字體大小
                            new SixLabors.Primitives.PointF[]{
                                    new Vector2(10, 10),
                                    new Vector2(200, 150),
                                    new Vector2(50, 300)
                            } //兩點一線坐標
                        )
                    );

                image.Save($"{path}/1.png"); //保存
            }
總要步驟我都備註上文字了,這裏主要通過兩點一線來繪制圖形,Vector2對象值得註意就是C#二維坐標(x,y)對象,其實除了Vector2還有Vector3(三維坐標)等,這對於做u3d的朋友來說不會陌生,老實說這個也是我在接觸u3d時候才知道有這個類的。下面來看效果圖:

由兩個兩點一線構造的一個角,下面來看下虛線繪制:

//虛線
            using (Image<Rgba32> image = new Image<Rgba32>(500, 500))   //畫布大小
            {
                image.Mutate(x => x.
                        BackgroundColor(Rgba32.WhiteSmoke).   //畫布背景
                            DrawLines(
                            Pens.Dash(Rgba32.HotPink, 5),   //字體大小
                            new SixLabors.Primitives.PointF[]{
                                    new Vector2(10, 10),
                                    new Vector2(200, 150),
                                    new Vector2(50, 300)
                            } //兩點一線坐標
                        )
                    );

                image.Save($"{path}/2.png"); //保存
            }
步驟都差不多,只是調用了DrawLines的擴展方法而已,其他線條例子就不多說了各位自行實驗。

生成個縮略圖和在圖片上畫字
對於圖片類型的網站來說縮略圖是常見的,這裏用ImageSharp生成縮略圖很簡單,本實例用8.png做樣本來生成縮略圖8-1.png,直接看例子如下是netstandard 1.3+的例子:

 //縮略圖
            using (Image<Rgba32> image = Image.Load($"{path}/8.png"))
            {
                image.Mutate(x => x
                     .Resize(image.Width / 2, image.Height / 2)
                     );
                image.Save($"{path}/8-1.png");
            }

為了更好的對比縮略圖和原圖的區別這裏對接拿兩圖的屬性做對比如:

能很好的看出縮略圖文件大小和像素都減半了,實際縮略的時候不一定減半,這全由參數控制Resize(width,height);
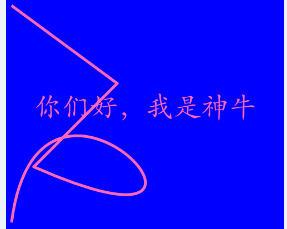
畫字:在圖片上畫我們想要的字,其實類似於水印的一種需求,下面是在圖片上畫字的代碼:

//畫字
            var install_Family = new FontCollection().Install(
                System.IO.Path.Combine(Directory.GetCurrentDirectory(), "wwwroot/bak", "STKAITI.TTF")
                //@"C:\Windows\Fonts\STKAITI.TTF"   //字體文件
                );
            var font = new Font(install_Family, 50);  //字體
            using (Image<Rgba32> image = Image.Load($"{path}/8.png"))
            {
                image.Mutate(x => x
                     .DrawText(
                        "你們好,我是神牛",   //文字內容
                         font,
                         Rgba32.HotPink,
                         new Vector2(50, 150),
                         TextGraphicsOptions.Default)
                     );
                image.Save($"{path}/8-2.png");
            }

這裏用ImageSharp在圖片上畫字的時候需要註意:字體,因為windows系統自帶了字體問題這裏以STKAITI.TTF字體文件為例,它存儲於 C:\Windows\Fonts\STKAITI.TTF 目錄,當然您可以直接把它拷貝到我們項目中如下我這裏的例子一樣做法(這裏只測試了windows下可用,尚未測試linux下直接使用該字體文件是否可行);

制作一個驗證碼圖片
下面我們將用她來畫一個驗證碼類型的圖片,通常驗證碼都有一些點和線來幹擾,上面已經有畫線例子了,這裏展示怎麽畫點:

//畫點(規則的點,其他的各位自行寫算法)
            var dianWith = 1; //點寬度
            var xx = 300;  //圖片寬度
            var yy = 200;  //圖片高度

            var xx_space = 10;  //點與點之間x坐標間隔
            var yy_space = 5;    //y坐標間隔

            var listPath = new List<IPath>();
            for (int i = 0; i < xx / xx_space; i++)
            {
                for (int j = 0; j < yy / yy_space; j++)
                {
                    var position = new Vector2(i * xx_space, j * yy_space);
                    var linerLine = new LinearLineSegment(position, position);
                    var shapesPath = new SixLabors.Shapes.Path(linerLine);
                    listPath.Add(shapesPath);
                }
            }

            using (Image<Rgba32> image = new Image<Rgba32>(xx, yy))   //畫布大小
            {
                image.Mutate(x => x.
                        BackgroundColor(Rgba32.WhiteSmoke).   //畫布背景
                            Draw(
                            Pens.Dot(Rgba32.HotPink, dianWith),   //大小
                            new SixLabors.Shapes.PathCollection(listPath)  //坐標集合
                        )
                    );
                image.Save($"{path}/9.png"); //保存
            }

這裏直接利用IImageProcessingContext<TPixel>擴展方法Draw來繪制有規則的點,如圖所示:

比較單調,或許您們能做的更好看些;下面來做驗證碼圖片,主要由:畫點+畫字=驗證碼圖片,這裏我封裝了一個方法直接生成驗證碼圖片:

/// <summary>
        /// 畫點+畫字=驗證碼圖片
        /// </summary>
        /// <param name="content">驗證碼</param>
        /// <param name="outImgPath">輸出圖片路徑</param>
        /// <param name="fontFilePath">字體文件</param>
        /// <param name="x">圖片寬度</param>
        /// <param name="y">圖片高度</param>
        public void GetValidCode(
                    string content = "我是神牛",
                    string outImgPath = "D:/F/學習/vs2017/netcore/Study.AspNetCore/WebApp02-1/wwwroot/images/10.png",
                    string fontFilePath = @"D:\F\學習\vs2017\netcore\Study.AspNetCore\WebApp02-1\wwwroot\bak\STKAITI.TTF",
                    int xx = 150, int yy = 25)
        {
            var dianWith = 1; //點寬度
            var xx_space = 10;  //點與點之間x坐標間隔
            var yy_space = 5;    //y坐標間隔
            var wenZiLen = content.Length;  //文字長度
            var maxX = xx / wenZiLen; //每個文字最大x寬度
            var prevWenZiX = 0; //前面一個文字的x坐標
            var size = 16;//字體大小

            //字體
            var install_Family = new FontCollection().Install(
              fontFilePath
              //@"C:\Windows\Fonts\STKAITI.TTF"   //windows系統下字體文件
              );
            var font = new Font(install_Family, size);  //字體

            //點坐標
            var listPath = new List<IPath>();
            for (int i = 0; i < xx / xx_space; i++)
            {
                for (int j = 0; j < yy / yy_space; j++)
                {
                    var position = new Vector2(i * xx_space, j * yy_space);
                    var linerLine = new LinearLineSegment(position, position);
                    var shapesPath = new SixLabors.Shapes.Path(linerLine);
                    listPath.Add(shapesPath);
                }
            }

            //畫圖
            using (Image<Rgba32> image = new Image<Rgba32>(xx, yy))   //畫布大小
            {
                image.Mutate(x =>
                {
                    //畫點
                    var imgProc = x.BackgroundColor(Rgba32.WhiteSmoke).   //畫布背景
                              Draw(
                              Pens.Dot(Rgba32.HotPink, dianWith),   //大小
                              new SixLabors.Shapes.PathCollection(listPath)  //坐標集合
                          );

                    //逐個畫字
                    for (int i = 0; i < wenZiLen; i++)
                    {
                        //當前的要輸出的字
                        var nowWenZi = content.Substring(i, 1);

                        //文字坐標
                        var wenXY = new Vector2();
                        var maxXX = prevWenZiX + (maxX - size);
                        wenXY.X = new Random().Next(prevWenZiX, maxXX);
                        wenXY.Y = new Random().Next(0, yy - size);

                        prevWenZiX = Convert.ToInt32(Math.Floor(wenXY.X)) + size;

                        //畫字
                        imgProc.DrawText(
                           nowWenZi,   //文字內容
                           font,
                           i % 2 > 0 ? Rgba32.HotPink : Rgba32.Red,
                           wenXY,
                           TextGraphicsOptions.Default);
                    }
                });
                //保存到圖片
                image.Save(outImgPath);
            }
        }

通過簡單的調用 GetValidCode("我是神牛");return Page(); 能得到如圖驗證碼圖片的效果:

文字看起來好像在點的前面,不過沒關系只需要把畫點和畫字的先後順序修改下就行了,這裏不貼圖了;
結合RazorPage模板,展示驗證碼圖片
上面一節是生成了驗證碼圖片,當然實際場景中我們是不需要生成驗證碼物理圖片的,只需要返回一個流或base64等方式輸出到web界面上就行了,我們可以來看看 Image<TPixel> 保存時候的擴展方法:
 View Code
好吧有點多,我們只需要明白她能轉base64,stream,保存為圖片等就行了;這裏我們將用到 SaveAsPng(Stream) 方法,然後獲取他的byte[],如下代碼:

/// <summary>
        /// 畫點+畫字=驗證碼byte[]
        /// </summary>
        /// <param name="content">驗證碼</param>
        /// <param name="outImgPath">輸出圖片路徑</param>
        /// <param name="fontFilePath">字體文件</param>
        /// <param name="x">圖片寬度</param>
        /// <param name="y">圖片高度</param>
        public byte[] GetValidCodeByte(
                    string content = "我是神牛",
                    string fontFilePath = @"D:\F\學習\vs2017\netcore\Study.AspNetCore\WebApp02-1\wwwroot\bak\STKAITI.TTF",
                    int xx = 150, int yy = 25)
        {
            var bb = default(byte[]);
            try
            {
                var dianWith = 1; //點寬度
                var xx_space = 10;  //點與點之間x坐標間隔
                var yy_space = 5;    //y坐標間隔
                var wenZiLen = content.Length;  //文字長度
                var maxX = xx / wenZiLen; //每個文字最大x寬度
                var prevWenZiX = 0; //前面一個文字的x坐標
                var size = 16;//字體大小

                //字體
                var install_Family = new FontCollection().Install(
                  fontFilePath
                  //@"C:\Windows\Fonts\STKAITI.TTF"   //windows系統下字體文件
                  );
                var font = new Font(install_Family, size);  //字體

                //點坐標
                var listPath = new List<IPath>();
                for (int i = 0; i < xx / xx_space; i++)
                {
                    for (int j = 0; j < yy / yy_space; j++)
                    {
                        var position = new Vector2(i * xx_space, j * yy_space);
                        var linerLine = new LinearLineSegment(position, position);
                        var shapesPath = new SixLabors.Shapes.Path(linerLine);
                        listPath.Add(shapesPath);
                    }
                }

                //畫圖
                using (Image<Rgba32> image = new Image<Rgba32>(xx, yy))   //畫布大小
                {
                    image.Mutate(x =>
                    {
                        var imgProc = x;

                        //逐個畫字
                        for (int i = 0; i < wenZiLen; i++)
                        {
                            //當前的要輸出的字
                            var nowWenZi = content.Substring(i, 1);

                            //文字坐標
                            var wenXY = new Vector2();
                            var maxXX = prevWenZiX + (maxX - size);
                            wenXY.X = new Random().Next(prevWenZiX, maxXX);
                            wenXY.Y = new Random().Next(0, yy - size);

                            prevWenZiX = Convert.ToInt32(Math.Floor(wenXY.X)) + size;

                            //畫字
                            imgProc.DrawText(
                                   nowWenZi,   //文字內容
                                   font,
                                   i % 2 > 0 ? Rgba32.HotPink : Rgba32.Red,
                                   wenXY,
                                   TextGraphicsOptions.Default);
                        }

                        //畫點
                        imgProc.BackgroundColor(Rgba32.WhiteSmoke).   //畫布背景
                                     Draw(
                                     Pens.Dot(Rgba32.HotPink, dianWith),   //大小
                                     new SixLabors.Shapes.PathCollection(listPath)  //坐標集合
                                 );
                    });
                    using (MemoryStream stream = new MemoryStream())
                    {
                        image.SaveAsPng(stream);
                        bb = stream.GetBuffer();
                    }
                }
            }
            catch (Exception ex)
            {
            }
            return bb;
        }

該方法返回了一個byte[]數組,然後通過HttpGet方式請求Razor接口,前端就能夠獲取到這個驗證碼圖片byte[]了;

/// <summary>
        /// Get獲取驗證碼圖片byte[]
        /// </summary>
        /// <returns></returns>
        public FileResult OnGetValidCode()
        {
            var codebb = GetValidCodeByte(DateTime.Now.ToString("mmssfff"));
            return File(codebb, "image/png");
        }

我們通過get請求獲取驗證碼: http://localhost:1120/login?handler=ValidCode ,然後得到如圖效果:

本篇內容到此就結束了,如果對您有好的幫助,不妨點個“贊”;一起努力推動NetCore發展吧,謝謝。
本文轉自:http://www.cnblogs.com/wangrudong003/p/7656842.html
ImageSharp一個專註於NetCore平臺圖像處理的開源項目
