
S3C2440串口的基本使用
阿新 • • 發佈:2017-11-05
mod start pin tex 說明 bit signed logs --
2440A有三個串口,我們使用串口0對它進行了解熟悉。
首先肯定是應該找到手冊上串口0所對應的引腳,然後配置相應寄存器。
串口0對應GPIO H的 2,3

串口在單片機中我們已經有很多使用經驗了,對於協議采用 8-N-1,8bit數據位,無校驗,1停止位。
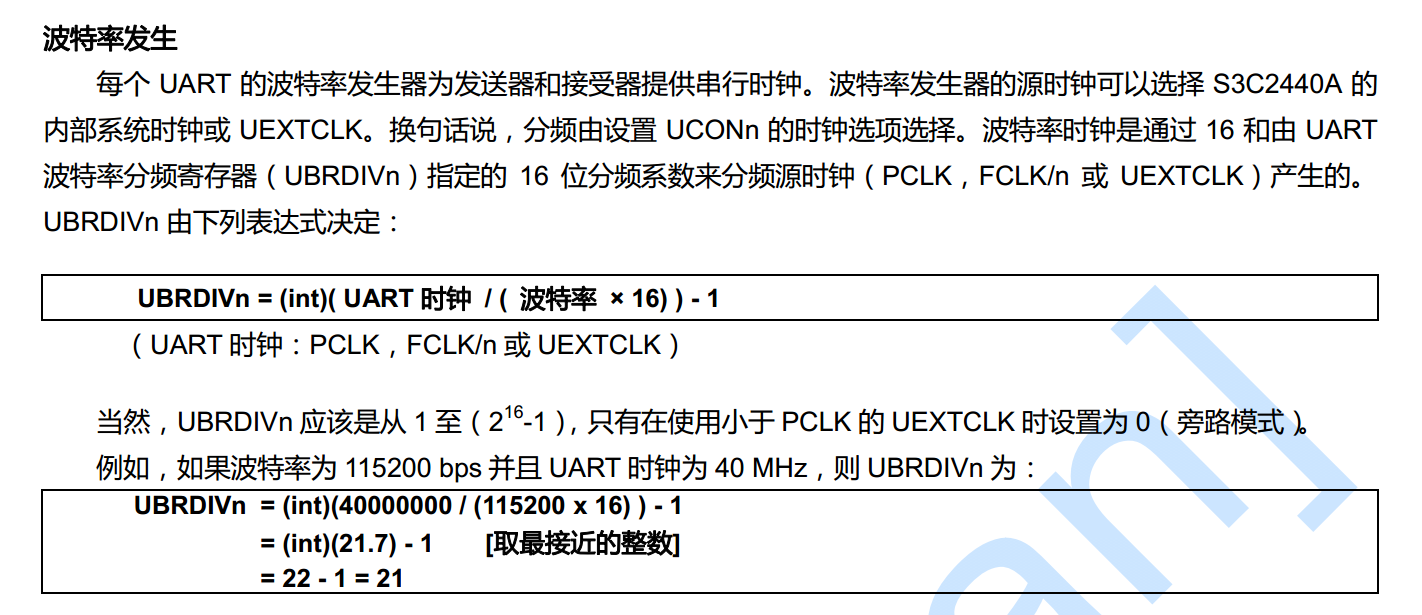
說明波特率的計算方式:

把串口對應IO配置成 TX和RX功能之後,我們需要對指定寄存器進行讀寫操作,實現串口的接發。
具體的寄存器就不貼出來了。手冊上都有,這裏不使用FIFO和中斷方式,只是最基本的接發操作。
main.c:
#include "s3c2440_gpio.h" #include "s3c2440_soc.h" #include"uart.h" void SystemInit(void) { //配置LOCKTIME(0x4C000000) = 0xFFFFFFFF *(volatile unsigned int *)0x4C000000=0xFFFFFFFF; //CLKDIVN(0x4C000014) = 0X5, tFCLK:tHCLK:tPCLK = 1:4:8 *(volatile unsigned int *)0x4C000014=0x5; //協處理指令 __asm__( "mrc p15, 0, r1, c1, c0, 0\n" /* 讀出控制寄存器 */ "orr r1, r1, #0xc0000000\n" /* 設置為“asynchronous bus mode” */ "mcr p15, 0, r1, c1, c0, 0\n" /* 寫入控制寄存器 */ ); /* 設置MPLLCON(0x4C000004) = (92<<12)|(1<<4)|(1<<0) * m = MDIV+8 = 92+8=100 * p = PDIV+2 = 1+2 = 3 * s = SDIV = 1 * FCLK = 2*m*Fin/(p*2^s) = 2*100*12/(3*2^1)=400M */*(volatile unsigned int *)0x4C000004=(92<<12)|(1<<4)|(1<<0); } void Delay(uint32_t count) { while(count--); } int main(void) { //配置GPIOF 0,2,GPIOG 3為輸入模式 Set_gpio(IN, GPIOF,GPIO_PinSource0); Set_gpio(IN, GPIOF,GPIO_PinSource2); Set_gpio(IN, GPIOG,GPIO_PinSource3); //點亮LED1然後熄滅 Reset_gpio(OUT, GPIOF,GPIO_PinSource4); Delay(100000); Set_gpio(OUT, GPIOF,GPIO_PinSource4); Delay(100000); //點亮LED2然後熄滅 Reset_gpio(OUT, GPIOF,GPIO_PinSource5); Delay(100000); Set_gpio(OUT, GPIOF,GPIO_PinSource5); Delay(100000); //點亮LED3然後熄滅 Reset_gpio(OUT, GPIOF,GPIO_PinSource6); Delay(100000); Set_gpio(OUT, GPIOF,GPIO_PinSource6); Delay(100000); //熄滅三盞LED燈 Set_gpio(OUT, GPIOF,GPIO_PinSource5); Set_gpio(OUT, GPIOF,GPIO_PinSource4); unsigned char c; uart_init(); puts("Hello, world!\n\r"); while (1) { while(1) { c = getchar(); if (c == ‘\r‘) { putchar(‘\n‘); } if (c == ‘\n‘) { putchar(‘\r‘); } putchar(c); } } return 0; }
uart.c:
#include "uart.h"
#include "s3c2440_soc.h"
#define PCLK            50000000    // PCLK為50MHz
#define UART_CLK        PCLK        //  UART0的時鐘源設為PCLK
#define UART_BAUD_RATE  115200      // 波特率
#define UART_BRD        ((int)(UART_CLK  / (UART_BAUD_RATE * 16.0)+0.5) - 1)
#define NULL 0
void uart_init(void)
{
    /* GPH2,3用於TxD0, RxD0 */
    //清除GPHCON
    GPHCON &= ~((3<<4) | (3<<6));
    //設置2,3為發送接收
    GPHCON |= ((2<<4) | (2<<6));
    //使能內部上拉
    GPHUP &= ~((1<<2) | (1<<3));
    ULCON0  = 0x03;     // 8N1(8個數據位,無校驗,1個停止位)
    UCON0   = 0x05;     // 中斷/查詢模式,UART時鐘源為PCLK
    UFCON0  = 0x00;     // 不使用FIFO
    UMCON0  = 0x00;     // 不使用流控
    UBRDIV0 = UART_BRD; // 波特率為115200

}

int putchar(int c)
{
    /* UTRSTAT0 */
    /* UTXH0 */
    /*發送是向寄存器寫數據*/
    while (!(UTRSTAT0 & (1<<2)));
    UTXH0 = (unsigned char)c;
    return 0;

}

int getchar(void)
{
//接收是在寄存器中讀數據
    while (!(UTRSTAT0 & (1<<0)));
    return URXH0;
}

int puts(const char *s)
{
    if(s!=NULL)
    {
        while (*s)
        {
            putchar(*s);
            s++;
        }
    }
    return 0;
}
配置串口,要註意波特率,還有是否有緩存,實際應用中,FIFO是不可缺少的,這裏只是入門簡單實現。
啟動文件和之前的時鐘章節一樣,
Makefile:
all:
    arm-linux-gcc -c -g -o s3c2440_gpio.o s3c2440_gpio.c
    arm-linux-gcc -c -g -o uart.o uart.c
    arm-linux-gcc -c -g -o main.o main.c
    arm-linux-gcc -c -g -o start.o start.S
    arm-linux-ld -Ttext 0 start.o main.o s3c2440_gpio.o uart.o -o uart.elf
    arm-linux-objcopy -O binary -S uart.elf uart.bin
    arm-linux-objdump -S -D uart.elf > uart.dis
clean:
    rm *.bin *.o *.elf *.dis
NOTE:
在此之後,還是不去編寫庫函數了,太過於消耗時間,使用寄存器配置的方式,如果工作中需要長期使用某個cpu或mcu時,再去編寫對應的庫函數,因為時間實在不夠。
S3C2440串口的基本使用