FragmentTabHostTopDemo【FragmentTabHost固定寬度且居中】
版權聲明:本文為博主原創文章,未經博主允許不得轉載。
前言
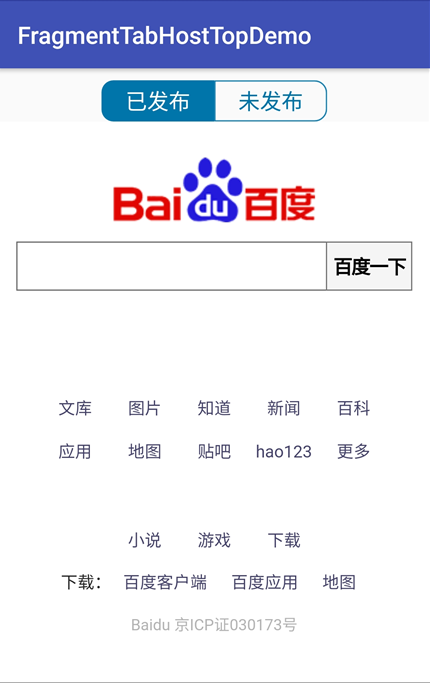
使用FragmentTabHost實現頂部選項卡(居中且寬度非全屏)展現。
備註:該Demo主要是演示FragmentTabHost的一些設置和部分功能,實際中需要參考其他Demo。
效果圖

代碼分析
1、該Demo中采用的是FragmentTabHost的布局方案之一【命名為常規布局寫法】;
2、未使用自定義的FragmentTabHost;【建議使用自定義的FragmentTabHost,見《FragmentTabHostUnderLineDemo【FragmentTabHost帶下劃線】》】
3、演示更新文字顏色和背景;
4、切換回來後無法保持打開的網頁,始終實現網址的首頁。原因是FragmentTabHost切換時執行的是attach/detach,而不是show/hide。而atach觸發的執行順序:
attach()->onCreateView()->onActivityCreated()->onStart()->onResume()
而Demo中將webview.loadUrl()執行放到了onActivityCreated()方法中了。
解決方案:建議采用自定義的FragmentTabHost。
使用步驟
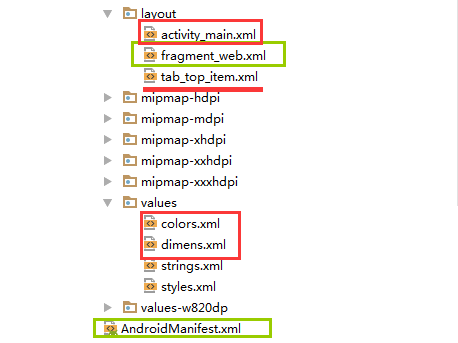
一、項目組織結構圖


註意事項:
1、 導入類文件後需要change包名以及重新import R文件路徑
2、 Values目錄下的文件(strings.xml、dimens.xml、colors.xml等),如果項目中存在,則復制裏面的內容,不要整個覆蓋
二、導入步驟
將選項卡子項布局文件tab_top_item.xml文件復制到項目中

<?xml version="1.0" encoding="utf-8"?> <!-- 頂部選項卡布局 --> <RelativeLayout xmlns:android="http://schemas.android.com/apk/res/android" android:layout_width="match_parent"tab_top_itemandroid:layout_height="wrap_content" android:background="@color/tab_bg_normal_top" android:gravity="center" > <!-- android:checkMark="?android:attr/listChoiceIndicatorMultiple"代表多選 android:checkMark="?android:attr/listChoiceIndicatorSingle" 代表單選 該屬性不添加的話,不會顯示方框或者圓點 --> <!-- android:drawableTop的屬性值使用drawable目錄下的selector選擇器 --> <!-- android:tag="tag1"用於checkedTextview的索引 --> <!-- 選項卡的內容(圖片+文字)類似RadioButton --> <!--android:textAlignment="center" 文本居中--> <CheckedTextView android:id="@+id/toptab_checkedTextView" android:tag="tag1" android:layout_width="wrap_content" android:layout_height="wrap_content" android:gravity="center" android:text="" android:textSize="@dimen/tab_larger_text_size" android:textColor="@color/tab_text_normal_top" android:paddingTop="5dp" android:paddingBottom="5dp" android:paddingLeft="20dp" android:paddingRight="20dp" android:textAlignment="center"/> </RelativeLayout>
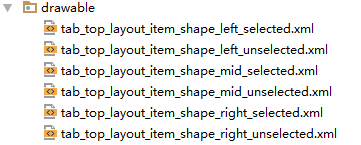
將selector文件復制到項目中【後續可根據實際情況更換】

在colors.xml文件中添加以下代碼:【後續可根據實際情況更改背景顏色、文字顏色值】
<?xml version="1.0" encoding="utf-8"?>
<resources>
    <color name="colorPrimary">#3F51B5</color>
    <color name="colorPrimaryDark">#303F9F</color>
    <color name="colorAccent">#FF4081</color>

    <!-- *********************************頂部選項卡區域********************************* -->
    <!-- 頂部選項卡底部背景色 -->
    <color name="tab_bg_normal_top">#00ffffff</color>
    <color name="tab_bg_selected_top">#0075AA</color>
    <!-- 頂部選項卡文本顏色 -->
    <color name="tab_text_normal_top">#0075AA</color>
    <color name="tab_text_selected_top">#ffffff</color>

</resources>
在dimens.xml文件中添加以下代碼:【後續可根據實際情況更改底部選項卡區域的高度值、文字大小值】
<resources>
    <!-- Default screen margins, per the Android Design guidelines. -->
    <dimen name="activity_horizontal_margin">16dp</dimen>
    <dimen name="activity_vertical_margin">16dp</dimen>

    <!-- *********************************頂部選項卡區域********************************* -->
    <!-- 頂部選項卡文本大小 -->
    <dimen name="tab_text_size">14sp</dimen>
    <dimen name="tab_medium_text_size">16sp</dimen>
    <dimen name="tab_larger_text_size">18sp</dimen>
    <dimen name="tab_larger_small_text_size">20sp</dimen>
</resources>
至此,選項卡子項的布局所需的文件已集成到項目中了。
在AndroidManifest.xml文件中添加網絡請求的權限【demo中用到的】
<?xml version="1.0" encoding="utf-8"?>
<manifest xmlns:android="http://schemas.android.com/apk/res/android"
          package="com.why.project.fragmenttabhosttopdemo">

    <!-- ======================授權訪問網絡(HttpUtil)========================== -->
    <!-- 允許程序打開網絡套接字 -->
    <uses-permission android:name="android.permission.INTERNET"/>

    <application
        android:allowBackup="true"
        android:icon="@mipmap/ic_launcher"
        android:label="@string/app_name"
        android:supportsRtl="true"
        android:theme="@style/AppTheme">
        <activity android:name=".MainActivity">
            <intent-filter>
                <action android:name="android.intent.action.MAIN"/>

                <category android:name="android.intent.category.LAUNCHER"/>
            </intent-filter>
        </activity>
    </application>

</manifest>
三、使用方法
在Activity布局文件中引用FragmentTabHost【註意:TabWidget的android:layout_width="wrap_content"】
<?xml version="1.0" encoding="utf-8"?>
<!-- 頂部選項卡區域 -->
<android.support.v4.app.FragmentTabHost
    xmlns:android="http://schemas.android.com/apk/res/android"
    android:id="@+id/tab_top_ftabhost_layout"
    android:layout_width="match_parent"
    android:layout_height="match_parent"
    >

    <!-- 必須要有LinearLayout,因為FragmentTabHost屬於FrameLayout幀布局 -->
    <LinearLayout
        android:layout_width="match_parent"
        android:layout_height="match_parent"
        android:orientation="vertical">

        <!-- 選項卡區域 -->
        <!--註意:原來的配置:android:layout_height="?attr/actionBarSize"-->
        <TabWidget
            android:id="@android:id/tabs"
            android:layout_width="wrap_content"
            android:layout_height="wrap_content"
            android:layout_gravity="top|center_horizontal"
            android:layout_marginTop="10dp"/>

        <!-- 碎片切換區域,且其id必須為@android:id/tabcontent -->
        <FrameLayout
            android:id="@android:id/tabcontent"
            android:layout_width="match_parent"
            android:layout_height="0dp"
            android:layout_weight="1"
            />

    </LinearLayout>

</android.support.v4.app.FragmentTabHost>
創建需要用到的fragment類和布局文件【後續可根據實際情況更改命名,並且需要重新import R文件】


fragment_web.xml文件布局如下
<?xml version="1.0" encoding="utf-8"?>
<LinearLayout xmlns:android="http://schemas.android.com/apk/res/android"
    android:orientation="vertical"
    android:layout_width="match_parent"
    android:layout_height="match_parent">

    <!-- webview -->
    <WebView
        android:id="@+id/web_view"
        android:layout_width="match_parent"
        android:layout_height="match_parent"></WebView>

</LinearLayout>
WebViewFragment
package com.why.project.fragmenttabhosttopdemo.fragment;

import android.os.Bundle;
import android.util.Log;
import android.view.LayoutInflater;
import android.view.View;
import android.view.ViewGroup;
import android.webkit.WebView;
import android.webkit.WebViewClient;

import com.why.project.fragmenttabhosttopdemo.R;


/**
 * @Created HaiyuKing
 * @Used  首頁界面——碎片界面
 */
public class WebViewFragment extends BaseFragment{

    private static final String TAG = "WebViewFragment";
    /**View實例*/
    private View myView;

    private WebView web_view;

    /**傳遞過來的參數*/
    private String bundle_param;

    //重寫
    public View onCreateView(LayoutInflater inflater, ViewGroup container,Bundle savedInstanceState) {


        //使用FragmentTabHost時,Fragment之間切換時每次都會調用onCreateView方法,導致每次Fragment的布局都重繪,無法保持Fragment原有狀態。
        //http://www.cnblogs.com/changkai244/p/4110173.html
        if(myView==null){
            myView = inflater.inflate(R.layout.fragment_web, container, false);
            //接收傳參
            Bundle bundle = this.getArguments();
            bundle_param = bundle.getString("param");
        }
        //緩存的rootView需要判斷是否已經被加過parent, 如果有parent需要從parent刪除,要不然會發生這個rootview已經有parent的錯誤。
        ViewGroup parent = (ViewGroup) myView.getParent();
        if (parent != null) {
            parent.removeView(myView);
        }

        return myView;
    }

    @Override
    public void onActivityCreated(Bundle savedInstanceState) {
        // TODO Auto-generated method stub
        super.onActivityCreated(savedInstanceState);

        //初始化控件以及設置
        initView();
        //初始化數據
        initData();
        //初始化控件的點擊事件
          initEvent();
    }
    @Override
    public void onResume() {
        super.onResume();
    }

    @Override
    public void onPause() {
        super.onPause();
    }

    @Override
    public void onDestroy() {
        super.onDestroy();
    }

    /**
     * 初始化控件
     */
    private void initView() {
        web_view = (WebView) myView.findViewById(R.id.web_view);
        //設置支持js腳本
//        web_view.getSettings().setJavaScriptEnabled(true);
        web_view.setWebViewClient(new WebViewClient() {
            /**
             * 重寫此方法表明點擊網頁內的鏈接由自己處理,而不是新開Android的系統browser中響應該鏈接。
             */
            @Override
            public boolean shouldOverrideUrlLoading(WebView webView, String url) {
                //webView.loadUrl(url);
                return false;
            }
        });
    }

    /**
     * 初始化數據
     */
    public void initData() {
        Log.e("tag","{initData}bundle_param="+bundle_param);
        web_view.loadUrl(bundle_param);//加載網頁
    }

    /**
     * 初始化點擊事件
     * */
    private void initEvent(){
    }

}
在Activity中使用如下【繼承FragmentActivity或者其子類】
package com.why.project.fragmenttabhosttopdemo;

import android.content.Context;
import android.os.Bundle;
import android.support.v4.app.Fragment;
import android.support.v4.app.FragmentTabHost;
import android.support.v7.app.AppCompatActivity;
import android.view.View;
import android.widget.CheckedTextView;
import android.widget.TabHost;
import android.widget.Toast;

import com.why.project.fragmenttabhosttopdemo.fragment.WebViewFragment;

import java.util.ArrayList;

public class MainActivity extends AppCompatActivity {

    private FragmentTabHost mTopFTabHostLayout;

    //選項卡子類集合
    private ArrayList<TabItem> tabItemList = new ArrayList<TabItem>();

    @Override
    protected void onCreate(Bundle savedInstanceState) {
        super.onCreate(savedInstanceState);
        setContentView(R.layout.activity_main);

        initTabList();
        initFTabHostLayout();
        setFTabHostData();
        initEvents();

    }

    /**
     * 初始化選項卡數據集合
     */
    private void initTabList() {
        //底部選項卡對應的Fragment類使用的是同一個Fragment,那麽需要考慮切換Fragment時避免重復加載UI的問題】
        tabItemList.add(new TabItem(this,"已發布",WebViewFragment.class));
        tabItemList.add(new TabItem(this,"未發布",WebViewFragment.class));
    }

    /**
     * 初始化FragmentTabHost
     */
    private void initFTabHostLayout() {
        //實例化
        mTopFTabHostLayout = (FragmentTabHost) findViewById(R.id.tab_top_ftabhost_layout);
        mTopFTabHostLayout.setup(this, getSupportFragmentManager(), android.R.id.tabcontent);//最後一個參數是碎片切換區域的ID值
        // 去掉分割線
        mTopFTabHostLayout.getTabWidget().setDividerDrawable(null);

    }

    /**
     * 設置選項卡的內容
     */
    private void setFTabHostData() {
        //Tab存在於TabWidget內,而TabWidget是存在於TabHost內。與此同時,在TabHost內無需在寫一個TabWidget,系統已經內置了一個TabWidget
        for (int i = 0; i < tabItemList.size(); i++) {
            //實例化一個TabSpec,設置tab的名稱和視圖
            TabHost.TabSpec spec = mTopFTabHostLayout.newTabSpec(tabItemList.get(i).getTabTitle()).setIndicator(tabItemList.get(i).getTabView());
            // 添加Fragment
            //初始化傳參:http://bbs.csdn.net/topics/391059505
            Bundle bundle = new Bundle();
            if(i == 0 ){
                bundle.putString("param", "http://www.baidu.com");
            }else{
                bundle.putString("param", "http://www.cnblogs.com");
            }

            mTopFTabHostLayout.addTab(spec, tabItemList.get(i).getTabFragment(), bundle);
        }

        //默認選中第一項
        mTopFTabHostLayout.setCurrentTab(0);
        upDateTab(mTopFTabHostLayout);
    }


    /**
     * 更新文字顏色和背景
     * http://blog.csdn.net/ray_admin/article/details/69951540
     */
    private void upDateTab(FragmentTabHost mTabHost) {
        int size = mTabHost.getTabWidget().getChildCount();
        for (int i = 0; i < size; i++) {
              //CheckedTextView tv = (CheckedTextView) mTabHost.getTabWidget().getChildAt(i).findViewById(toptab_checkedTextView);//常規寫法
            CheckedTextView tv = (CheckedTextView) tabItemList.get(i).getToptab_checkedTextView();
            if (mTabHost.getCurrentTab() == i) {//選中
                //修改文字的顏色
                tv.setTextColor(this.getResources().getColor(R.color.tab_text_selected_top));
                //修改view的背景顏色
                if (0 == i) {
                    mTopFTabHostLayout.getTabWidget().getChildAt(i).setBackgroundResource(R.drawable.tab_top_layout_item_shape_left_selected);
                } else if (i == size - 1) {
                    mTopFTabHostLayout.getTabWidget().getChildAt(i).setBackgroundResource(R.drawable.tab_top_layout_item_shape_right_selected);
                } else {
                    mTopFTabHostLayout.getTabWidget().getChildAt(i).setBackgroundResource(R.drawable.tab_top_layout_item_shape_mid_selected);
                }
            } else {//不選中
                //修改文字的顏色
                tv.setTextColor(this.getResources().getColor(R.color.tab_text_normal_top));
                //修改view的背景顏色
                if (0 == i) {
                    mTopFTabHostLayout.getTabWidget().getChildAt(i).setBackgroundResource(R.drawable.tab_top_layout_item_shape_left_unselected);
                } else if (i == size - 1) {
                    mTopFTabHostLayout.getTabWidget().getChildAt(i).setBackgroundResource(R.drawable.tab_top_layout_item_shape_right_unselected);
                } else {
                    mTopFTabHostLayout.getTabWidget().getChildAt(i).setBackgroundResource(R.drawable.tab_top_layout_item_shape_mid_unselected);
                }
            }
        }
    }

    private void initEvents() {
        //選項卡的切換事件監聽
        mTopFTabHostLayout.setOnTabChangedListener(new TabHost.OnTabChangeListener() {
            @Override
            public void onTabChanged(String tabId) {

                upDateTab(mTopFTabHostLayout);

                Toast.makeText(MainActivity.this, tabId, Toast.LENGTH_SHORT).show();

            }
        });

    }

    /**
     * 選項卡子項類*/
    class TabItem{

        private Context mContext;

        private CheckedTextView toptab_checkedTextView;

        //底部選項卡對應的文字
        private String tabTitle;
        //底部選項卡對應的Fragment類
        private Class<? extends Fragment> tabFragment;

        public TabItem(Context mContext, String tabTitle, Class tabFragment){
            this.mContext = mContext;

            this.tabTitle = tabTitle;
            this.tabFragment = tabFragment;
        }

        public Class<? extends Fragment> getTabFragment() {
            return tabFragment;
        }

        public String getTabTitle() {
            return tabTitle;
        }

        /**
         * 獲取底部選項卡的布局實例並初始化設置*/
        private View getTabView() {
            //取得布局實例
            View toptabitemView = View.inflate(mContext, R.layout.tab_top_item, null);

            //===========設置CheckedTextView控件的圖片和文字==========
            toptab_checkedTextView = (CheckedTextView) toptabitemView.findViewById(R.id.toptab_checkedTextView);

            //設置CheckedTextView的文字
            toptab_checkedTextView.setText(tabTitle);

            return toptabitemView;
        }

        public CheckedTextView getToptab_checkedTextView() {
            return toptab_checkedTextView;
        }
    }
}
混淆配置
無
參考資料
Android的FragmentTabHost使用(頂部或底部菜單欄)
FragmentTabHost使用方法
Android_ FragmentTabHost切換Fragment時避免重復加載UI
使用FragmentTabHost+TabLayout+ViewPager實現雙層嵌套Tab
如何自定義FragmentTabHost中某一個Tab的點擊效果
FragmentTabHost布局的使用及優化方式
改變FragmentTabHost選中的文字顏色
fragmenttabhost 傳參問題
FragmentTabHost+fragment中獲得fragment的對象
fragment中的attach/detach方法說明(網上拷貝,只為作筆記)
FragmentTabHost切換Fragment,與ViewPager切換Fragment時重新onCreateView的問題
Android選項卡動態滑動效果
項目demo下載地址
https://github.com/haiyuKing/FragmentTabHostTopDemo
FragmentTabHostTopDemo【FragmentTabHost固定寬度且居中】

