Security-OAuth2.0 密碼模式客戶端實現
阿新 • • 發佈:2017-11-08
super temp auto bsp mas es2017 success ann turn
我的OAuth2.0 客戶端項目目錄

pom 的配置
<?xml version="1.0" encoding="UTF-8"?>
<project xmlns="http://maven.apache.org/POM/4.0.0"
         xmlns:xsi="http://www.w3.org/2001/XMLSchema-instance"
         xsi:schemaLocation="http://maven.apache.org/POM/4.0.0 http://maven.apache.org/xsd/maven-4.0.0.xsd">
    <parent>
        <artifactId>OauthText</artifactId>
        <groupId>OauthText</groupId>
        <version>1.0-SNAPSHOT</version>
    </parent>
    <modelVersion>4.0.0</modelVersion>

    <artifactId>OAuthClient</artifactId>

     <dependencies>

         <dependency>
             <groupId>org.springframework.security.oauth</groupId>
             <artifactId>spring-security-oauth2</artifactId>
         </dependency>
         <dependency>
             <groupId>org.springframework.boot</groupId>
             <artifactId>spring-boot-starter-security</artifactId>
         </dependency>

     </dependencies>

</project>
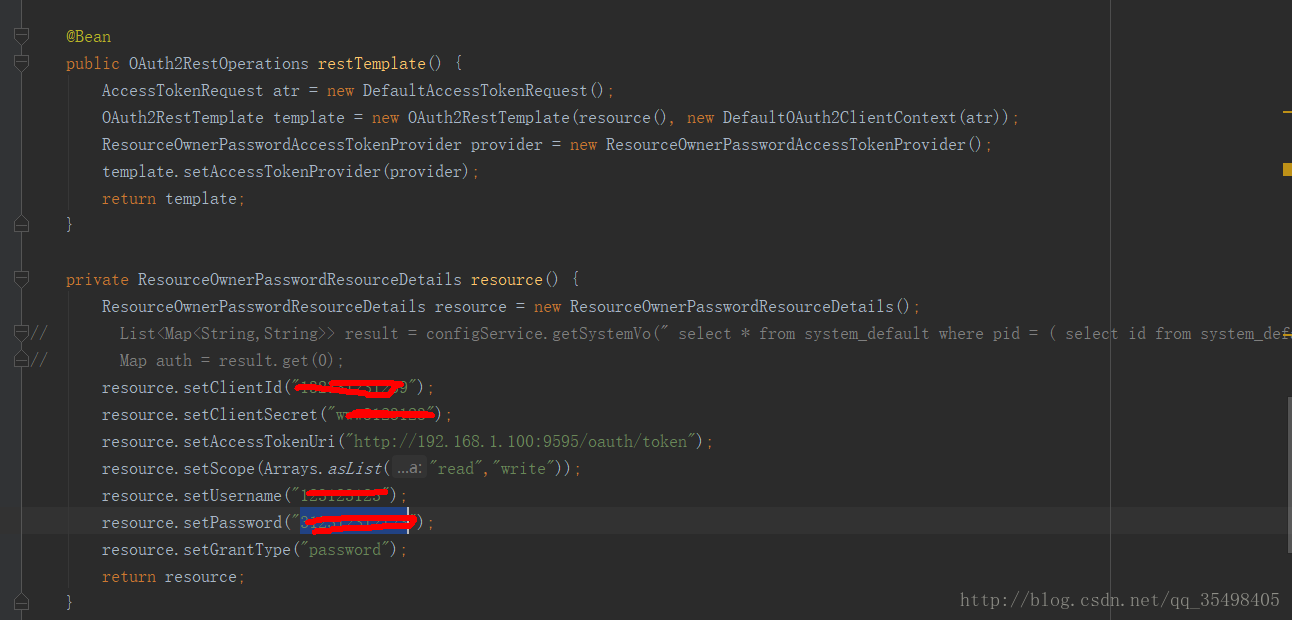
核心配置UlegalZCConfiger

上圖username 和password 要與服務端自定義驗證的賬戶和密碼相同。setClientId和setClientSecret要與服務端數據庫配置一樣。如下字段

之後為前端攔截驗證
package cn.xudy.sso.config; import cn.xudy.sso.Tool.MyAuthenticationProvider; import org.springframework.beans.factory.annotation.Autowired; import org.springframework.context.annotation.Bean;import org.springframework.context.annotation.Configuration; import org.springframework.security.authentication.AuthenticationManager; import org.springframework.security.config.annotation.authentication.builders.AuthenticationManagerBuilder; import org.springframework.security.config.annotation.method.configuration.EnableGlobalMethodSecurity;import org.springframework.security.config.annotation.web.builders.HttpSecurity; import org.springframework.security.config.annotation.web.configuration.WebSecurityConfigurerAdapter; /** * Created by Joe on 2017/8/8. */ @Configuration @EnableGlobalMethodSecurity(prePostEnabled = true)//開啟security註解 public class WebSecurityConfig extends WebSecurityConfigurerAdapter { @Bean @Override protected AuthenticationManager authenticationManager() throws Exception { return super.authenticationManager(); } @Autowired private MyAuthenticationProvider provider;//自定義驗證 @Override protected void configure(HttpSecurity http) throws Exception { // 全部通過 // http.csrf().disable().authorizeRequests() // .anyRequest() // .permitAll(); //允許所有用戶訪問"/"和"/home" 條件判斷 http.csrf().disable() .authorizeRequests() .antMatchers("/login", "/page-login.html").permitAll() //其他地址的訪問均需驗證權限 .antMatchers("/*.html").authenticated() .and() .formLogin() //指定登錄頁是"/login" .loginPage("/login") .defaultSuccessUrl("/otherPage")//登錄成功後默認跳轉到"/index.html" .permitAll() .and() .logout() .logoutUrl("/logout") .logoutSuccessUrl("/login")//退出登錄後的默認url是"/login" .invalidateHttpSession(true) .permitAll(); } @Autowired public void configureGlobal(AuthenticationManagerBuilder auth) throws Exception { //將驗證過程交給自定義驗證工具 auth.authenticationProvider(provider); } }
如果為條件驗證,前端請求的話經過次方法,自定義驗證代碼WebSecurityConfig
 /**
     * 自定義驗證方式
     */
    @Override
    public Authentication authenticate(Authentication authentication) throws AuthenticationException {
        String username = authentication.getName();
        String password = (String) authentication.getCredentials();
        System.out.println("=-=-=-=-=:"+username);

          // 假裝請求數據庫

        User user=new User();


        Collection<? extends GrantedAuthority> authorities = AuthorityUtils.commaSeparatedStringToAuthorityList("USER");
        return new UsernamePasswordAuthenticationToken(user, password, authorities);
    }

    @Override
    public boolean supports(Class<?> arg0) {
        return true;
    }
這是ClientControlled 請求
@RestController
public class ClientControlled {

    @Autowired
    private OAuth2RestOperations oauthRestTemplate;

    @PostMapping(value = "/login")
    public String  saveCuringEvidence(@RequestBody User user ){
        System.out.println("---------------------Client"+user.getUsername());
        //  重點請求服務端
        oauthRestTemplate.postForEntity("http://192.168.1.100:9595/log",user,String.class);

        return user.getUsername();
    }

}
最後建議先看看我寫的服務端 兩方配套使用
http://www.cnblogs.com/memoryXudy/p/7805178.html
Security-OAuth2.0 密碼模式客戶端實現
