
Hibernate (操作步驟)
阿新 • • 發佈:2017-11-19
ber try gen type public actor logs 3.0 mysqli 
在java工程裏導入Hibernate架包:
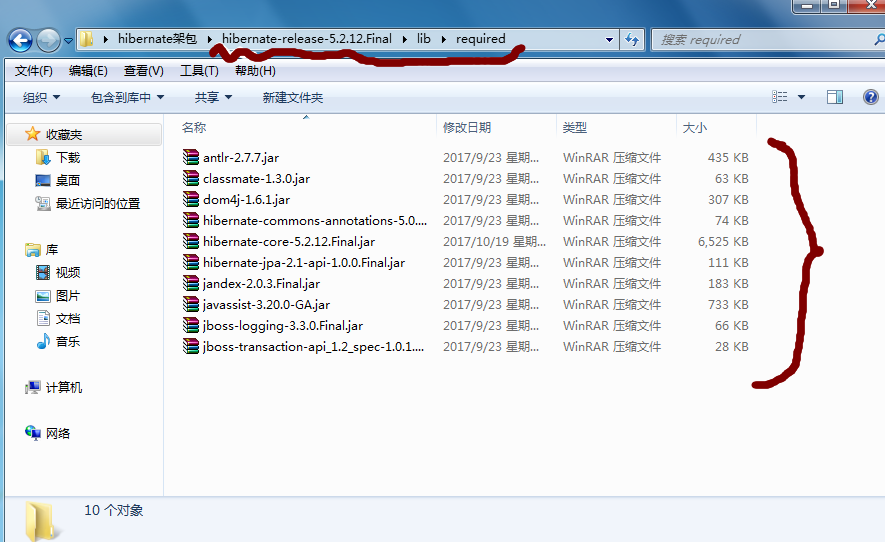
在添加數據庫架包如:
Hibernate開發步驟:
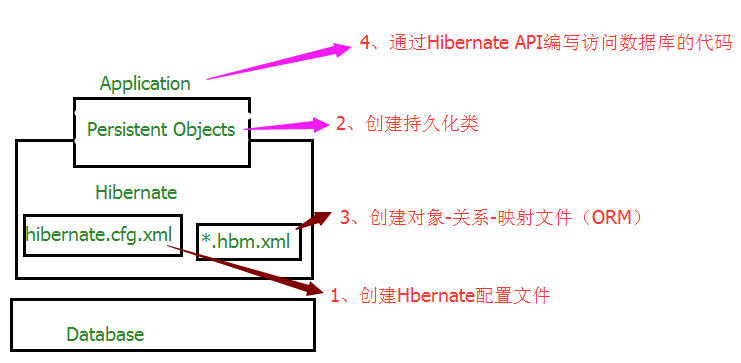
1、Eclipse下創建Hibernate配置文件(需要tools插件)
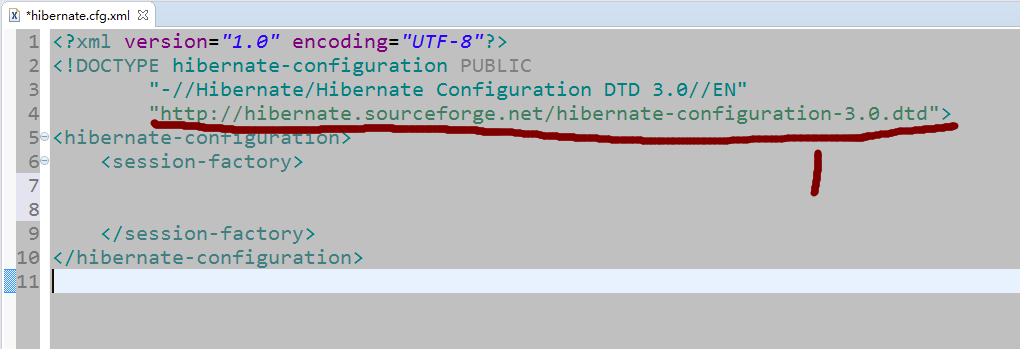
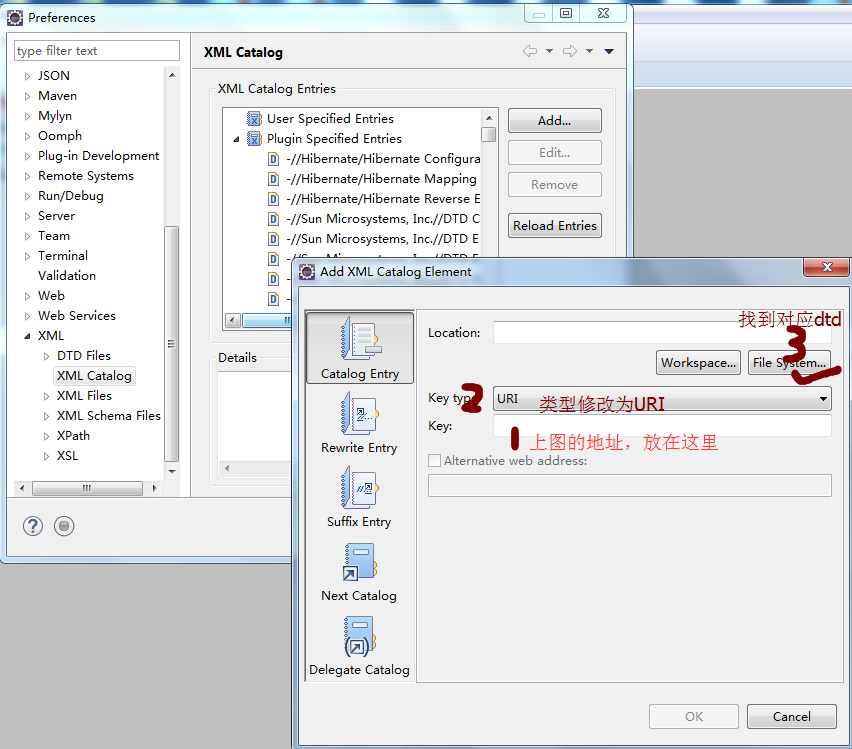
new---->other---->Hibernate Configuration File(cfg.xml) 點擊next----finish 創建下圖文件,然後配置dtd文件

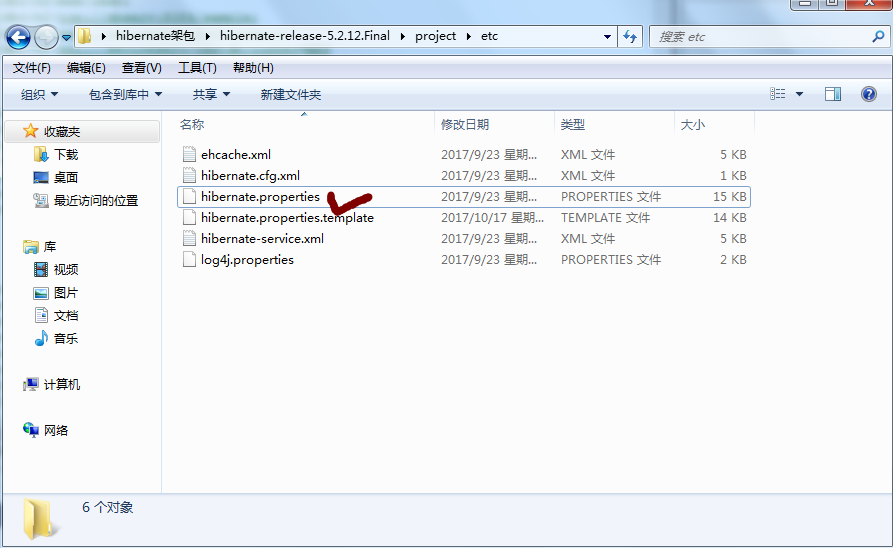
然後通過下圖的properties文件,編寫我們的hibernate.cfg.xml文件
常用的配置如下(至此第一步完成)

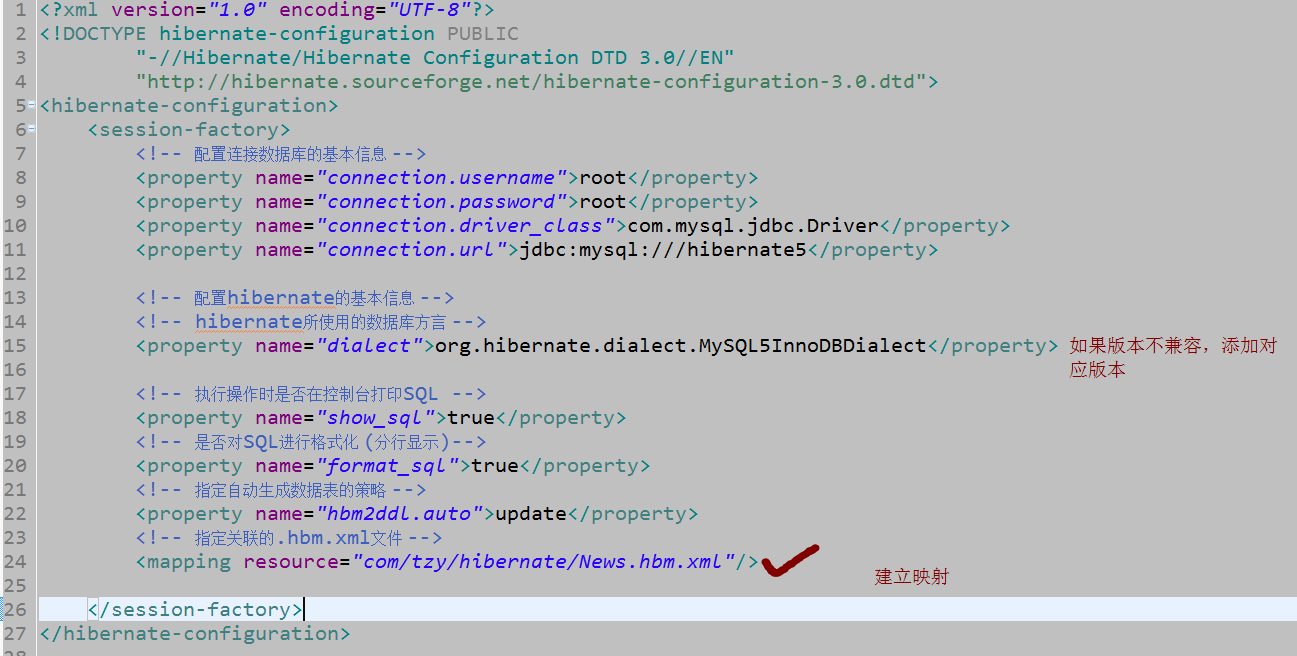
1 <?xml version="1.0" encoding="UTF-8"hibernate.cfg.xml?> 2 <!DOCTYPE hibernate-configuration PUBLIC 3 "-//Hibernate/Hibernate Configuration DTD 3.0//EN" 4 "http://hibernate.sourceforge.net/hibernate-configuration-3.0.dtd"> 5 <hibernate-configuration> 6 <session-factory> 7 <!-- 配置連接數據庫的基本信息 --> 8<property name="connection.username">root</property> 9 <property name="connection.password">root</property> 10 <property name="connection.driver_class">com.mysql.jdbc.Driver</property> 11 <property name="connection.url">jdbc:mysql:///hibernate5</property> 12 13 <!-- 配置hibernate的基本信息 --> 14 <!-- hibernate所使用的數據庫方言 --> 15 <property name="dialect">org.hibernate.dialect.MySQLInnoDBDialect</property> 16 17 <!-- 執行操作時是否在控制臺打印SQL --> 18 <property name="show_sql">true</property> 19 20 <!-- 是否對SQL進行格式化 (分行顯示)--> 21 <property name="format_sql">true</property> 22 23 <!-- 指定自動生成數據表的策略 --> 24 <property name="hbm2ddl.auto">update</property> 25 26 27 </session-factory> 28 </hibernate-configuration>
2、創建持久化類
 1 package com.tzy.hibernate;
 2
 3 import java.util.Date;
 4
 5 public class News {
 6 private Integer id;
 7 private String title;
 8 private String author;
 9 private Date date;
10 public Integer getId() {
11     return id;
12 }
13 public void setId(Integer id) {
14     this.id = id;
15 }
16 public String getTitle() {
17     return title;
18 }
19 public void setTitle(String title) {
20     this.title = title;
21 }
22 public String getAuthor() {
23     return author;
24 }
25 public void setAuthor(String author) {
26     this.author = author;
27 }
28 public Date getDate() {
29     return date;
30 }
31 public void setDate(Date date) {
32     this.date = date;
33 }
34
35 public News(String title, String author, Date date) {
36     super();
37     this.title = title;
38     this.author = author;
39     this.date = date;
40 }
41 public News() {
42     super();
43 }
44 @Override
45 public String toString() {
46     return "News [id=" + id + ", title=" + title + ", author=" + author + "]";
47 }
48
49 }
News
3、創建對象-關系-映射文件
new---->other---->Hibernate XML Mapping file(hbm.xml) 點擊next-next-next----finish 創建下圖文件
 1 <?xml version="1.0"?>
 2 <!DOCTYPE hibernate-mapping PUBLIC "-//Hibernate/Hibernate Mapping DTD 3.0//EN"
 3 "http://hibernate.sourceforge.net/hibernate-mapping-3.0.dtd">
 4 <!-- Generated 2017-11-19 16:22:35 by Hibernate Tools 3.4.0.CR1 -->
 5 <hibernate-mapping>
 6     <class name="com.tzy.hibernate.News" table="NEWS">
 7         <id name="id" type="java.lang.Integer">
 8             <column name="ID" />
 9             <!-- 指定逐漸生成的方式,native:使用數據庫本地方式 -->
10             <generator class="native" />
11         </id>
12
13         <property name="title" type="java.lang.String">
14             <column name="TITLE" />
15         </property>
16
17         <property name="author" type="java.lang.String">
18             <column name="AUTHOR" />
19         </property>
20
21         <property name="date" type="java.util.Date">
22             <column name="DATE" />
23         </property>
24
25     </class>
26 </hibernate-mapping>
News.hbm.xml
然後在hibernate.cfg.xml裏面建立映射關系
4、通過Hibernate API編寫訪問數據庫的代碼
 1 package com.tzy.hibernate;
 2
 3 import java.util.Date;
 4
 5 import org.hibernate.Session;
 6 import org.hibernate.SessionFactory;
 7 import org.hibernate.Transaction;
 8 import org.hibernate.boot.MetadataSources;
 9 import org.hibernate.boot.registry.StandardServiceRegistry;
10 import org.hibernate.boot.registry.StandardServiceRegistryBuilder;
11 import org.junit.Test;
12
13 public class HibernateTest {
14
15     @Test
16     public void test() {
17         //1.創建一個SessionFactory對象
18         SessionFactory sessionFactory = null;
19
20         //hibernate4獲取sessionFactory辦法
21         //1).創建Configuration對象:對應hibernate的基本配置信息和關系映射信息
22         //Configuration configuration = new Configuration().configure();
23         //4.0之前這樣創建
24         //sessionFactory = configuration.buildSessionFactory();
25         //2).創建一個ServiceRegistry對象:hibernate 4.x新添加的對象
26         //hibernate的任何配置和服務都需要在該對象中註冊後才能有效。
27         //ServiceRegistry serviceRegistry = new ServiceRegistryBuilder().applySettings(configuration.getProperties())
28         //                                                                .buildServiceRegistry();
29         //3).
30         //sessionFactory = configuration.buildSessionFactory(serviceRegistry);
31
32         //4).
33         //hibernate5獲取sessionFactory辦法
34         //創建StandardServiceRegistry對象(標準服務註冊)
35         StandardServiceRegistry standardServiceRegistry = new StandardServiceRegistryBuilder().configure().build();
36
37         sessionFactory = new MetadataSources(standardServiceRegistry).buildMetadata().buildSessionFactory();
38         //2.創建一個Session對象
39         Session session = sessionFactory.openSession();
40
41         //3.開啟事物
42         Transaction transaction = session.beginTransaction();
43
44         //4.執行保存操作
45         News news = new News("Java", "Tzy", new Date());
46         session.save(news);
47
48         //5.提交事物
49         transaction.commit();
50
51         //6.關閉Session
52         session.close();
53
54         //7.關閉SessionFactory對象
55         sessionFactory.close();
56     }
57
58 }
HibernateTest
1.創建一個SessionFactory對象2.創建一個Session對象3.開啟事物4.執行保存操作5.提交事物6.關閉Session7.關閉SessionFactory對象
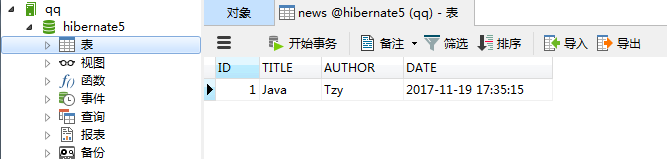
操作執行完畢(表自動創建---cfg.xml裏的生成數據表策略)
Hibernate (操作步驟)