shell全自動登錄遠程終端
阿新 • • 發佈:2017-11-20
選擇 賬號 lin exit nbsp data- pre http 相關
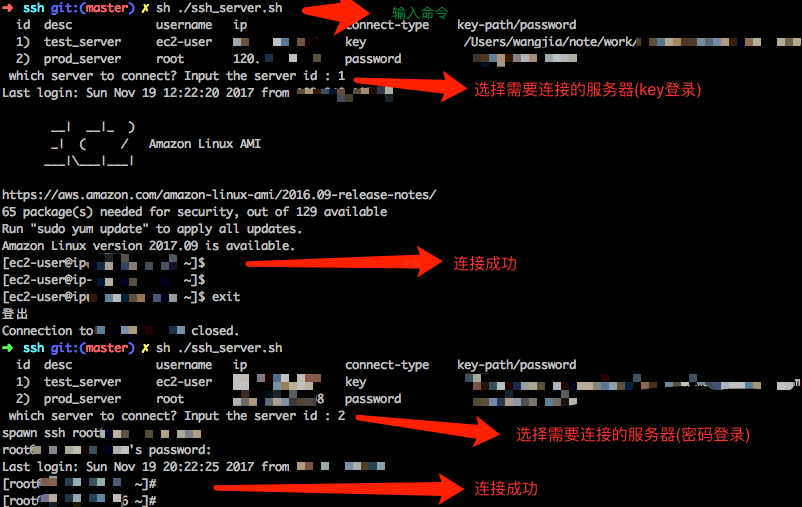
先看效果

傳統手工連接
#密碼方式
ssh user@ip   # 然後輸入服務器密碼

#密鑰登錄
ssh -i identity_file  user@ip

#將本機 id_rsa.pub 添加到服務器authorized_keys中
ssh ssh user@ip
? 弊端很明顯,需要記服務器地址、ip、key位置、密碼等,每次都需要自己手打一長串命令啊。。。
自動連接
? 思路很簡單,將連接需要的參數提取到配置文件,從讀取配置文件讀取指定行服務器信息進行連接,下面是配置文件
server.conf
id  desc            username   ip              connect-type    key-path/password
1)  test_server     ec2-user   123.xx.xx.xx    key             key_abs_path
2)  prod_server     root       121.xxx.x.x8    password        dasdxxxxx
? 除第一行之外,每行代表一臺服務器連接信息,配置文件信息比較簡單,僅僅包含一些連接需要的必要信息和簡單說明。
過程說明
-
打印服務器配置文件信息
-
用戶輸入需要連接服務器的 id
-
讀取用戶選擇行的信息到數組中,組成對應的 shell執行
其中如果需要密碼輸入,自動交互由 expect 完成。
expect是什麽?
? 一個可以幫助完成 用戶與 終端交互的小工具(可以自行了解下,很簡單,花不了10分鐘)
? 比如連接服務器需要輸入密碼,你寫好 expect 腳本,讓它在指定的時候,幫你輸入你的密碼,下面是腳本內容
expect_login.sh
#!/usr/bin/expect -f # @author : wangjia # @time : 2016/03/12 11:10 # desc : expect 登錄 ? set timeout3 #接受傳入參數, #參數1是 user@ip, #參數2 password set user_ip [lindex ${argv} 0] set password [lindex ${argv} 1] ? #套殼 根據 expect 發送 對應信息 spawn ssh ${user_ip} # 根據期望做出對應的動作,自動輸入密碼 expect { "*assword:*" { send "${password}\r"} } #將操作權交還給用戶 interact ?
相關代碼
第一步讀取配置文件,並打印到 終端
# 讀取配置文件到數組
# @param1 $1服務器信息配置表
function init_server_info_arr(){
    conf_file_path=$1;
    lineCount=0;
    while read oneLine
    do
        lines[lineCount]=${oneLine}
        let lineCount++;
    done < ${conf_file_path}
    print_server_list
}
?
#服務器信息打印(數組打印)
function print_server_list(){
    for i in "${!lines[@]}";
    do
        echo "  ${lines[i]}"
    done
}
第二步,用戶交互
# 用戶選擇需要連接的服務器
function interact_user(){
    read -p " which server to connect? Input the server id : " user_choose
    input_check "${user_choose}"
}
?
#用戶交互 輸入檢查
function input_check(){
    input=$1
    if [[ ${input} =~ ^[1-9]+$ ]] && [ ${input} -lt ${lineCount} ]
    then
        input="pass"
    else
        echo " wrong enter"
        exit
    fi
}
第三步,連接
#進行連接
#@param1 配置文件的行
function connect_by_line(){
    choose_server=$1;
    #將行信息按空格分割成數組
    server_info_arr=(${choose_server// / })
    #讀取數組,key-按密鑰方式登錄,password按密碼方式調用 expect登錄
    if [ "${server_info_arr[4]}" == "key" ]
    then
        ssh -i "${server_info_arr[5]}" "${server_info_arr[2]}@${server_info_arr[3]}";
    elif [ "${server_info_arr[4]}" = "password" ]
    then
        pw_login "${server_info_arr[2]}@${server_info_arr[3]}" "${server_info_arr[5]}";
    else
        ssh "${server_info_arr[2]}@${server_info_arr[3]}";
    fi
}
?
# 賬號密碼登錄 expect 腳本調用
# @param1  用戶登錄名@IP eg.. root@123.23.12.22
# @param2  password
function pw_login(){
    /Users/wangjia/coder/github/shell/ssh/expect_login.sh  $1 $2
}
尾
-
本文沒有什麽深奧的地方,僅僅是很早之前簡單了解 shell 之後,對日常操作做了一點點改進和優化,相信還有許多更好更優化的方式,也希望本文對一些朋友有幫助。
-
該自動登錄需要 expect 支持,如果不想裝 expect ,可以將 ecpect 相關註釋掉,需要輸入密碼的時候,將打印出的密碼 copy 進去即可。
#進行連接
# @param1 配置文件的行
function connect_by_line(){
    choose_server=$1;
    #按空格分割成數組
    server_info_arr=(${choose_server// / })
    if [ "${server_info_arr[4]}" == "key" ]
    then
        ssh -i "${server_info_arr[5]}" "${server_info_arr[2]}@${server_info_arr[3]}";
#    elif [ "${server_info_arr[4]}" = "password" ]
#    then
#        pw_login "${server_info_arr[2]}@${server_info_arr[3]}" "${server_info_arr[5]}";
    else
        ssh "${server_info_arr[2]}@${server_info_arr[3]}";
    fi
}
文中所有源碼地址 github-shell自動登錄
shell全自動登錄遠程終端
