【SSH學習筆記】用Struts2實現簡單的用戶登錄
準備階段
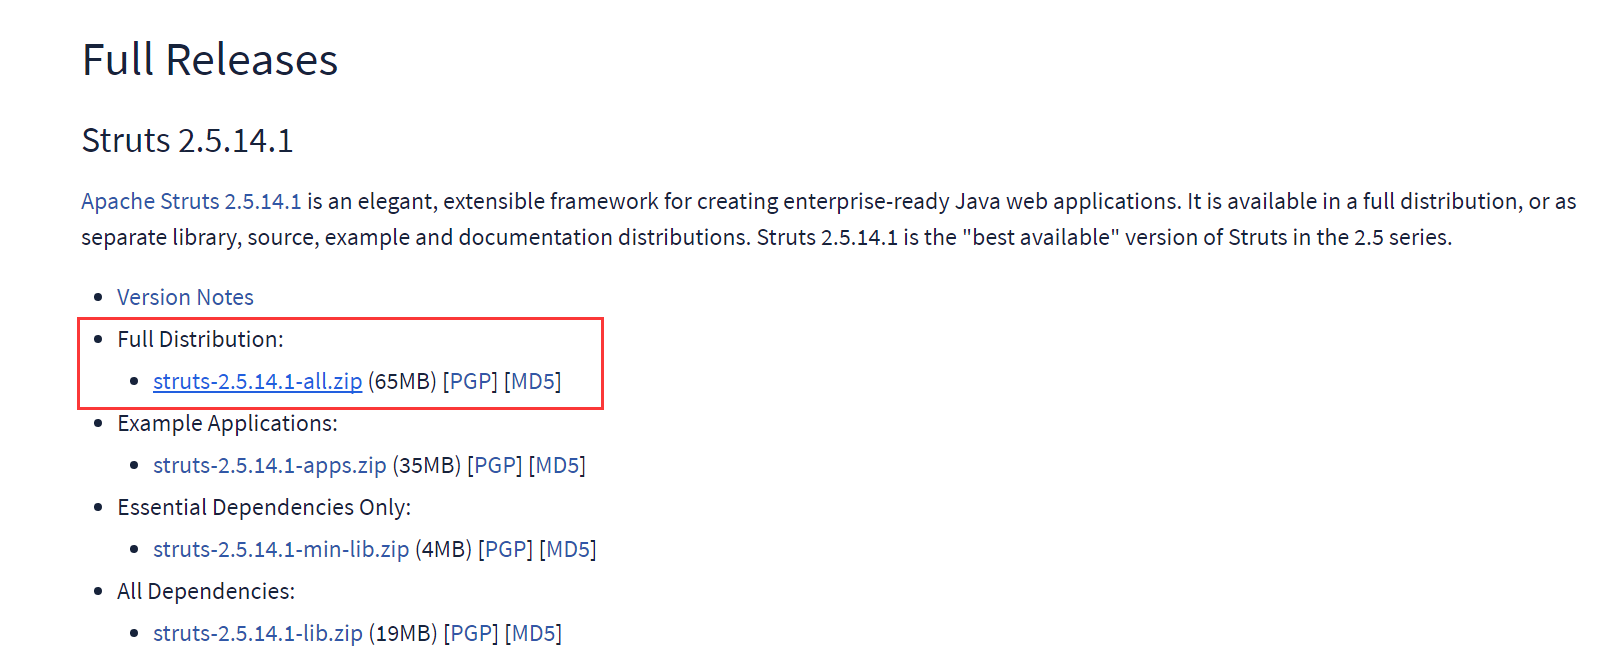
在使用學習Struts2的時候首先要下載相應的架包
Struts2資源下載

這裏建議下載第一個,在struts-2.5.14.1-all.zip裏有很多實用的東西,不僅有架包還有官方為開發者準備的實例等。
任何所學的知識最有效的檢測方式就是做一個小小的實例,這裏吉力就帶著大家看看Struts2是怎麽實現這個功能的。
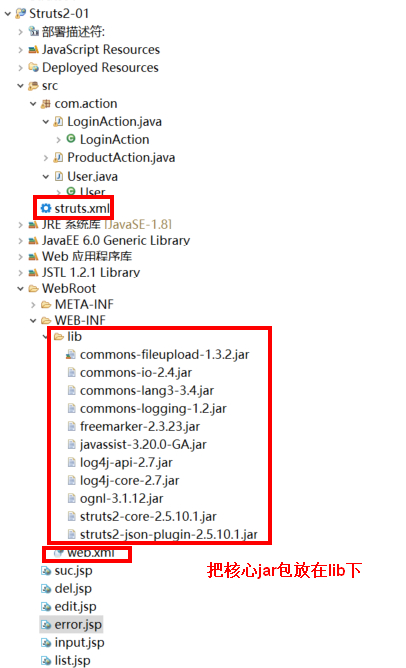
Struts2核心jar包:
struts2-core-2.3.15.3.jar
asm-3.3jar
asm-common-3.3jar
asm-tree-3.3jar
xwork-core-2.3.15.3.3.jar
commons-io-2.0.1.jar
commons-lang-3.3.1.jar
commons-fileupload-1.3.jar
commons-logging-1.1.3.jar
freemarker-2.3.16.jar
log4j-1.2.17.jar
ognl-3.0.6.jar
javassist-3.11.0.GA.jar
項目框架:

1.配置web.xml
<?xml version="1.0" encoding="UTF-8"?>
<web-app xmlns:xsi="http://www.w3.org/2001/XMLSchema-instance" xmlns="http://java.sun.com/xml/ns/javaee" xsi:schemaLocation="http://java.sun.com/xml/ns/javaee http://java.sun.com/xml/ns/javaee/web-app_3_0.xsd" id="WebApp_ID" version="3.0">
<display-name> 任何MVC框架需要與Web應用整合時都要借助web.xml配置文件。通常MVC框架只需要在Web應用裏加載一個核心控制器即可,對於Struts2來說就是加載StrutsPrepareAndExecuteFilter。一個Web應用只要加載StrutsPrepareAndExecuteFilter後,就具有Struts2的基本功能。
2.創建登錄視圖
<%@ page language="java" import="java.util.*" pageEncoding="UTF-8"%>
<%
String path = request.getContextPath();
String basePath = request.getScheme()+"://"+request.getServerName()+":"+request.getServerPort()+path+"/";
%>

<!DOCTYPE HTML PUBLIC "-//W3C//DTD HTML 4.01 Transitional//EN">
<html>
  <head>
    <base href="<%=basePath%>">

    <title>My JSP ‘index.jsp‘ starting page</title>
    <meta http-equiv="pragma" content="no-cache">
    <meta http-equiv="cache-control" content="no-cache">
    <meta http-equiv="expires" content="0">
    <meta http-equiv="keywords" content="keyword1,keyword2,keyword3">
    <meta http-equiv="description" content="This is my page">
    <!--
    <link rel="stylesheet" type="text/css" href="styles.css">
    -->
  </head>

  <body>
  <form action="login.action" method="post">

    用戶名:<input type="text" name="useName"><br>
    密碼:<input type="password" name="password"><br>
    <input type="submit" value="登錄"><input type="reset" value="重置">

  </form>
  </body>
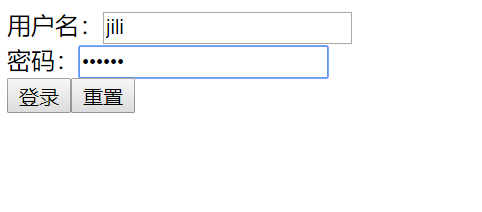
</html>上述頁面代碼裏定義了一個表單,該表單提交給login.action進行處理。表單裏有2個輸入文本框,分別接收用戶名和密碼。
3.創建實體POJO層
在src下的com.beans包裏創建實體User
package com.beans;

public class User {
    private String useName;
    private String password;

    public User() {
        // TODO 自動生成的構造函數存根
    }
    public User(String useName, String password) {
        super();
        this.useName = useName;
        this.password = password;
    }
    public String getUseName() {
        return useName;
    }
    public void setUseName(String useName) {
        this.useName = useName;
    }
    public String getPassword() {
        return password;
    }
    public void setPassword(String password) {
        this.password = password;
    }

}
在Strut2裏,不對,是在整個SSH框架裏實體的概念特別重要,它與數據庫表相對應,將數據很好的保持了起來,實現了數據的持久化,這樣我們以實體的形式傳遞數據和映射就變得簡單。
4.創建業務控制器
在src下的com.action包裏添加用於處理用戶登錄的業務控制器LoginAction類
package com.action;

import com.beans.User;
import com.opensymphony.xwork2.ActionSupport;
import com.opensymphony.xwork2.ModelDriven;

public class LoginAction extends ActionSupport implements ModelDriven<User>{
    User user=new User();

    public User getUser() {
        return user;
    }

    public void setUser(User user) {
        this.user = user;
    }

    public String execute()
    {
        if(user.getUseName().equals("jili")&&user.getPassword().length()>=6)
        {
            return SUCCESS;
        }
        else
        {
            return ERROR;
        }
    }

    @Override
    public User getModel() {
        // TODO 自動生成的方法存根
        return user;
    }

}
這裏采用了模型驅動的方式實現了對於用戶輸入數據的映射,這個方法比再在action裏添加屬性接收後再賦給User更加高效。
5.配置業務控制器struts.xml
再src下新建struts.xml配置文件,在該文件配置LoginAction
<?xml version="1.0" encoding="UTF-8"?>
<!DOCTYPE struts PUBLIC
    "-//Apache Software Foundation//DTD Struts Configuration 2.3//EN"
    "http://struts.apache.org/dtds/struts-2.3.dtd">
<struts>
<constant name="struts.devMode" value="true"/>
<constant name="struts.enable.DynamicMethodInvocation" value="true"/>

    <package name="default" namespace="/" extends="struts-default">
        <!-- 定義一個叫user的Action,並帶上實現類的路徑 -->
        <action name="login" class="com.action.LoginAction">
            <!-- 配置execute()方法返回值與視圖資源之間的映射關系 -->
            <result name="success">/suc.jsp</result>
            <result name="error">/error.jsp</result>
        </action>
    </package>
</struts>該配置文件配置了一個名為login的Action,並指明了Action實現類com.action.LoginAction。在
6.運行顯示


suc.jsp
<%@ page language="java" import="java.util.*" pageEncoding="UTF-8"%>
<%
String path = request.getContextPath();
String basePath = request.getScheme()+"://"+request.getServerName()+":"+request.getServerPort()+path+"/";
%>

<!DOCTYPE HTML PUBLIC "-//W3C//DTD HTML 4.01 Transitional//EN">
<html>
  <head>
    <base href="<%=basePath%>">

    <title>My JSP ‘suc.jsp‘ starting page</title>

    <meta http-equiv="pragma" content="no-cache">
    <meta http-equiv="cache-control" content="no-cache">
    <meta http-equiv="expires" content="0">
    <meta http-equiv="keywords" content="keyword1,keyword2,keyword3">
    <meta http-equiv="description" content="This is my page">
    <!--
    <link rel="stylesheet" type="text/css" href="styles.css">
    -->

  </head>

  <body>
    歡迎${param.useName}登錄!
  </body>
</html>
error.jsp
<%@ page language="java" import="java.util.*" pageEncoding="UTF-8"%>
<%
String path = request.getContextPath();
String basePath = request.getScheme()+"://"+request.getServerName()+":"+request.getServerPort()+path+"/";
%>

<!DOCTYPE HTML PUBLIC "-//W3C//DTD HTML 4.01 Transitional//EN">
<html>
  <head>
    <base href="<%=basePath%>">

    <title>My JSP ‘error.jsp‘ starting page</title>

    <meta http-equiv="pragma" content="no-cache">
    <meta http-equiv="cache-control" content="no-cache">
    <meta http-equiv="expires" content="0">
    <meta http-equiv="keywords" content="keyword1,keyword2,keyword3">
    <meta http-equiv="description" content="This is my page">
    <!--
    <link rel="stylesheet" type="text/css" href="styles.css">
    -->

  </head>

  <body>
   賬號或者密碼錯誤!<a href="input.jsp">返回</a> <br>
  </body>
</html>
小結
本篇博文只是最簡單地實現了用戶登錄,這也直觀驗證了Struts2是MVC的很好的應用。
當然,Struts2還有很多應用比如動態方法的調用、標簽庫等使用,吉力會在今後的博文裏會給大家舉例子說明。
【SSH學習筆記】用Struts2實現簡單的用戶登錄
