
Day6-常用模塊
阿新 • • 發佈:2018-01-18
字符處理 得到 意思 tps count 字符串 練習 位置 igp 1.re模塊
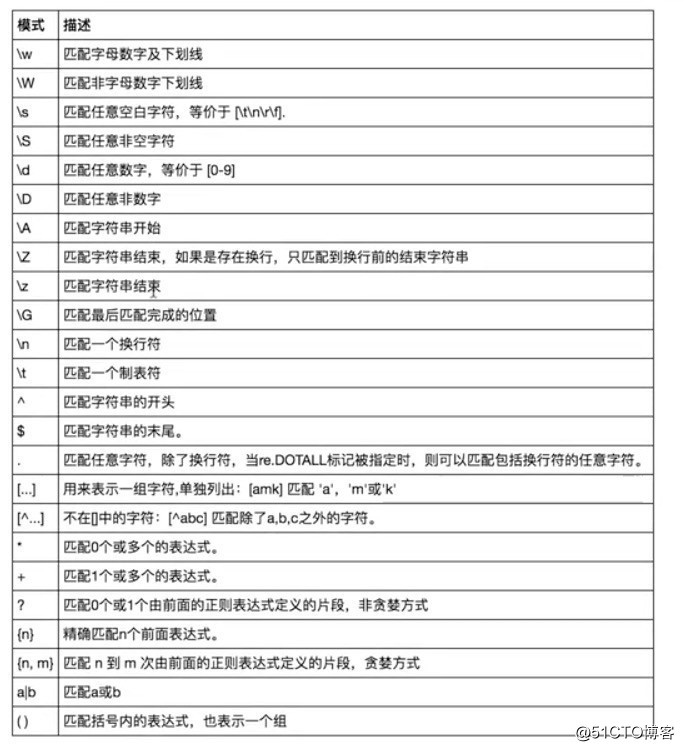
# =================================匹配模式=================================
#一對一的匹配
# ‘hello‘.replace(old,new)
# ‘hello‘.find(‘pattern‘)

#正則匹配
import re
#\w與\W
print(re.findall(‘\w‘,‘hello egon 123‘)) #[‘h‘, ‘e‘, ‘l‘, ‘l‘, ‘o‘, ‘e‘, ‘g‘, ‘o‘, ‘n‘, ‘1‘, ‘2‘, ‘3‘]
print(re.findall(‘\W‘,‘hello egon 123‘)) #[‘ ‘, ‘ ‘]

#\s與\S
print(re.findall(‘\s‘,‘hello  egon  123‘)) #[‘ ‘, ‘ ‘, ‘ ‘, ‘ ‘]
print(re.findall(‘\S‘,‘hello  egon  123‘)) #[‘h‘, ‘e‘, ‘l‘, ‘l‘, ‘o‘, ‘e‘, ‘g‘, ‘o‘, ‘n‘, ‘1‘, ‘2‘, ‘3‘]

#\n \t都是空,都可以被\s匹配
print(re.findall(‘\s‘,‘hello \n egon \t 123‘)) #[‘ ‘, ‘\n‘, ‘ ‘, ‘ ‘, ‘\t‘, ‘ ‘]

#\n與\t
print(re.findall(r‘\n‘,‘hello egon \n123‘)) #[‘\n‘]
print(re.findall(r‘\t‘,‘hello egon\t123‘)) #[‘\n‘]

#\d與\D
print(re.findall(‘\d‘,‘hello egon 123‘)) #[‘1‘, ‘2‘, ‘3‘]
print(re.findall(‘\D‘,‘hello egon 123‘)) #[‘h‘, ‘e‘, ‘l‘, ‘l‘, ‘o‘, ‘ ‘, ‘e‘, ‘g‘, ‘o‘, ‘n‘, ‘ ‘]

#\A與\Z
print(re.findall(‘\Ahe‘,‘hello egon 123‘)) #[‘he‘],\A==>^
print(re.findall(‘123\Z‘,‘hello egon 123‘)) #[‘he‘],\Z==>$

#^與$
print(re.findall(‘^h‘,‘hello egon 123‘)) #[‘h‘]
print(re.findall(‘3$‘,‘hello egon 123‘)) #[‘3‘]

# 重復匹配:| . | * | ? | .* | .*? | + | {n,m} |
#.
print(re.findall(‘a.b‘,‘a1b‘)) #[‘a1b‘]
print(re.findall(‘a.b‘,‘a1b a*b a b aaab‘)) #[‘a1b‘, ‘a*b‘, ‘a b‘, ‘aab‘]
print(re.findall(‘a.b‘,‘a\nb‘)) #[]
print(re.findall(‘a.b‘,‘a\nb‘,re.S)) #[‘a\nb‘]
print(re.findall(‘a.b‘,‘a\nb‘,re.DOTALL)) #[‘a\nb‘]同上一條意思一樣

#*
print(re.findall(‘ab*‘,‘bbbbbbb‘)) #[]
print(re.findall(‘ab*‘,‘a‘)) #[‘a‘]
print(re.findall(‘ab*‘,‘abbbb‘)) #[‘abbbb‘]

#?
print(re.findall(‘ab?‘,‘a‘)) #[‘a‘]
print(re.findall(‘ab?‘,‘abbb‘)) #[‘ab‘]
#匹配所有包含小數在內的數字
print(re.findall(‘\d+\.?\d*‘,"asdfasdf123as1.13dfa12adsf1asdf3")) #[‘123‘, ‘1.13‘, ‘12‘, ‘1‘, ‘3‘]

#.*默認為貪婪匹配
print(re.findall(‘a.*b‘,‘a1b22222222b‘)) #[‘a1b22222222b‘]

#.*?為非貪婪匹配:推薦使用
print(re.findall(‘a.*?b‘,‘a1b22222222b‘)) #[‘a1b‘]

#+
print(re.findall(‘ab+‘,‘a‘)) #[]
print(re.findall(‘ab+‘,‘abbb‘)) #[‘abbb‘]

#{n,m}
print(re.findall(‘ab{2}‘,‘abbb‘)) #[‘abb‘]
print(re.findall(‘ab{2,4}‘,‘abbb‘)) #[‘abb‘]
print(re.findall(‘ab{1,}‘,‘abbb‘)) #‘ab{1,}‘ ===> ‘ab+‘
print(re.findall(‘ab{0,}‘,‘abbb‘)) #‘ab{0,}‘ ===> ‘ab*‘

#[]
print(re.findall(‘a[1*-]b‘,‘a1b a*b a-b‘)) #[]內的都為普通字符了,且如果-沒有被轉意的話,應該放到[]的開頭或結尾
print(re.findall(‘a[^1*-]b‘,‘a1b a*b a-b a=b‘)) #[]內的^代表的意思是取反,所以結果為[‘a=b‘]
print(re.findall(‘a[0-9]b‘,‘a1b a*b a-b a=b‘)) #[]內的^代表的意思是取反,所以結果為[‘a=b‘]
print(re.findall(‘a[a-z]b‘,‘a1b a*b a-b a=b aeb‘)) #[]內的^代表的意思是取反,所以結果為[‘a=b‘]
print(re.findall(‘a[a-zA-Z]b‘,‘a1b a*b a-b a=b aeb aEb‘)) #[]內的^代表的意思是取反,所以結果為[‘a=b‘]

#\# print(re.findall(‘a\\c‘,‘a\c‘)) #對於正則來說a\\c確實可以匹配到a\c,但是在python解釋器讀取a\\c時,會發生轉義,然後交給re去執行,所以拋出異常
print(re.findall(r‘a\\c‘,‘a\c‘)) #r代表告訴解釋器使用rawstring,即原生字符串,把我們正則內的所有符號都當普通字符處理,不要轉義
print(re.findall(‘a\\\\c‘,‘a\c‘)) #同上面的意思一樣,和上面的結果一樣都是[‘a\\c‘]

#():分組
print(re.findall(‘ab+‘,‘ababab123‘)) #[‘ab‘, ‘ab‘, ‘ab‘]
print(re.findall(‘(ab)+123‘,‘ababab123‘)) #[‘ab‘],匹配到末尾的ab123中的ab
print(re.findall(‘(?:ab)+123‘,‘ababab123‘)) #findall的結果不是匹配的全部內容,而是組內的內容,?:可以讓結果為匹配的全部內容
print(re.findall(‘href="(.*?)"‘,‘<a href="http://www.baidu.com">點擊</a>‘))#[‘http://www.baidu.com‘]
print(re.findall(‘href="(?:.*?)"‘,‘<a href="http://www.baidu.com">點擊</a>‘))#[‘href="http://www.baidu.com"‘]

#|
print(re.findall(‘compan(?:y|ies)‘,‘Too many companies have gone bankrupt, and the next one is my company‘))

# ===========================re模塊提供的方法介紹===========================
import re
#1
print(re.findall(‘e‘,‘alex make love‘) )   #[‘e‘, ‘e‘, ‘e‘],返回所有滿足匹配條件的結果,放在列表裏
#2
print(re.search(‘e‘,‘alex make love‘).group()) #e,只到找到第一個匹配然後返回一個包含匹配信息的對象,該對象可以通過調用group()方法得到匹配的字符串,如果字符串沒有匹配,則返回None。

#3
print(re.match(‘e‘,‘alex make love‘))    #None,同search,不過在字符串開始處進行匹配,完全可以用search+^代替match

#4
print(re.split(‘[ab]‘,‘abcd‘))     #[‘‘, ‘‘, ‘cd‘],先按‘a‘分割得到‘‘和‘bcd‘,再對‘‘和‘bcd‘分別按‘b‘分割

#5
print(‘===>‘,re.sub(‘a‘,‘A‘,‘alex make love‘)) #===> Alex mAke love,不指定n,默認替換所有
print(‘===>‘,re.sub(‘a‘,‘A‘,‘alex make love‘,1)) #===> Alex make love
print(‘===>‘,re.sub(‘a‘,‘A‘,‘alex make love‘,2)) #===> Alex mAke love
print(‘===>‘,re.sub(‘^(\w+)(.*?\s)(\w+)(.*?\s)(\w+)(.*?)$‘,r‘\5\2\3\4\1‘,‘alex make love‘)) #===> love make alex

print(‘===>‘,re.subn(‘a‘,‘A‘,‘alex make love‘)) #===> (‘Alex mAke love‘, 2),結果帶有總共替換的個數

#6
obj=re.compile(‘\d{2}‘)

print(obj.search(‘abc123eeee‘).group()) #12
print(obj.findall(‘abc123eeee‘)) #[‘12‘],重用了obj
2.time模塊
import time
#--------------------------我們先以當前時間為準,讓大家快速認識三種形式的時間
print(time.time()) # 時間戳:1487130156.419527
print(time.strftime("%Y-%m-%d %X")) #格式化的時間字符串:‘2017-02-15 11:40:53‘

print(time.localtime()) #本地時區的struct_time
print(time.gmtime())    #UTC時區的struct_time
#--------------------------按圖1轉換時間
# localtime([secs])
# 將一個時間戳轉換為當前時區的struct_time。secs參數未提供,則以當前時間為準。
time.localtime()
time.localtime(1473525444.037215)

# gmtime([secs]) 和localtime()方法類似,gmtime()方法是將一個時間戳轉換為UTC時區(0時區)的struct_time。

# mktime(t) : 將一個struct_time轉化為時間戳。
print(time.mktime(time.localtime()))#1473525749.0

# strftime(format[, t]) : 把一個代表時間的元組或者struct_time(如由time.localtime()和
# time.gmtime()返回)轉化為格式化的時間字符串。如果t未指定,將傳入time.localtime()。如果元組中任何一個
# 元素越界,ValueError的錯誤將會被拋出。
print(time.strftime("%Y-%m-%d %X", time.localtime()))#2016-09-11 00:49:56

# time.strptime(string[, format])
# 把一個格式化時間字符串轉化為struct_time。實際上它和strftime()是逆操作。
print(time.strptime(‘2011-05-05 16:37:06‘, ‘%Y-%m-%d %X‘))
#time.struct_time(tm_year=2011, tm_mon=5, tm_mday=5, tm_hour=16, tm_min=37, tm_sec=6,
#  tm_wday=3, tm_yday=125, tm_isdst=-1)
#在這個函數中,format默認為:"%a %b %d %H:%M:%S %Y"。
3.logging模塊
#日誌模塊的詳細用法:
import logging
#1、Logger:產生日誌
logger1=logging.getLogger("訪問日誌")
#2、Filter:

#3、Handler:接受傳過來的日誌,進行日誌格式化,可以打印到終端或者文件
sh=logging.StreamHandler()#打印到終端
fh1 = logging.FileHandler(‘s1.log‘,encoding=‘utf-8‘)
fh2 = logging.FileHandler(‘s2.log‘,encoding=‘utf-8‘)

#4、Formatter:日誌格式
formatter1 = logging.Formatter(
    fmt=‘%(asctime)s - %(name)s - %(levelname)s -%(module)s:  %(message)s‘,
    datefmt=‘%Y-%m-%d %H:%M:%S %p‘,
)
formatter2 = logging.Formatter(
    fmt=‘%(asctime)s - %(message)s‘,
    datefmt=‘%Y-%m-%d %H:%M:%S %p‘,
)

formatter3=logging.Formatter(
    fmt=‘%(asctime)s : %(module)s : %(message)s‘,
    datefmt=‘%Y-%m-%d %H:%M:%S %p‘,
)

#5、為handler綁定日誌格式
# sh.setFormatter()
4.random模塊
#random 生成隨機數模塊

import random
# random.randint(a,b) [a,b]生成a到b之前的隨機整數
# random.random() (0,1) 生成0到1之間的隨機小數
# random.choice()
# random.randrange() [a,b) 生成a到b之間的隨機整數
# random.uniform() (a,b) 生成a到b之間的隨機小數
# 練習:編寫一個隨機驗證碼的函數,驗證碼包含數字,字母大小寫

def make_code(n):
    res = ""
    for i in range(n):
        s1 = str(random.randint(0,9))
        s2 = chr(random.randint(65,90))
        s3 = chr(random.randint(97,122))
        res += random.choice([s1,s2,s3])
    return res

print(make_code(9))
# print(random.random())
# print(random.choice([‘1‘,‘2‘,‘3‘]),2)
# print(random.randrange(1,3))
# print(random.uniform(1,3))

#洗牌操作
item=[1,2,3,4,5,6,7,8,9,10,‘J‘,‘Q‘,‘K‘]
random.shuffle(item)
print(item)
5.os 模塊
import os,sys

#拼接項目所在跟路徑
print(os.path.normpath(os.path.join(
    os.path.abspath(__file__),
    ‘..‘,
    ‘..‘
)))
# print(os.path.dirname(__file__)) #獲取當前文件的目錄路徑
# print(os.path.abspath(__file__)) #獲取當前文件的絕對路徑
# print(os.path.exists(__file__)) #判斷文件是否存在
# print(os.path.join(‘C:‘,‘a‘,‘D:‘,‘b‘,‘c‘)) #從最右邊的根目錄開始拼接文件路徑
print(os.path.split(‘D:b\c\d\a.txt‘)) #將路徑拆成分
# print(os.name) #操作系統的類型
# print(os.pardir) #上級目錄
6.sys模塊
import sys,time,os

#打印進度條
def progress(percent,width=50):
    ‘‘‘print process ‘‘‘
    if percent > 1:
        percent = 1
    show_str = ((‘[%%-%ds]‘ %width) %(‘#‘*int(percent*width)))
    print(‘\r%s %d%%‘ %(show_str,int(percent*100)),end=‘‘)

revc_size = 0
total_size = 10242

while revc_size < total_size:
    revc_size+=1024
    time.sleep(0.1)
    progress(revc_size/total_size)

#打印進度條  簡版
# for n in range(50):
#     sys.stdout.write(‘#‘)
#     sys.stdout.flush()
#     time.sleep(0.05)

# sys.argv[1]  #傳入的第一個參數
# print(sys.path ) #打印系統環境變量
# sys.exit(n) # 定義退出時的狀態碼
# print(sys.platform) #系統的類型
7.json/pikle模塊
之前我們學習過用eval內置方法可以將一個字符串轉成python對象,不過,eval方法是有局限性的,對於普通的數據類型,json.loads和eval都能用,但遇到特殊類型的時候,eval就不管用了,所以eval的重點還是通常用來執行一個字符串表達式,並返回表達式的值。

1 import json
2 x="[null,true,false,1]"
3 print(eval(x)) #報錯,無法解析null類型,而json就可以
4 print(json.loads(x))
什麽是序列化?

我們把對象(變量)從內存中變成可存儲或傳輸的過程稱之為序列化,在Python中叫pickling,在其他語言中也被稱之為serialization,marshalling,flattening等等,都是一個意思。

為什麽要序列化?

1:持久保存狀態

需知一個軟件/程序的執行就在處理一系列狀態的變化,在編程語言中,‘狀態‘會以各種各樣有結構的數據類型(也可簡單的理解為變量)的形式被保存在內存中。

內存是無法永久保存數據的,當程序運行了一段時間,我們斷電或者重啟程序,內存中關於這個程序的之前一段時間的數據(有結構)都被清空了。

在斷電或重啟程序之前將程序當前內存中所有的數據都保存下來(保存到文件中),以便於下次程序執行能夠從文件中載入之前的數據,然後繼續執行,這就是序列化。

具體的來說,你玩使命召喚闖到了第13關,你保存遊戲狀態,關機走人,下次再玩,還能從上次的位置開始繼續闖關。或如,虛擬機狀態的掛起等。

2:跨平臺數據交互

序列化之後,不僅可以把序列化後的內容寫入磁盤,還可以通過網絡傳輸到別的機器上,如果收發的雙方約定好實用一種序列化的格式,那麽便打破了平臺/語言差異化帶來的限制,實現了跨平臺數據交互。

反過來,把變量內容從序列化的對象重新讀到內存裏稱之為反序列化,即unpickling。

如何序列化之json和pickle:

json

如果我們要在不同的編程語言之間傳遞對象,就必須把對象序列化為標準格式,比如XML,但更好的方法是序列化為JSON,因為JSON表示出來就是一個字符串,可以被所有語言讀取,也可以方便地存儲到磁盤或者通過網絡傳輸。JSON不僅是標準格式,並且比XML更快,而且可以直接在Web頁面中讀取,非常方便。

JSON表示的對象就是標準的JavaScript語言的對象,JSON和Python內置的數據類型對應如下: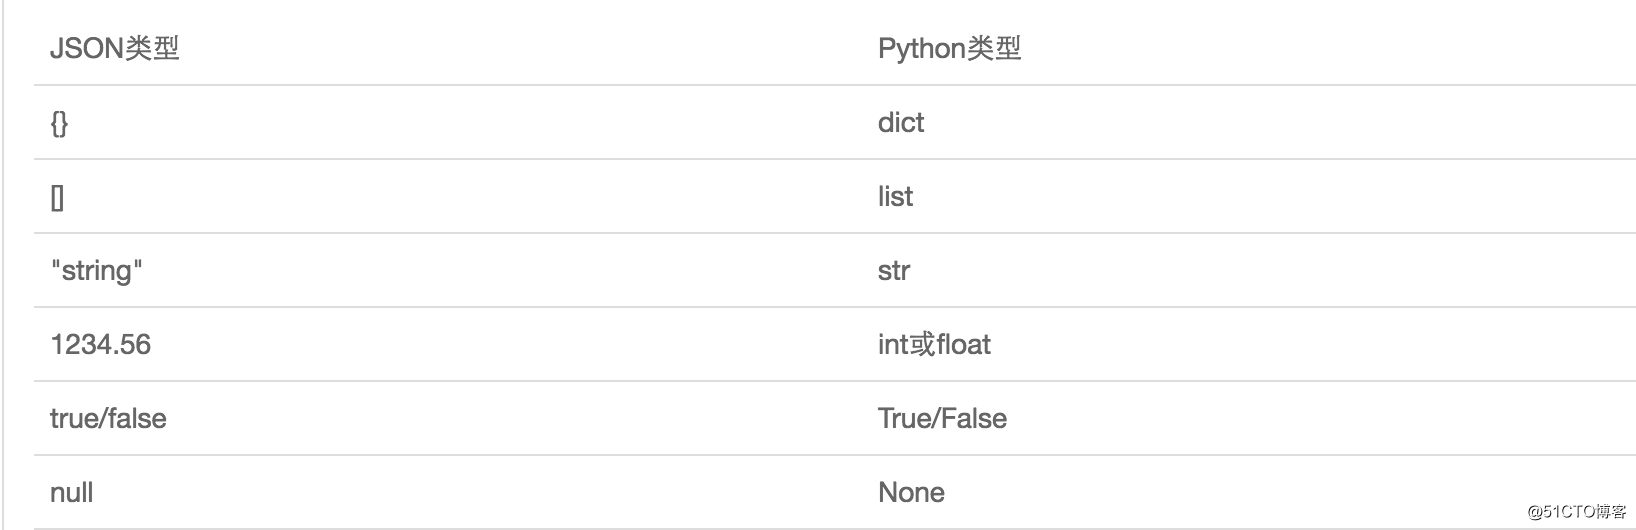

import json

dic={‘name‘:‘alvin‘,‘age‘:23,‘sex‘:‘male‘}
print(type(dic))#<class ‘dict‘>

j=json.dumps(dic)
print(type(j))#<class ‘str‘>

f=open(‘序列化對象‘,‘w‘)
f.write(j)  #-------------------等價於json.dump(dic,f)
f.close()
#-----------------------------反序列化<br>
import json
f=open(‘序列化對象‘)
data=json.loads(f.read())#  等價於data=json.load(f)

import json
#dct="{‘1‘:111}"#json 不認單引號
#dct=str({"1":111})#報錯,因為生成的數據還是單引號:{‘one‘: 1}

dct=‘{"1":"111"}‘
print(json.loads(dct))

#conclusion:
#        無論數據是怎樣創建的,只要滿足json格式,就可以json.loads出來,不一定非要dumps的數據才能loads

 註意點
import pickle

dic={‘name‘:‘alvin‘,‘age‘:23,‘sex‘:‘male‘}

print(type(dic))#<class ‘dict‘>

j=pickle.dumps(dic)
print(type(j))#<class ‘bytes‘>

f=open(‘序列化對象_pickle‘,‘wb‘)#註意是w是寫入str,wb是寫入bytes,j是‘bytes‘
f.write(j)  #-------------------等價於pickle.dump(dic,f)

f.close()
#-------------------------反序列化
import pickle
f=open(‘序列化對象_pickle‘,‘rb‘)

data=pickle.loads(f.read())#  等價於data=pickle.load(f)

print(data[‘age‘])
8.configparse模塊
對類似於mysql php等配置文件進行操作
import configparser
config = configparser.ConfigParser()

config.read(‘my.ini‘)
#增加配置項
# config.add_section(‘mysqld‘)
# config.set(‘mysqld‘,‘port‘,‘3306‘)
# config.set(‘mysqld‘,‘character-server-set‘,‘utf8‘)
# config.set(‘mysqld‘,‘db-engin‘,‘innodb‘)
#
# config.add_section(‘client‘)
# config.set(‘client‘,‘name‘,‘huazai‘)
# config.set(‘client‘,‘password‘,‘123456‘)

#修改配置項
config.set(‘client‘,‘password‘,‘abc123‘)
config.write(open(‘my.ini‘,‘w‘,encoding=‘utf-8‘))  #最後

# config.add_section(‘hehe‘)
#查看section下的配置內容
print(config.get(‘mysqld‘,‘port‘))
9.hashlib模塊
#hashlib加密三個特點:
    #hash值長度固定
    #不可逆
    #str相同加密後,hash值相同
#用途:
#文件下載,校驗文件的完整

# import hashlib
# md5=hashlib.md5()
# md5.update(‘hello‘.encode(‘utf-8‘))
# md5.update(‘hello‘.encode(‘utf-8‘))
# print(md5.hexdigest())

#加鹽
# import hashlib
# md5 = hashlib.md5()
# md5.update(‘兩個黃鸝鳴翠柳‘.encode(‘utf-8‘))
# md5.update(‘hello‘.encode(‘utf-8‘))
# md5.update(‘一行白鷺上青天‘.encode(‘utf-8‘))
# print(md5.hexdigest())
# md = hashlib.md5()
#
# md.update(‘兩個黃鸝鳴翠柳hello一行白鷺上青天‘.encode(‘utf-8‘))
# print(md.hexdigest())

import hmac
h=hmac.new(‘slat‘.encode(‘utf-8‘))
h.update(‘hello‘.encode(‘utf-8‘))
print(h.hexdigest())
10.shutil模塊
import shutil
#對文件操作
# shutil.copyfileobj() #將文件內容拷貝到另一個文件中
# shutil.copyfile() #拷貝文件
# shutil.copymode() #僅拷貝權限。內容、組、用戶均不變
# shutil.copystat() #僅拷貝狀態的信息,包括:mode bits, atime, mtime, flags
# shutil.copy() #拷貝文件和權限
# shutil.copy2() #拷貝文件和狀態信息
# shutil.copytree() #遞歸的去拷貝文件夾
# shutil.ignore_patterns() #忽略一些文件,和其他命令組合使用
# shutil.rmtree() #遞歸的去刪除文件
# shutil.move() #遞歸的去移動文件,它類似mv命令,其實就是重命名。
# shutil.make_archive() #創建壓縮包並返回文件路徑
# 將 /data 下的文件打包放置當前程序目錄
import shutil

# ret = shutil.make_archive("data_bak", ‘gztar‘, root_dir=‘/data‘)

# 將 /data下的文件打包放置 /tmp/目錄
import shutil

ret = shutil.make_archive("/tmp/data_bak", ‘gztar‘, root_dir=‘/data‘)
11.shelve模塊
 # shelve模塊比pickle模塊簡單,只有一個open函數,返回類似字典的對象,可讀可寫;key必須為字符串,而值可以是python所支持的數據類型

import shelve

f=shelve.open(r‘sheve.txt‘)
# f[‘stu1_info‘]={‘name‘:‘egon‘,‘age‘:18,‘hobby‘:[‘piao‘,‘smoking‘,‘drinking‘]}
# f[‘stu2_info‘]={‘name‘:‘gangdan‘,‘age‘:53}
# f[‘school_info‘]={‘website‘:‘http://www.pypy.org‘,‘city‘:‘beijing‘}

print(f[‘stu1_info‘][‘hobby‘])
f.close()
12.xml模塊
xml是實現不同語言或程序之間進行數據交換的協議,跟json差不多,但json使用起來更簡單,不過,古時候,在json還沒誕生的黑暗年代,大家只能選擇用xml呀,至今很多傳統公司如金融行業的很多系統的接口還主要是xml。
xml的格式如下,就是通過<>節點來區別數據結構的:
xml是實現不同語言或程序之間進行數據交換的協議,跟json差不多,但json使用起來更簡單,不過,古時候,在json還沒誕生的黑暗年代,大家只能選擇用xml呀,至今很多傳統公司如金融行業的很多系統的接口還主要是xml。

xml的格式如下,就是通過<>節點來區別數據結構的:

<?xml version="1.0"?>
<data>
    <country name="Liechtenstein">
        <rank updated="yes">2</rank>
        <year>2008</year>
        <gdppc>141100</gdppc>
        <neighbor name="Austria" direction="E"/>
        <neighbor name="Switzerland" direction="W"/>
    </country>
    <country name="Singapore">
        <rank updated="yes">5</rank>
        <year>2011</year>
        <gdppc>59900</gdppc>
        <neighbor name="Malaysia" direction="N"/>
    </country>
    <country name="Panama">
        <rank updated="yes">69</rank>
        <year>2011</year>
        <gdppc>13600</gdppc>
        <neighbor name="Costa Rica" direction="W"/>
        <neighbor name="Colombia" direction="E"/>
    </country>
</data>

xml協議在各個語言裏的都 是支持的,在python中可以用以下模塊操作xml:

# print(root.iter(‘year‘)) #全文搜索
# print(root.find(‘country‘)) #在root的子節點找,只找一個
# print(root.findall(‘country‘)) #在root的子節點找,找所有

import xml.etree.ElementTree as ET

tree = ET.parse("xmltest.xml")
root = tree.getroot()
print(root.tag)

#遍歷xml文檔
for child in root:
    print(‘========>‘,child.tag,child.attrib,child.attrib[‘name‘])
    for i in child:
        print(i.tag,i.attrib,i.text)

#只遍歷year 節點
for node in root.iter(‘year‘):
    print(node.tag,node.text)
#---------------------------------------

import xml.etree.ElementTree as ET

tree = ET.parse("xmltest.xml")
root = tree.getroot()

#修改
for node in root.iter(‘year‘):
    new_year=int(node.text)+1
    node.text=str(new_year)
    node.set(‘updated‘,‘yes‘)
    node.set(‘version‘,‘1.0‘)
tree.write(‘test.xml‘)

#刪除node
for country in root.findall(‘country‘):
   rank = int(country.find(‘rank‘).text)
   if rank > 50:
     root.remove(country)

tree.write(‘output.xml‘)

#在country內添加(append)節點year2
import xml.etree.ElementTree as ET
tree = ET.parse("a.xml")
root=tree.getroot()
for country in root.findall(‘country‘):
    for year in country.findall(‘year‘):
        if int(year.text) > 2000:
            year2=ET.Element(‘year2‘)
            year2.text=‘新年‘
            year2.attrib={‘update‘:‘yes‘}
            country.append(year2) #往country節點下添加子節點

tree.write(‘a.xml.swap‘)

自己創建xml文檔:

import xml.etree.ElementTree as ET

new_xml = ET.Element("namelist")
name = ET.SubElement(new_xml,"name",attrib={"enrolled":"yes"})
age = ET.SubElement(name,"age",attrib={"checked":"no"})
sex = ET.SubElement(name,"sex")
sex.text = ‘33‘
name2 = ET.SubElement(new_xml,"name",attrib={"enrolled":"no"})
age = ET.SubElement(name2,"age")
age.text = ‘19‘

et = ET.ElementTree(new_xml) #生成文檔對象
et.write("test.xml", encoding="utf-8",xml_declaration=True)

ET.dump(new_xml) #打印生成的格式
Day6-常用模塊