
SpringCloud學習之SpringCloudStream&集成kafka
一、關於Spring-Cloud-Stream
Spring Cloud Stream本質上就是整合了Spring Boot和Spring Integration,實現了一套輕量級的消息驅動的微服務框架。通過使用Spring Cloud Stream,可以有效地簡化開發人員對消息中間件的使用復雜度,讓系統開發人員可以有更多的精力關註於核心業務邏輯的處理。
在這裏我先放一張官網的圖:
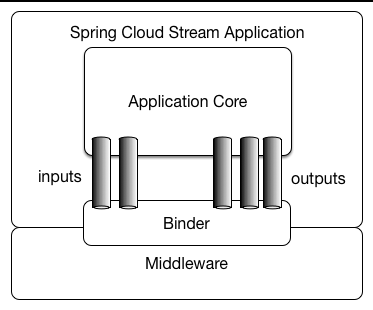
應用程序通過Spring Cloud Stream註入到其中的輸入和輸出通道與外界進行通信,應用程序並不關心到底和哪個消息中間件通訊,它主要通過inputs與outputs進行消息的訂閱和發送,根據此規則如果我們很容易的實現消息傳遞,訂閱消息與消息中轉,並且當需要切換消息中間件時,幾乎不需要修改代碼,只需要變更配置就行了。
其中 Inputs代表了應用程序監聽消息 、outputs代表發送消息、binder的話大家可以理解為將應用程序與消息中間件隔離的抽象,類似於dao模式下dao的屏蔽service與數據庫的實現類似。當然springcloud默認提供了rabbitmq與kafka的實現。
二、springcloud集成kafka
1、添加gradle依賴:


dependencies{ compile(‘org.springframework.cloud:spring-cloud-stream‘) compile(‘org.springframework.cloud:spring-cloud-stream-binder-kafka‘) compile(View Code‘org.springframework.kafka:spring-kafka‘) }
2、定義一個接口:
spring-cloud-stream已經給我們定義了最基本的輸入與輸出接口,他們分別是 Source,Sink, Processor
Sink接口:
package org.springframework.cloud.stream.messaging; import org.springframework.cloud.stream.annotation.Input; import org.springframework.messaging.SubscribableChannel;View Codepublic interface Sink { String INPUT = "input"; @Input("input") SubscribableChannel input(); }
Source接口:
package org.springframework.cloud.stream.messaging;

import org.springframework.cloud.stream.annotation.Output;
import org.springframework.messaging.MessageChannel;

public interface Source {
    String OUTPUT = "output";

    @Output("output")
    MessageChannel output();
}
View Code
Processor接口:
package org.springframework.cloud.stream.messaging;

public interface Processor extends Source, Sink {
}
View Code
這裏面Processor這個接口既定義輸入通道又定義了輸出通道。同時我們也可以自己定義通道接口,代碼如下:
package com.bdqn.lyrk.shop.channel;

import org.springframework.cloud.stream.annotation.Input;
import org.springframework.cloud.stream.annotation.Output;
import org.springframework.messaging.MessageChannel;
import org.springframework.messaging.SubscribableChannel;

public interface ShopChannel {

    /**
     * 發消息的通道名稱
     */
    String SHOP_OUTPUT = "shop_output";

    /**
     * 消息的訂閱通道名稱
     */
    String SHOP_INPUT = "shop_input";

    /**
     * 發消息的通道
     *
     * @return
     */
    @Output(SHOP_OUTPUT)
    MessageChannel sendShopMessage();

    /**
     * 收消息的通道
     *
     * @return
     */
    @Input(SHOP_INPUT)
    SubscribableChannel recieveShopMessage();


}
View Code
3、定義服務類
package com.bdqn.lyrk.shop.server;

import com.bdqn.lyrk.shop.channel.ShopChannel;
import org.springframework.cloud.stream.annotation.StreamListener;
import org.springframework.messaging.Message;
import org.springframework.messaging.MessageChannel;
import org.springframework.messaging.support.MessageBuilder;
import org.springframework.web.bind.annotation.GetMapping;
import org.springframework.web.bind.annotation.RestController;

import javax.annotation.Resource;

@RestController
public class ShopService {

    @Resource(name = ShopChannel.SHOP_OUTPUT)
    private MessageChannel sendShopMessageChannel;

    @GetMapping("/sendMsg")
    public String sendShopMessage(String content) {
        boolean isSendSuccess = sendShopMessageChannel.
                send(MessageBuilder.withPayload(content).build());
        return isSendSuccess ? "發送成功" : "發送失敗";
    }

    @StreamListener(ShopChannel.SHOP_INPUT)
    public void receive(Message<String> message) {
        System.out.println(message.getPayload());
    }
}
View Code
這裏面大家註意 @StreamListener 這個註解可以監聽輸入通道裏的消息內容,這裏面要指定我們剛才定義的輸入通道名稱,而MessageChannel則可以通過
輸出通道發送消息,使用@Resource註入時也要指定我們剛才定義的輸出通道名稱
4、定義啟動類
package com.bdqn.lyrk.shop;

import com.bdqn.lyrk.shop.channel.ShopChannel;
import org.springframework.boot.SpringApplication;
import org.springframework.boot.autoconfigure.SpringBootApplication;
import org.springframework.cloud.stream.annotation.EnableBinding;

@SpringBootApplication
@EnableBinding(ShopChannel.class)
public class ShopServerApplication {

    public static void main(String[] args) {
        SpringApplication.run(ShopServerApplication.class, args);
    }
}
View Code
註意@EnableBinding註解,這個註解指定剛才我們定義通道的接口名稱,當然這裏也可以傳多個相關的接口
5、定義application.yml文件
spring:
  application:
    name: shop-server
  cloud:
    stream:
      bindings:
        #配置自己定義的通道與哪個中間件交互
        shop_input: #ShopChannel裏Input和Output的值
          destination: zhibo #目標主題
        shop_output:
          destination: zhibo
      default-binder: kafka #默認的binder是kafka
  kafka:
    bootstrap-servers: localhost:9092 #kafka服務地址
    consumer:
      group-id: consumer1
    producer:
      key-serializer: org.apache.kafka.common.serialization.ByteArraySerializer
      value-serializer: org.apache.kafka.common.serialization.ByteArraySerializer
      client-id: producer1
server:
  port: 8100
View Code
這裏是重頭戲,我們必須指定在接口裏定義的所有通道對應的消息主題,同時指定默認的binder為kafka,緊接著定義Spring-kafka的外部化配置,在這裏指定producer的序列化類為ByteArraySerializer
啟動程序成功後,我們訪問 http://localhost:8100/sendMsg?content=2 即可得到如下結果
SpringCloud學習之SpringCloudStream&集成kafka