
android:fitsSystemWindows屬性的用法
屬性說明
fitsSystemWindows屬性可以讓view根據系統窗口來調整自己的布局;簡單點說就是我們在設置應用布局時是否考慮系統窗口布局,這裏系統窗口包括系統狀態欄、導航欄、輸入法等,包括一些手機系統帶有的底部虛擬按鍵。
android:fitsSystemWindows=”true” (觸發View的padding屬性來給系統窗口留出空間)
這個屬性可以給任何view設置,只要設置了這個屬性此view的其他所有padding屬性失效,同時該屬性的生效條件是只有在設置了透明狀態欄(StatusBar)或者導航欄(NavigationBar)此屬性才會生效。
註意: fitsSystemWindows只作用在Android4.4及以上的系統,因為4.4以下的系統StatusBar沒有透明狀態。
應用場景
在不同Android版本下,App狀態欄和不同版本中系統本身的狀態欄的適配;
兼容帶有底部虛擬按鍵的手機系統。
屬性使用
1、默認效果
先貼一張未對系統狀態欄和導航欄做透明設置時測試布局效果圖:

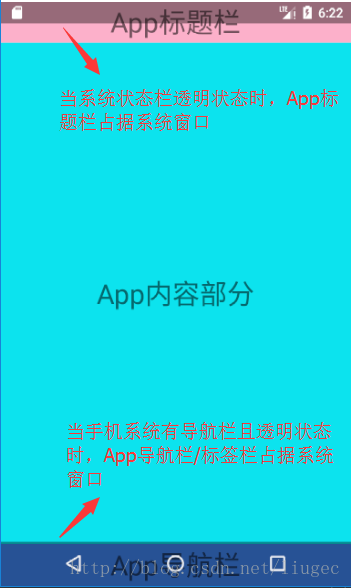
2、系統窗口透明後效果
當設置了透明狀態欄(StatusBar)和透明導航欄(NavigationBar)時效果圖:
透明狀態欄代碼設置:
//布局設置
<item name="android:windowTranslucentStatus">true</item>
//或者代碼設置
if (Build.VERSION.SDK_INT >= Build.VERSION_CODES.KITKAT) {
    getWindow().addFlags(WindowManager.LayoutParams.FLAG_TRANSLUCENT_NAVIGATION);
}
透明導航欄代碼設置:
//布局設置
<item name="android:windowTranslucentNavigation">true</item>
//或者代碼設置
if (Build.VERSION.SDK_INT >= Build.VERSION_CODES.KITKAT) {
    getWindow().addFlags(WindowManager.LayoutParams.FLAG_TRANSLUCENT_NAVIGATION);
}
如果有以上兩種情況之一,我們的狀態欄(StatusBar)或導航欄(NavigationBar)就會變成透明,並且布局會擴展到StatusBar或NavigationBar的位置。
註意:這裏有個關於狀態欄和導航欄透明樣式的問題,這個是受Android版本決定,4.4以下無透明效果,4.4~5.0是全透明,5.0以上是半透明。我使用的是5.0以上的版本模擬器進行測試的,所以是半透明。
3、設置fitsSystemWindows屬性後效果
現在就到了我們關鍵的fitsSystemWindows屬性登場了,只要在根布局中加上android:fitsSystemWindows=”true”效果如下圖:
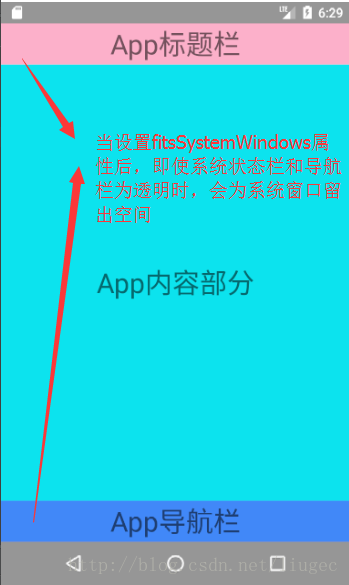
設置了android:fitsSystemWindows=”true”屬性後針對透明的狀態欄會自動添加一個值等於狀態欄高度的paddingTop;針對透明的系統導航欄會自動添加一個值等於導航欄高度的paddingBottom
貼上布局的代碼:
<?xml version="1.0" encoding="utf-8"?>
<LinearLayout xmlns:android="http://schemas.android.com/apk/res/android"
              android:layout_width="match_parent"
              android:layout_height="match_parent"
              android:fitsSystemWindows="true"
              android:orientation="vertical">

    <TextView
        android:layout_width="match_parent"
        android:layout_height="45dp"
        android:background="#66FF4081"
        android:gravity="center"
        android:text="App標題欄"
        android:textSize="30sp"
        />

    <TextView
        android:layout_width="match_parent"
        android:layout_height="0dp"
        android:layout_weight="1"
        android:background="#0CE3EE"
        android:gravity="center"
        android:text="App內容部分"
        android:textSize="30sp"/>

    <TextView
        android:layout_width="match_parent"
        android:layout_height="45dp"
        android:background="#4188F8"
        android:gravity="center"
        android:text="App導航欄"
        android:textSize="30sp"/>
</LinearLayout>
追及
附加一個獲取狀態欄StatusBar的和一個獲取導航欄NavigationBar高度的java代碼:
//返回值就是狀態欄的高度,得到的值單位px
public float getStatusBarHeight() {
    float result = 0;
    int resourceId = getResources().getIdentifier("status_bar_height", "dimen", "android");
    if (resourceId > 0) {
        result = getResources().getDimension(resourceId);
    }
    return result;
}
 //返回值就是導航欄的高度,得到的值單位px
public float getNavigationBarHeight() {
    float result = 0;
    int resourceId = getResources().getIdentifier("navigation_bar_height", "dimen", "android");
    if (resourceId > 0) {
        result = getResources().getDimension(resourceId);
    }
    return result;
}
android:fitsSystemWindows屬性的用法