
是時候來了解android7了:shortcuts(快捷方式)
本文已授權微信公眾號:鴻洋(hongyangAndroid)在微信公眾號平臺原創首發。
就在前幾天的一個晚上, Google召開了它的秋季釋出會, 毫無懸念的宣佈了它的最新手機品牌Pixel, 與此同時我的nexus裝置也從親兒子降級成為乾兒子. 不過還好Google並沒有對這一干一親區別對待, 這不, 今天就推送了android7.1.1的更新, 隨之而來的又是一大波新特性(又有我們開發者忙的了…), 這其中一個叫作Shortcuts的功能真的是太讚了, 利用這個功能以後我們就再也不用一頁一頁的進入我們想要的頁面了, 在桌面長按圖示就可以快捷進入(唉, 國產APP這個功能估計要等好久好久…), 而且, 這個快捷方式是我們開發者去自定義了! 所以, 就在API釋出的當天晚上, 我從文件中瞭解了一下這個新特性, 然後就有了這篇文章.
Shortcuts初體驗
好了, 在我們開始擼碼之前, 還是來看看這個新特性有多贊, 新系統中好多google家的APP都集成了這項功能, 所以, 我們先挑個APP來體驗一下.
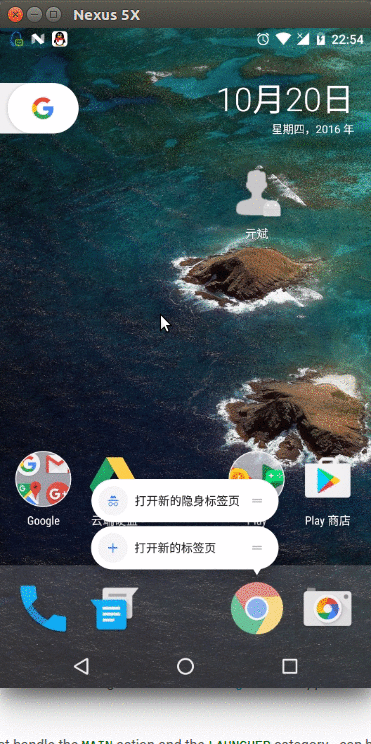
這個功能還是很實用的, 有了它, 我們就可以直接開啟簡訊應用給某人發簡訊啦~~ 下面我們就開始學習一下這個新的Shortcuts在開發中如何使用!
使用Static Shortcuts
什麼是Static Shortcuts? 我的理解就是利用xml寫死的配置, 想想BroadcastReceiver可以靜態註冊也可以利用java程式碼動態註冊, 這裡也是一樣的.
那靜態註冊該如何做呢? 首先, 我們需要在res/xml
shortcuts.xml.
<shortcuts xmlns:android="http://schemas.android.com/apk/res/android">
<shortcut
android:shortcutId="settings"
android:enabled="true"
android:icon="@drawable/icon"
android:shortcutShortLabel="@string/settings_short_name"
android:shortcutLongLabel 首先一個shortcuts標籤, 然後是一個shortcut, 到這裡我們大概可以猜測到這裡可以註冊多個shortcut, shortcut標籤有很多屬性, 我們來一個個的瞭解下.
- shortcutId, 不用多說, 這肯定是一個唯一的id
- enabled, 表示這個shortcut是否可用
- shortcutShortLabel, 這裡是配置的短名稱, 下面還會有長名稱, 如果長名稱顯示不下, 就顯示短名稱
- shortcutLongLabel, 這裡是配置的長名稱, launcher會優先選擇長名稱顯示
- shortcutDisabledMessage, 這個配置是在我們選擇一個不可用的shortcut時給使用者的一個提示
在shortcut標籤下還有兩個我們熟悉的標籤.
- intent, 這裡表示我們點選shortcut時要幹嘛, targetPackage是指定一個目標應用的包名, targetClass是我們要跳轉的目標類, 這裡要注意的是
android:action一定要配置, 否則會崩潰- categories, 這個東西目前位置官方只給提供了
android.shortcut.conversation
ok, 上面的幾行程式碼, 我們一個static shortcuts就完成了, 那如何使用呢? 是在manifest中配置activity的地方使用, 而且這個activity是有要求的.
能配置shortcuts的activity必須要有action是android.intent.action.MAIN和category是android.intent.category.LAUNCHER!
為什麼要有這個要求, 自己去體會…
最終, 我們來看看這個配置:
<application
        android:allowBackup="true"
        android:icon="@mipmap/ic_launcher"
        android:label="@string/app_name"
        android:supportsRtl="true"
        android:theme="@style/AppTheme">
        <activity android:name=".MainActivity">
            <intent-filter>
                <action android:name="android.intent.action.MAIN" />
                <category android:name="android.intent.category.LAUNCHER" />
            </intent-filter>

            <meta-data
                android:name="android.app.shortcuts"
                android:resource="@xml/shortcuts"/>
        </activity>

        <activity android:name=".SettingsActivity" />
    </application>
來看看最終實現的效果:
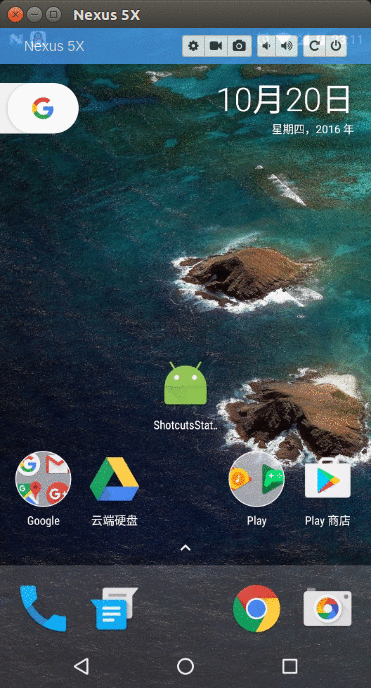
ok, 到這裡, 靜態配置shortcuts我們就學習完了, 是不是很簡單? 那這個靜態配置是用在什麼地方呢? 我想了想, 這裡適用的場景一般是一些固定不變的功能, 例如你APP的設定介面, 如果是一些動態的資料, 那靜態配置就不適合了, 就需要我們接下來要介紹到了動態配置了.
使用Dynamic Shortcuts
在看完Static Shortcuts後, 我們不相信Google僅僅給我們開發者開放了侷限性如此大的使用方式, 肯定還會存在靈活性更大的API, 是的, 這就是我們馬上要講的Dynamic Shortcuts, 我把它稱為動態配置.
說起動態配置, 那肯定是用java程式碼實現了, 那如何實現呢?
首先第一步, 我們需要利用一下程式碼拿到ShortcutManager
getSystemService(ShortcutManager.class)拿到ShortcutManager後, 我們可以呼叫setDynamicShortcuts(List<ShortcutInfo>)方法去設定Shortcut, 那這個List如何得到呢? 我們來看看完整點的程式碼,
private void setupShortcuts() {
    mShortcutManager = getSystemService(ShortcutManager.class);

    List<ShortcutInfo> infos = new ArrayList<>();
    for (int i = 0; i < mShortcutManager.getMaxShortcutCountPerActivity(); i++) {
        Intent intent = new Intent(this, MessageActivity.class);
        intent.setAction(Intent.ACTION_VIEW);
        intent.putExtra("msg", "我和" + mAdapter.getItem(i) + "的對話");

        ShortcutInfo info = new ShortcutInfo.Builder(this, "id" + i)
                .setShortLabel(mAdapter.getItem(i))
                .setLongLabel("聯絡人:" + mAdapter.getItem(i))
                .setIcon(Icon.createWithResource(this, R.drawable.icon))
                .setIntent(intent)
                .build();
        infos.add(info);
//            manager.addDynamicShortcuts(Arrays.asList(info));
    }

    mShortcutManager.setDynamicShortcuts(infos);
}
這段程式碼的背景是我們模擬了一個聯絡人列表功能, 在launcher中我們長按圖示會出現一定數量的聯絡人快捷方式, 點選某個快捷方式會直接跳轉該聯絡人相關的頁面. 好, 介紹完背景, 我們來看程式碼, 首先我們通過getSystemService(ShortcutManager.class)來拿到ShortcutManager, 接下來一個for迴圈, 注意這個for迴圈的次數, 因為我們要新增的Shortcut不能是無限個, 所以這裡我們用getMaxShortcutCountPerActivity來獲取到最大個數. 然後在for迴圈裡, 我們首先構造一個intent, 注意, 這裡和Static Shortcut一樣, 必須要提供一個Action. 然後我們用ShortcutInfo.Builder來構造一個ShortcutInfo並且放到List中, 最終我們呼叫mShortcutManager.setDynamicShortcuts(infos)來設定Shortcuts.
好了, 程式碼其實很簡單, 我們來看看效果.
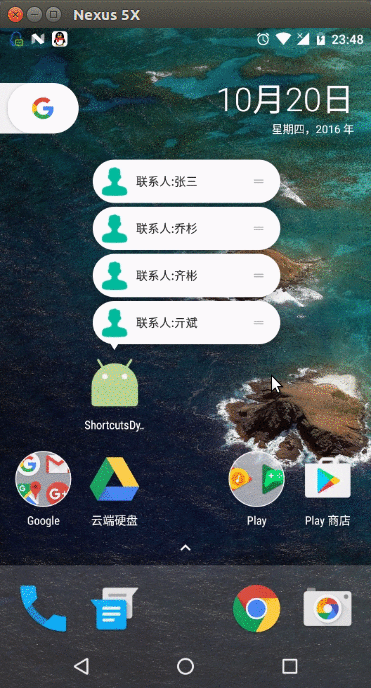
是不是很666?
動態更新 Shortcuts
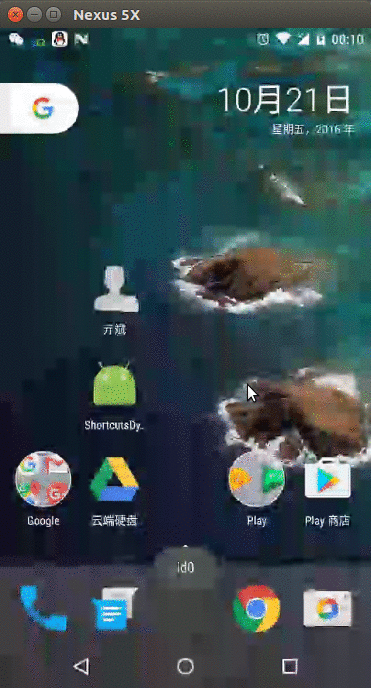
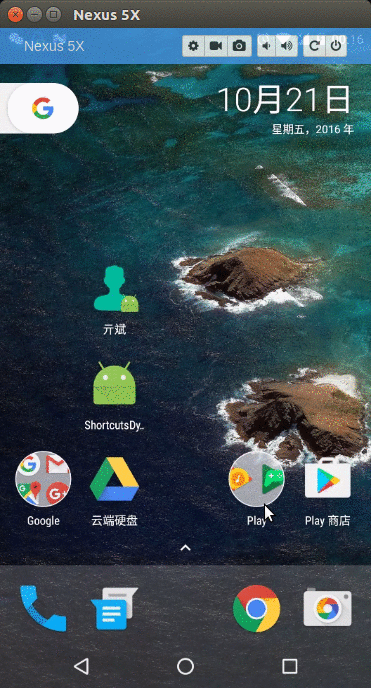
上面的程式碼我們雖然說是Dynamic, 但僅僅是使用java程式碼實現的罷了, 真正的Dynamic我們接下來才去講解, 在講解Dynamic之前, 我們先來介紹一個名詞-Pinning Shortcuts, 這是個啥玩意呢? 其實對於Shortcut, Android是允許我們直接放到桌面的, 這樣就更加方便了使用者的操作, google把他稱作為Pinning Shortcuts, 具體啥樣, 我們來張圖就明白了.
對於這個Pinning Shortcuts, google的文件說, 我們開發者是沒有權利去刪除的, 能刪除它的只有使用者. 那我該項功能刪除了咋辦? 這東西還在桌面上, 是不是APP要崩? 當然Google考慮到了這點, 它允許我們去disable這個shortcut. 具體還是來看程式碼, 這裡我們長按item來模擬一下刪除.
private void removeItem(int index) {
    List<ShortcutInfo> infos = mShortcutManager.getPinnedShortcuts();
    for (ShortcutInfo info : infos) {
        if (info.getId().equals("id" + index)) {
            mShortcutManager.disableShortcuts(Arrays.asList(info.getId()), "暫無該聯絡人");
        }
    }
    mShortcutManager.removeDynamicShortcuts(Arrays.asList("id" + index));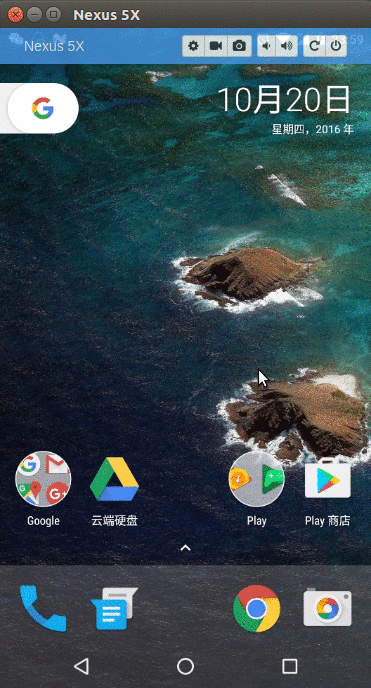
}首先我們先呼叫mShortcutManager.getPinnedShortcuts()來獲取到所有的Pinning Shortcuts, 然後去遍歷它, 找到我們刪除的那個, 然後通過APIdisableShortcuts(List<Ids>)來disable掉該項, 最後我們還要用過removeDynamicShortcuts(List<Ids>)來從shortcuts中移除. 來看看效果.
通過效果中, 我們可以看到, 我們disableShortcuts的那個Pinning Shortcut已經變灰了, 而且在點選的時候會提醒暫無該聯絡人, 這個提醒正是disableShortcuts的第二個引數.
現在, 刪除和禁用我們已經瞭解了, 那更新呢? 假如我修改了某個聯絡人的名字, shortcut是不是也應該相應的修改呢? 是的, 這裡還是需要我們通過程式碼來實現.
private void updItem(int index) {
    Intent intent = new Intent(this, MessageActivity.class);
    intent.setAction(Intent.ACTION_VIEW);
    intent.putExtra("msg", "我和" + mAdapter.getItem(index) + "的對話");

    ShortcutInfo info = new ShortcutInfo.Builder(this, "id" + index)
            .setShortLabel(mAdapter.getItem(index))
            .setLongLabel("聯絡人:" + mAdapter.getItem(index))
            .setIcon(Icon.createWithResource(this, R.drawable.icon))
            .setIntent(intent)
            .build();

    mShortcutManager.updateShortcuts(Arrays.asList(info));
}
構建intent我們就不說了, 接下來我們又使用ShortcutInfo.Builder來構建了一個新的ShortcutInfo, 最後我們是用過updateShortcuts(List<ShortcutInfo>)來實現更新shortcut的, 很簡單, 來看看效果.
ok, 現在, Android7.1的Shortcuts功能我們就差不多介紹完了, 文章中的例項程式碼大家可以在https://github.com/qibin0506/Android7_Shortcuts_Demo上下載到, 官網的文件大家也可以多看看, 這裡給出地址: https://developer.android.com/preview/shortcuts.html
最後的彩蛋:大家都知道, 從android 7開始, google開始推廣圓形圖示了, 那肯定有很多人疑惑“那我在之前的launcher上咋辦? 很醜陋啊”, 其實這點google完全考慮到了,圓形圖示並不是通過android:icon指定的, 是一個額外提供的屬性支援圓形圖示的:android:roundIcon, 所以說,現在我們的manifest應該這麼寫了:
<manifest xmlns:android="http://schemas.android.com/apk/res/android"
    package="com.example.android.commitcontent.app">

    <application
        android:allowBackup="true"
        android:icon="@mipmap/ic_launcher"
        android:roundIcon="@mipmap/ic_launcher_round"
        android:label="@string/app_name"
        android:supportsRtl="true"
        android:theme="@style/AppTheme">
        <activity android:name=".MainActivity">
            <intent-filter>
                <action android:name="android.intent.action.MAIN" />

                <category android:name="android.intent.category.LAUNCHER" />
            </intent-filter>
        </activity>
    </application>
</manifest>看application的配置, android:icon指定普通圖示, android:roundIcon指定的是圓形圖示, 那麼在支援圓形圖示的launcher上就會顯示圓形圖示, 我們現在大部分人用的launcher上海市顯示預設的圖示。