
利用Powershell每天自動設定提取Win10的windows聚焦圖片(Spotlight)作為桌面桌布的方法
阿新 • • 發佈:2018-11-01
微軟在 Windows 10 上新增了一項功能 Windows 聚焦 (Windows Spotlight),它會自動隨機下載並更換鎖屏介面的桌布 (Lockscreen),讓你每次開啟電腦都有不一樣的視覺享受。這些高清鎖屏桌布往往都很精美,很多視覺衝擊力十足,非常值得收藏。但很多同學想將這些桌布設為桌面,卻不知道怎樣下載儲存Win10的鎖屏桌布。實際上這些精美的圖片都在你電腦上的快取資料夾中,比如我的就在“C:\Users\Anymake\AppData\Local\Packages\Microsoft.Windows.ContentDeliveryManager_cw5n1h2txyewy\LocalState\Assets”中,這些快取檔案沒有後綴名,你只需要重新命名加上.jpg就可以看到了。這些手動提取的教程各大網站都有介紹。
但是每次手動複製比較繁瑣,我實現了一個自動化的將每天新更新的Windows 聚焦 (Windows Spotlight)圖片設定為桌面桌布的程式。本方法不需要單獨安裝任何軟體,只需要windows自帶的Powershell和任務計劃程式就可以了。
其中設定桌面桌布的程式碼參考自:http://www.pstips.net/powershell-change-wallpaper.html
單擊“操作”選單,然後單擊“建立任務”。
配置如下:
所有完成就大功告成了,要檢查效果的話,單機左側的任務計劃程式庫,從右邊找到你剛設定的SetWallPaperFromSpotlight任務,右鍵立即執行就可以看到效果了。
PS:
首先,確保你的 Windows 10 已經開啟了“聚焦”桌布功能,桌面右鍵 > 個性化 > 鎖屏介面 > “背景”選項下選擇 “Windows 聚焦”即為開啟,之後系統將會自動聯網更換鎖屏桌布。為了使工作列顏色隨著桌布改變,最好將顏色設定為從桌布中自動選取
但是每次手動複製比較繁瑣,我實現了一個自動化的將每天新更新的Windows 聚焦 (Windows Spotlight)圖片設定為桌面桌布的程式。本方法不需要單獨安裝任何軟體,只需要windows自帶的Powershell和任務計劃程式就可以了。
一、編寫自動提取並設定為桌布的指令碼
開啟一個文字檔案,複製以下程式碼,儲存字尾為.ps1,命名為SetWallPaperFromSpotlight.ps1,然後右鍵“使用powershell執行”就可以發現桌面桌布已經被設定為了最新的圖片。所有的聚焦圖片都被複制到你自己的使用者資料夾下的Spotlight資料夾。比如我的是在:“C:\Users\Anymake\Pictures\Spotlight”。這樣你就有了一個手動提取並設定最新圖片為桌面桌布的方法。下面第二步介紹每天電腦自動設定的方法。
# 將複製出來的快取圖片儲存在下面的資料夾
add-type -AssemblyName System.Drawing
New-Item "$($env:USERPROFILE)\Pictures\Spotlight" -ItemType directory -Force;
New-Item "$($env:USERPROFILE)\Pictures\Spotlight\CopyAssets" -ItemType directory -Force;
New-Item "$($env:USERPROFILE)\Pictures\Spotlight\Horizontal" -ItemType directory -Force;
New-Item "$($env:USERPROFILE)\Pictures\Spotlight\Vertical" -ItemType directory -Force;

# 將橫豎圖片分別複製到對應的兩個資料夾
foreach($file in (Get-Item "$($env:LOCALAPPDATA)\Packages\Microsoft.Windows.ContentDeliveryManager_cw5n1h2txyewy\LocalState\Assets\*"))
{
    if ((Get-Item $file).length -lt 100kb) { continue }
    Copy-Item $file.FullName "$($env:USERPROFILE)\Pictures\Spotlight\CopyAssets\$($file.Name).jpg";
}

foreach($newfile in (Get-Item "$($env:USERPROFILE)\Pictures\Spotlight\CopyAssets\*"))
{
    $image = New-Object -comObject WIA.ImageFile;
    $image.LoadFile($newfile.FullName);
    if($image.Width.ToString() -eq "1920"){ Move-Item $newfile.FullName "$($env:USERPROFILE)\Pictures\Spotlight\Horizontal" -Force; }
    elseif($image.Width.ToString() -eq "1080"){ Move-Item $newfile.FullName "$($env:USERPROFILE)\Pictures\Spotlight\Vertical" -Force; }
}

# 桌布設定函式
function Set-Wallpaper
{
    param(
        [Parameter(Mandatory=$true)]
        $Path,

        [ValidateSet('Center', 'Stretch')]
        $Style = 'Center'
    )

    Add-Type @"
using System;
using System.Runtime.InteropServices;
using Microsoft.Win32;
namespace Wallpaper
{
public enum Style : int
{
Center, Stretch
}
public class Setter {
public const int SetDesktopWallpaper = 20;
public const int UpdateIniFile = 0x01;
public const int SendWinIniChange = 0x02;
[DllImport("user32.dll", SetLastError = true, CharSet = CharSet.Auto)]
private static extern int SystemParametersInfo (int uAction, int uParam, string lpvParam, int fuWinIni);
public static void SetWallpaper ( string path, Wallpaper.Style style ) {
SystemParametersInfo( SetDesktopWallpaper, 0, path, UpdateIniFile | SendWinIniChange );
RegistryKey key = Registry.CurrentUser.OpenSubKey("Control Panel\\Desktop", true);
switch( style )
{
case Style.Stretch :
key.SetValue(@"WallpaperStyle", "2") ;
key.SetValue(@"TileWallpaper", "0") ;
break;
case Style.Center :
key.SetValue(@"WallpaperStyle", "1") ;
key.SetValue(@"TileWallpaper", "0") ;
break;
}
key.Close();
}
}
}
"@

    [Wallpaper.Setter]::SetWallpaper( $Path, $Style )
}


$filePath = "$($env:USERPROFILE)\Pictures\Spotlight\Horizontal\*"
$file = Get-Item -Path $filePath | Sort-Object -Property LastWriteTime -Descending | Select-Object -First 1
Set-Wallpaper -Path $file.FullName
# echo $file.FullName

Remove-Item "$($env:USERPROFILE)\Pictures\Spotlight\CopyAssets\*";
#pause
其中設定桌面桌布的程式碼參考自:http://www.pstips.net/powershell-change-wallpaper.html
提取windows聚焦的圖片參考自:http://www.iplaysoft.com/save-win10-spotlight-wallpapers.html
二、利用windows自帶的任務計劃程式每天自動執行指令碼
必須以管理員身份登入才能執行這些步驟。如果不是以管理員身份登入,則您僅能更改適用於您的使用者帳戶的設定。
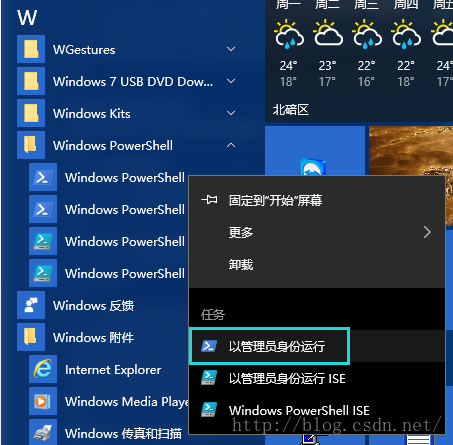
1、由於windows預設的任務計劃沒有許可權執行ps1指令碼,因此首先需要用管理員執行Windows PowerShell
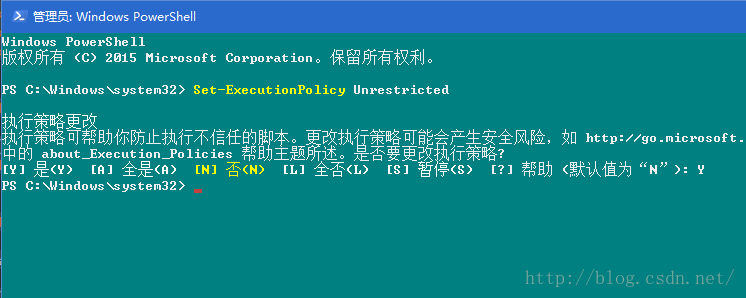
2、輸入 Set-ExecutionPolicy Unrestricted進行許可權更改,輸入Y確認
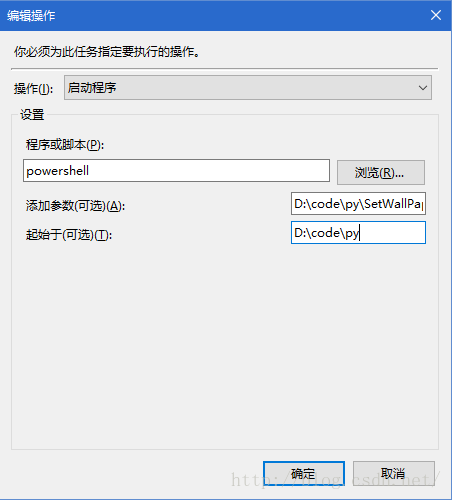
單擊“操作”選單,然後單擊“建立任務”。
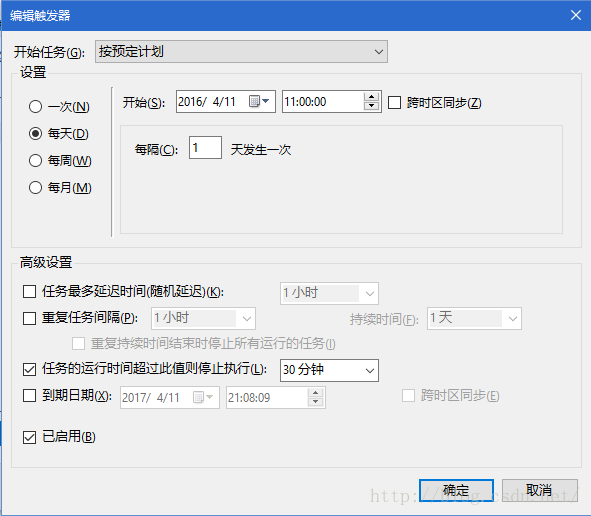
配置如下:
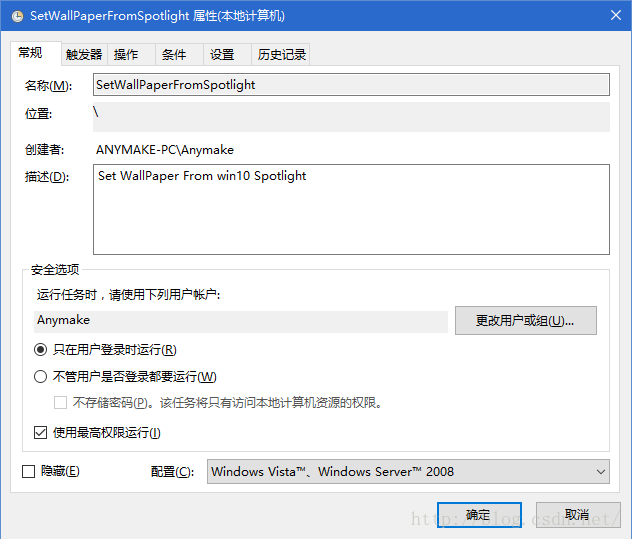
常規:鍵入任務的名稱比如SetWallPaperFromSpotlight和描述(可選) - 勾選“使用最高許可權執行”
觸發器:新建 - 選擇“制定計劃時” - 選擇 執行時間如“7:30:00” - 選擇執行週期如“每天 每隔1天發生一次” - 勾選"啟用",也可以根據需要選擇每小時,每半小時或者更高的頻率執行指令碼。
所有完成就大功告成了,要檢查效果的話,單機左側的任務計劃程式庫,從右邊找到你剛設定的SetWallPaperFromSpotlight任務,右鍵立即執行就可以看到效果了。
PS:
首先,確保你的 Windows 10 已經開啟了“聚焦”桌布功能,桌面右鍵 > 個性化 > 鎖屏介面 > “背景”選項下選擇 “Windows 聚焦”即為開啟,之後系統將會自動聯網更換鎖屏桌布。為了使工作列顏色隨著桌布改變,最好將顏色設定為從桌布中自動選取