009.KVM配置調整
阿新 • • 發佈:2018-11-02
一 記憶體CPU調整
1.1 增大虛擬機器記憶體
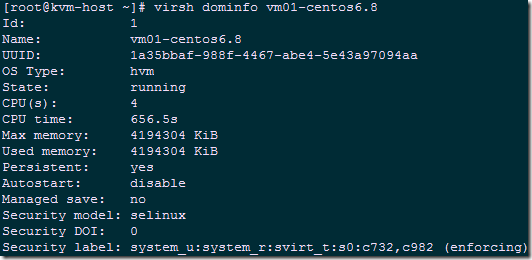
1 [[email protected] ~]# virsh shutdown vm01-centos6.8 2 [[email protected] ~]# virsh edit vm01-centos6.8 3 …… 4 <memory unit='KiB'>4194304</memory> 5 <currentMemory unit='KiB'>4194304</currentMemory> #修改當前記憶體 6 <vcpu placement='static'>4</vcpu> #修改當前CPU數 7 …… 8 [[email protected] ~]# virsh create /etc/libvirt/qemu/vm01-centos6.8.xml 9 #從配置檔案載入啟動虛機。 10 [[email protected] ~]# virsh dominfo vm01-centos6.8 #檢視最大記憶體

1 virsh setmaxmem vm01-centos6.8 4G #需要關閉此虛機 2 虛機記憶體調整 3 virsh setmem UAKVM2 2G --config #關機狀態下調整 4virsh setmem UAKVM2 2G #開機狀態下調整
二 qcow2磁碟擴容—:方法一
2.1 檢視現有磁碟情況
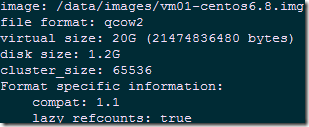
1 [[email protected] ~]# virsh edit vm01-centos6.8 2 <disk type='file' device='disk'> 3 <driver name='qemu' type='qcow2'/> 4 <source file='/data/images/vm01-centos6.8.img'/> #磁碟路徑 5<target dev='vda' bus='virtio'/> 6 <address type='pci' domain='0x0000' bus='0x00' slot='0x04' function='0x0'/> 7 </disk> 8 [[email protected] ~]# qemu-img info /data/images/vm01-centos6.8.img

2.2 新增qcow2磁碟
1 [[email protected] ~]# virsh edit vm01-centos6.8 2 <disk type='file' device='disk'> 3 <driver name='qemu' type='qcow2'/> 4 <source file='/data/images/vm01-centos6.8.img'/> #磁碟路徑 5 <target dev='vda' bus='virtio'/> 6 <address type='pci' domain='0x0000' bus='0x00' slot='0x04' function='0x0'/> 7 </disk> 8 [[email protected] ~]# qemu-img info /data/images/vm01-centos6.8.img提醒:必須保證宿主機有足夠的空間。
2.3 磁碟配置
1 [[email protected] ~]# virsh console 2
 使用fdisk建立vdb1分割槽,並將磁碟分割槽模式調整為lvm,方法略。

1 [[email protected] ~]# vgcreate -s 16m vg01 /dev/vdb1 2 [[email protected] ~]# lvcreate -L 1g -n lv01 vg01 3 [[email protected] ~]# mkfs.ext4 /dev/vg01/lv01 4 [[email protected] ~]# mkdir /data 5 [[email protected] ~]# mount /dev/vg01/lv01 /data/
 注意:若開始建立的分割槽為lvm,可直接新增,lvm擴容請參考其他筆記。
三 qcow2磁碟擴容—:方法二
3.1 檢視現有磁碟情況
  1 [[email protected] ~]# virsh edit vm01-centos6.8
  2     <disk type='file' device='disk'>
  3       <driver name='qemu' type='qcow2'/>
  4       <source file='/data/images/vm01-centos6.8.img'/>		#磁碟路徑
  5       <target dev='vda' bus='virtio'/>
  6       <address type='pci' domain='0x0000' bus='0x00' slot='0x04' function='0x0'/>
  7     </disk>
  8 [[email protected] ~]# qemu-img info /data/images/vm01-centos6.8.img

3.2 直接擴容qcw2格式磁碟
1 [[email protected] ~]# qemu-img resize /data/images/vm01-centos6.8.img +1G
3.3 再次驗證
1 [[email protected] ~]# qemu-img info /data/images/vm01-centos6.8.img
 注意:qcow2磁碟格式必須採用此方式進行擴充套件,不要採用dd方式,dd方式適用於raw格式。
3.3 磁碟配置
  1 [[email protected] ~]# virsh start vm01-centos6.8
  2 [[email protected] ~]# fdisk -l

  1 [[email protected] ~]# fdisk /dev/vda
  2 ……
  3 Command (m for help): p

  1 Command (m for help): d
  2 Partition number (1-4): 3
  3 Command (m for help): n
  4 p
  5 Partition number (1-4): 3

1 Command (m for help): w提醒:end從41611刪除後,新建通分割槽號3的分割槽,end變為47851.
  1 [[email protected] ~]# resize2fs /dev/vda3
  2 [[email protected] ~]# shutdown -r now
也可將新增磁碟使用lvm擴容,或分割槽後掛載即可,具體方法略。
四 raw磁碟格式擴容:方法一
4.1 檢視現有磁碟
參考2.1,略。4.2 建立磁碟檔案
  1 [[email protected] ~]# dd if=/dev/zero bs=1024M count=2 > /data/images/vm01-centos6.8-02.img
  2 [[email protected] ~]# qemu-img info /data/images/vm01-centos6.8-02.img

4.3 新增raw磁碟至配置檔案
參考2.2,略。4.4 配置磁碟
參考2.3,略。五 raw磁碟格式擴容:方法二
5.1 檢視現有磁碟
參考2.1,略。5.2 直接擴容
參考3.2,略。5.3 磁碟配置
參考2.3,略。六 線上擴容磁碟
6.1 檢視現有磁碟
參考2.1,略。6.2 建立磁碟檔案並新增
  1 [[email protected] ~]# qemu-img create -f qcow2 /data/images/vm01-centos6.8-02.img 1G
  2 [[email protected] ~]# virsh attach-disk vm01-centos6.8 /data/images/vm01-centos6.8-02.img vdb --cache=none --subdriver=qcow2
  3 [[email protected] ~]# virsh domblklist vm01-centos6.8

