
DOM操作學習目錄
一、前戲
截止到目前為止,我們已經學習了javascript的一些簡單的語法,但是使用這些簡單的語法,並不能做出一些我們經常看到的一些效果,比如說表格的全選和反選等,因此為了能夠操作網頁上的元素,我們需要繼續學習BOM相關的知識。
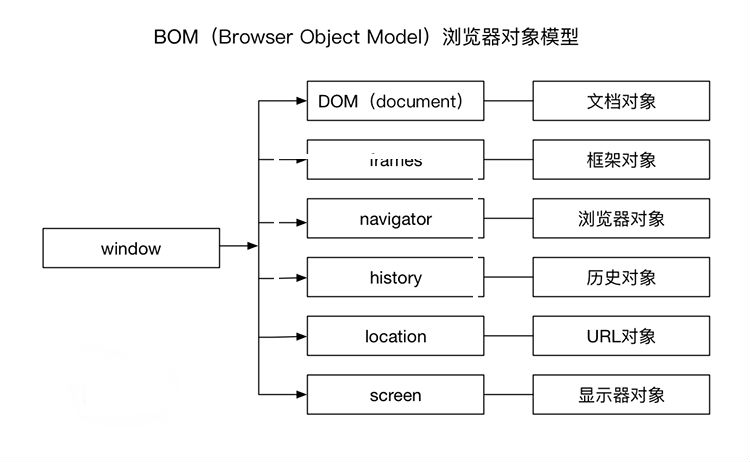
BOM是指瀏覽器物件模型,它是對一系列在瀏覽器環境中使用物件的統稱,這些物件提供了訪問瀏覽器的功能。在BOM物件中,window物件是最頂層物件,在瀏覽器環境中它是一個Global全域性物件,其它物件(如:DOM物件)對是這個物件的屬性(子物件)
BOM中的物件
1.WINDOW物件
window物件物件表示一個瀏覽器視窗或一個frame框架,它處於物件層次的最頂端,它提供了處理瀏覽器視窗的方法和屬性。window物件是瀏覽器物件中的預設物件,所以可以隱式地引用window物件的屬性和方法。
如,以下兩行程式碼是等價的:
| 1 2 3 | new Date(); // 等價於 new window.Date(); |
2.DOM(DOCUMENT)相關物件
document是window物件的了個屬性,它是一個Document物件例項,表示當前視窗中文件物件。通過該物件,可以對文件和文件中元素、節點等進行操作。
3.FRAMES物件
frames物件是一個集合,表示當前頁面中使用的子框架。如果頁面中使用了框架,將產生一個框架集合frames,在集合中可以用數字下標(從0開始)或名字索引框架。集全中的每一個物件,包含了框架的頁面佈局資訊,以及每一個框架所對應的window物件。
4.NAVIGATOR物件
navigator是指瀏覽器物件,該物件提供了當前正在使用的瀏覽器的資訊。navigator物件中的屬性是隻讀的,在W3C在HTML5標準中,對該物件進行了規範。
| 1 2 3 4 5 6 7 8 9 10 11 12 13 14 15 | `navigator`物件:包含大量有關Web瀏覽器的資訊,在檢測瀏覽器及作業系統上非常有用,也可用window.navigator引用它 `navigator.appCodeName` //瀏覽器程式碼名的字串表示 navigator.appName //官方瀏覽器名的字串表示 navigator.appVersion //瀏覽器版本資訊的字串表示 navigator.cookieEnabled //如果啟用cookie返回true,否則返回false navigator.javaEnabled //如果啟用java返回true,否則返回false navigator.platform //瀏覽器所在計算機平臺的字串表示 navigator.userAgent //使用者代理頭的字串表示 |
5.HISTORY物件
history物件來儲存瀏覽器歷史記錄資訊,也就是使用者訪問的頁面。瀏覽器的前進與後退功能本質上就是history的操作。history物件記錄了使用者瀏覽過的頁面,通過該物件提供的API可以實現與瀏覽器前進/後退類似的導航功能。
| 1 2 3 4 | history.length // 儲存歷史記錄的數量。 history.back() // 載入 history 列表中的前一個 URL history.go() // 載入 history 列表中的某個具體頁面 |
6.LOCATION物件
location是一個靜態物件,該物件是對當前視窗URL地址的解析。該物件提供了可以訪問URL中不同部分的資訊屬性,通過location物件也可以實現頁面或錨點跳轉等功能。
| 1 2 3 4 5 6 7 8 9 10 11 12 13 14 15 | location物件:表示載入視窗的URL,也可用 window.location引用它 location.href //當前載入頁面的完整URL,如http://www.somewhere.com/pictures/index.html location.portocol //URL中使用的協議,即雙斜槓之前的部分,如http location.host //伺服器的名字,如www.wrox.com location.hostname //通常等於host,有時會省略前面的www location.port //URL宣告的請求的埠,預設情況下,大多數URL沒有埠資訊,如8080 location.pathname //URL中主機名後的部分,如/pictures/index.htm location.reload( true | false); //重新載入當前頁面,為false時從瀏覽器快取中過載,為true時從伺服器端過載,預設為false |
7.SCREEN物件
screen物件中包含了使用者顯示器螢幕相關資訊。通過該物件,可以訪問使用者顯示器螢幕寬、高、色深等資訊。
| 1 2 3 | screen物件:用於獲取某些關於使用者螢幕的資訊,也可用 window.screen引用它 screen.width/height //螢幕的寬度與高度,以畫素計 |
上面的三個物件中,我們主要學習的是DOM物件,通過DOM程式設計,可以輕易的實現我們常見的一些效果
二、DOM物件–查詢元素
1.直接查詢
document.getElementById 根據ID獲取一個標籤
document.getElementsByName 根據name屬性獲取標籤集合
document.getElementsByClassName 根據class屬性獲取標籤集合
document.getElementsByTagName 根據標籤名獲取標籤集合
2.間接查詢
parentNode 父節點
childNodes 所有子節點
firstChild 第一個子節點
lastChild 最後一個子節點
nextSibling 下一個兄弟節點
previousSibling 上一個兄弟節點parentElement 父節點標籤元素
children 所有子標籤
firstElementChild 第一個子標籤元素
lastElementChild 最後一個子標籤元素
nextElementtSibling 下一個兄弟標籤元素
previousElementSibling 上一個兄弟標籤元素
案例:表格的全選和反選以及取消


<table border="1px">
    <tr>
        <td>192.168.1.1</td>
        <td>80</td>
        <td>111111</td>
        <td><input type="checkbox" class="check"></td>
    </tr>
    <tr>
        <td>192.168.1.2</td>
        <td>81</td>
        <td>222222</td>
        <td><input type="checkbox" class="check"></td>
    </tr>
    <tr>
        <td>192.168.1.3</td>
        <td>82</td>
        <td>333333</td>
        <td><input type="checkbox" class="check"></td>
    </tr>
</table>
</body>
<script>
    function selectAll() {
        // 1. 找到所有的checkbox
        var inpts = document.getElementsByClassName('check');
//        console.log(inpts);
        // 2. 對找到的checkbox進行打鉤
        for (var i = 0; i < inpts.length; i++){
//            console.log(inpts[i].checked);
            inpts[i].checked = true;
        }
    }
</script>
View Code
三、DOM物件–屬性操作
1.操作內容
innerText 文字
innerHTML HTML內容
value 值
2.操作屬性
attributes 獲取所有標籤屬性
setAttribute(key,value) 設定標籤屬性
getAttribute(key) 獲取指定標籤屬性
removeAttribute(key) 刪除屬性
案例:驗證碼倒計時傳送
<input type="button" id="btn" value="傳送驗證碼">
<script>
    var curNum = 10;
    var btn = document.getElementById('btn');
    btn.onclick = function () {
        this.setAttribute('disabled', true);
        this.value = "請在" + curNum + "s內輸入驗證碼";
        setInterval("setRemainTime();", 1000);
    };
    function setRemainTime(){
        if(curNum == 1){
            btn.removeAttribute("disabled");
            btn.value = "傳送驗證碼";
        } else {
            curNum = curNum - 1;
            btn.value = "請在" + curNum + "s內輸入驗證碼";
        }
    }
</script>
View Code
3.樣式操作
- 3.1 指定類操作
className 獲取所有類名
classList.remove(cls) 刪除指定類
classList.add(cls) 新增類
案例:左側選單顯示 和 模態框顯示取消
<!DOCTYPE html>
<html lang="en">
<head>
    <meta charset="UTF-8">
    <title>Title</title>
    <style>
        .menu{
            width:300px;
        }
        .header{
            height:38px;
            line-height: 38px;
            background-color: #2459a2;
            cursor: pointer;
        }
        .hide{
            display: none;
        }
    </style>
</head>
<body>
    <div class="menu">
        <div class="header" id="i1" onclick="changeMenu('i1')">選單1</div>
        <div class="info">
            <div class="content ">內容1</div>
            <div class="content ">內容1</div>
            <div class="content ">內容1</div>
        </div>
        <div class="header" id='i2' onclick="changeMenu('i2')">選單2</div>
        <div class="info hide">
            <div class="content ">內容2</div>
            <div class="content ">內容2</div>
            <div class="content ">內容2</div>
        </div>
        <div class="header" id="i3" onclick="changeMenu('i3')">選單3</div>
        <div class="info hide">
            <div class="content">內容3</div>
            <div class="content">內容3</div>
            <div class="content">內容3</div>
        </div>
    </div>
    <script>
        function changeMenu(nid) {
            var header = document.getElementById(nid);
//            var menuDiv = header.parentElement;
//            console.log(menuDiv);
            var infoDiv = document.getElementsByClassName('info');
            for(var i=0; i<infoDiv.length; i++){
                infoDiv[i].classList.add('hide');
            }
            var nextElement = header.nextElementSibling;
//            console.log(nextElement);
            nextElement.classList.remove('hide');
        }
    </script>
</body>
</html>
<!DOCTYPE html>
<html lang="en">
<head>
    <meta charset="UTF-8">
    <title>Title</title>
    <style>
        .c1{
            position: absolute;
            top:0;
            bottom:0;
            right:0;
            left:0;
            background-color: black;
            opacity: 0.5;
        }
        .c2{
            position: absolute;
            top:10%;
            left:35%;
            background-color: white;
            width:500px;
            height:300px;
        }
        .hide{
            display: none;
        }
    </style>
</head>
<body>
    <!--遮罩層開始-->
    <div class="c1 hide"></div>
    <!--遮罩層結束-->
    <!--彈出框開始-->
    <div class="c2 hide">
        <form action="">
            <input type="text" value="1111"><br>
            <input type="text" value="2222"><br>
            <input type="button" value="取消" onclick="cancelModal()">
            <input type="submit" value="提交"><br>
        </form>
    </div>
    <!--彈出框結束-->
    <script>
        function getModal(){
            document.getElementsByClassName('c1')[0].classList.remove('hide');
            document.getElementsByClassName('c2')[0].classList.remove('hide');
        }
        function cancelModal(){
            document.getElementsByClassName('c1')[0].classList.add('hide');
            document.getElementsByClassName('c2')[0].classList.add('hide');
        }
    </script>
</body>
</html>
View Code
- 3.2 指定css操作
obj.style.backgroundColor = “red”;

使用js操作css的屬性的規律如下:
1.對於沒有中劃線的css屬性一般直接使用style.屬性名即可。如:
obj.style.margin,obj.style.width,obj.style.left,obj.style.position等
2.對於含有中劃線的css屬性,將每個中劃線去掉並將每個中劃線後的第一個字元換成大寫即可。如:
obj.style.marginTop,obj.style.borderLeftWidth,obj.style.zIndex,obj.style.fontFamily等
案例:表格的隔行換色 和 文字框獲取失去焦點 以及 小說閱讀網站,點選大中小變換字型
4.操作標籤
| 1 2 3 4 5 6 7 8 | // 方式一 var tag = document.createElement('a') tag.innerText = "zhangsan" tag.className = "c1" tag.href = "http://www.shangzekai.com" // 方式二 var tag = "<a class='c1' href='http://www.shangzekai.com'>zhangsan</a>" |
1.常見的一些事件
獲得焦點事件——–onfocus
失去焦點事件——–onblur
內容改變事件——–onchange
載入頁面———–onload
單擊事件———–onclick
滑鼠移入事件——–onmouseover
滑鼠移出事件——–onmouseout
案例:onchange 多級選單聯動
<body>
    <select name="province" id="province" onchange="ld();">
        <option value="-1">請選擇</option>
        <option value="0">北京</option>
        <option value="1">山西</option>
    </select>
    <select name="city" id="city">
    </select>
</body>
<script>
    var citys = [
        ["海淀","東城","西城","朝陽"],
        ["太原","大同","運城","晉中"]
    ];
    function ld(){
        var provinces = document.getElementById("province");
        var opts;
        if(provinces.value == -1){
            opts = '';
            document.getElementById("city").innerHTML = opts;
            return;
        }
        var areas = citys[provinces.value];
        for(var i = 0; i < areas.length; i++){
            opts += "<option value='" + i + "'>" + areas[i] + "</option>";
        }
        document.getElementById("city").innerHTML = opts;
    }
</script>
View Code
2.繫結事件的三種方式
面試題:寫一個行為,樣式,結構相分離的頁面?
- 2.1 html屬性的方式繫結
| 1 | <a href= 'www.baidu.com' onclick="t1();"> 百度 </a> |
作為WEB開發人員,這是最早碰到的一種事件繫結方式,這種繫結方式非常古老
優點:相容性最強
缺點也很明顯:
1:需要在DOM渲染時分析繫結語句,影響DOM渲染速度(IE下尤其)
2:形式上沒達到”結構與行為”相分離的原則
- 2.2 物件屬性方式
| 1 2 3 4 | var bd = document.getElementById('bd'); bd.onclick = function(){ console.log(this.id); } |
這種繫結是把一個DOM物件onclick屬性賦值為一個函式,那此時函式內部的this指向的是該DOM物件,即這個a物件
缺點:該方式只能為一種事件,繫結一個回撥函式
即:.onclick = fn1, .onclick=fn2;
最終的效果是.onclick=fn2 執行
- 2.3 addEventListener方式(瞭解)
| 1 2 3 | var i0 = document.getElementById('i1'); i0.addEventListener( 'click', function(){console.log('a');}) i0.addEventListener( 'click', function(){console.log('b');}) |
格式:addEventListener(‘事件’,繫結的函式, true/false);
1.如果添加了多個事件處理函式,則按新增時的先後順序來執行
2.事件處理函式中的this指代的是DOM物件本身(w3c標準)
3.第一個事件引數,一律把事件名稱的“on”去掉優點: 能為同一種事件,如onclick,繫結多個函式函式中的this指向該DOM物件,操作方便
缺點:IE8及以下版本不支援此方法
五、window物件
1.WINDOW物件常見的方法
1.1 隨手就能用到的方法
- window.alert(msg);
- window.confirm(msg);
- window.open(URL, 位置);
| 1 2 3 4 5 6 | window.alert('fuck'); window.confirm('確認要刪除嗎?'); window.open('./02.html', '_blank'); // 02.html如下程式碼: <input type= 'button' onclick='window.close()' /> |
1.2 比較常用到的方法
setInerval()
- 在載入後,每隔指定的時間就執行一次回撥函式
- timer = setInterval(“函式()” , 毫秒數);
clearInterval()
- 取消setInterval()的設定
- clearInterval(timer)
setTimeout()
- 在載入後,在指定的時間就執行一次回撥函式(只是一次)
- timer = setTimeout(“函式()” , 毫秒數);
clearTimeout()
- 取消setTimeout()的設定
- clearTimeout(timer)
六、常見的案例