
答題卡的識別
目錄
該部落格整編於:https://www.pyimagesearch.com/
1.問題描述
現在,我們需要識別一張簡易的答題卡,如圖1-1所示。
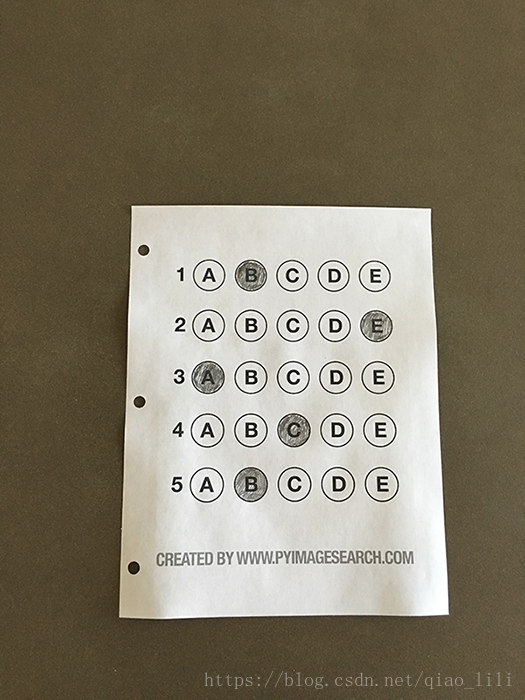
圖1-1 簡易答題卡
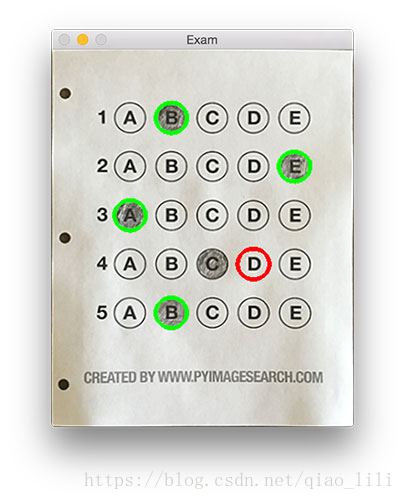
最終的識別結果如圖1-2所示。其中,選對的答案用綠色表示,錯選的用紅色表示。
那麼在答題卡識別的問題中有哪些待續解決的問題呢?我的理解是這樣的:
1.答題卡區域的分割問題:想要進行答題卡識別總得先把答題卡區域和環境區域分割出來吧。
2.答題卡紙張背景和答案的分離問題:我們需要的只有答案的區域,因此需要解決答案和答題卡背景的分割問題。
3.輪廓的篩選問題:篩選出我們想要的輪廓,排除那些不需要的輪廓資訊。
4.輪廓的排序和定位問題:如何對輪廓進行行和列的定位,這很重要。
5.檢測答題者所選擇的選項:檢測漏選、多選的情況。
2.解決思路
2.1 答題卡區域的分割問題
在這裡,由於環境色的一致性,我們使用了canny邊緣檢測運算元,檢測出答題卡的邊界資訊。
分割程式碼如下:
	Mat answerSheet = imread("answerSheet.png");
	//灰度轉化
	Mat gray;
	cvtColor(answerSheet,gray,CV_BGR2GRAY);
	//進行高斯濾波
	Mat blurred;
	GaussianBlur(gray,blurred,Size(3,3),0);
	//進行canny邊緣檢測
	Mat canny;
	Canny(blurred,canny,75,200);
計算的影象如圖2-1:

圖 2-1 canny運算元計算圖
2.2 分割答題卡的紙張和答題區域
首先,我們要找到答題卡輪廓區域的邊界,利用DP演算法計算出輪廓的角點,最後基於透視變化對影象進行矯正,即轉化為鳥瞰圖。實現的程式碼如下:
//排序運算元
bool sortBy_x( Point &a, Point &b)
{
	return a.x < b.x;
}

bool sortBy_y( Point &a,  Point &b)
{
	return a.y < b.y;
}
//尋找矩形邊界
vector<vector<Point>> contours;
findContours(canny, contours, RETR_EXTERNAL, CHAIN_APPROX_SIMPLE);
vector<Point>result_contour;
if (contours.size() == 1)
{
result_contour = contours[0];
}
else
{
int max = -1;
int index = -1;
for (int i = 0; i < contours.size(); i++)
{
int tem = arcLength(contours[i], true);
if (tem > max) max = tem;
index = i;
}
result_contour = contours[index];
}
//使用DP演算法擬合答題卡的幾何輪廓,儲存點集pts並順時針排序
vector<Point> pts;
approxPolyDP(result_contour,pts,(int)arcLength(result_contour,true)*0.02,true);
if (pts.size() != 4) return 1;
sort(pts.begin(), pts.end(), sortBy_x);
sort(pts.begin(), pts.end(), sortBy_y);
//進行透視變換
//1.確定變化尺寸的寬度
int width;
int width1 = (pts[0].x - pts[1].x)*(pts[0].x - pts[1].x) + (pts[0].y - pts[1].y)*(pts[0].y - pts[1].y);
int width2= (pts[2].x - pts[3].x)*(pts[2].x - pts[3].x) + (pts[2].y - pts[3].y)*(pts[2].y - pts[3].y);
if (width1 > width2) width = sqrt(width1);
else width = sqrt(width2);
//2.確定變化尺寸的高度
int height;
int height1 = (pts[0].x - pts[3].x)*(pts[0].x - pts[3].x) + (pts[0].y - pts[3].y)*(pts[0].y - pts[3].y);
int height2 = (pts[2].x - pts[1].x)*(pts[2].x - pts[1].x) + (pts[2].y - pts[1].y)*(pts[2].y - pts[1].y);
if (height1 > height2) height= sqrt(height1);
else height = sqrt(height2);
//3.計算透視變換矩陣
vector<Point2f> Pts(4);
Pts[0]=(Point2f(0,0));
Pts[1]=(Point2f(width-1, 0));
Pts[2]=(Point2f(width-1, height-1));
Pts[3]=(Point2f(0, height-1));
//4.計算透視變換矩陣
//4.1型別轉化
Mat src = Mat(pts);
vector<Point2f> Pt;
src.convertTo(src,CV_32F);
Pt = (vector<Point2f>) src;
//4.2計算M矩陣
Mat M = getPerspectiveTransform(Pt,Pts);
//5.進行透視變換
Mat birdMat;
warpPerspective(answerSheet,birdMat,M,Size(width,height));最終的結果如圖2-2所示:

圖2-2 計算的鳥瞰圖
隨後,我們要將答題卡的圖形資訊找出來,在這裡採用OTSU閾值分割的方法:
//OTSU閾值分割
Mat gray_birdMat;
cvtColor(birdMat,gray_birdMat,CV_BGR2GRAY);
Mat target;
threshold(gray_birdMat, target,0,255,CV_THRESH_BINARY_INV | CV_THRESH_OTSU);分割的結果如圖2-3所示:
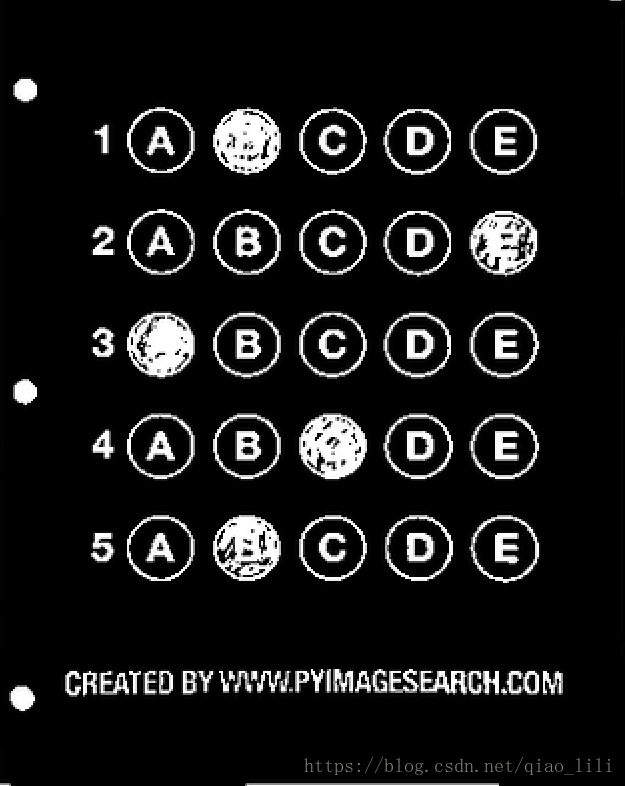
圖2.3 otsu分割結果
2.3 輪廓的篩選問題
首先,在對輪廓進行少篩選之前,最好對輪廓進行膨脹運算,這是為了增加輪廓的穩定性,防止如圖2.4所示的情況:

圖2-4 輪廓的不完整性
給定輪廓的篩選條件,寬度和高度同時大於20;
//輪廓篩選
//1.改善輪廓
Mat element = getStructuringElement(MORPH_RECT, Size(3, 3));
dilate(target,target,element);
//2.篩選輪廓
vector<vector<Point>> target_contour;
vector<vector<Point>> selected_contour;
findContours(target,target_contour,RETR_EXTERNAL,CHAIN_APPROX_SIMPLE);
for (auto m : target_contour)
{
Rect rect = boundingRect(m);
double k = (double)rect.height / rect.width;
if (rect.height > 20 && rect.width > 20 )
{
selected_contour.push_back(m);
}
}
//3.驗證結果
Mat answerSheet_con=target.clone();
cvtColor(answerSheet_con,answerSheet_con,CV_GRAY2BGR);
drawContours(answerSheet_con,selected_contour,-1,Scalar(0,0,255),2);這樣,我們便篩選出了所有想要的輪廓,用紅色標出,如圖2-5所示:

圖2-5 篩選出所有想要的輪廓
2.4 輪廓的排序問題
如何對輪廓進行排序,這是個很重要的問題,在這裡我們使用了計算圓心的方式,依據圓心的位置來確認答題卡輪廓的位置:
//輪廓的排序問題
//1.計算所有外接圓基本資料
vector<float> radius(selected_contour.size());
vector<Point2f> center(selected_contour.size());
for (int i = 0; i < selected_contour.size();i++)
{
minEnclosingCircle(selected_contour[i],center[i],radius[i]);
}
//2.計算x軸分割間隔
int x_min = 999;
int x_max = -1;
int x_interval = 0;
for (auto m : center)
{
if (m.x < x_min) x_min = m.x;
if (m.x > x_max) x_max = m.x;
}
x_interval = (x_max - x_min) / 4;
//3.計算y軸分割間隔
int y_min = 999;
int y_max = -1;
int y_interval = 0;
for (auto m : center)
{
if (m.y < y_min) y_min = m.y;
if (m.y > y_max) y_max = m.y;
}
y_interval = (y_max - y_min) / 4;
//4.分類
vector<vector<vector<Point>>> classed_contours;
classed_contours.resize(5,vector<vector<Point>>(5));
int thresh_x = x_interval / 2;
int thresh_y = y_interval / 2;
for (int i = 0; i < center.size();i++)
{
Point point = center[i];
int index_x = round((point.x - x_min) / x_interval);
int index_y= round((point.y - y_min) / y_interval);
classed_contours[index_y][index_x] = selected_contour[i];
}
//5.繪製並驗證
vector<Scalar>color;
color.push_back(Scalar(0,0,255));
color.push_back(Scalar(255, 0, 255));
color.push_back(Scalar(0, 255, 255));
color.push_back(Scalar(255, 0, 0));
color.push_back(Scalar(0, 255, 0));
Mat test_result = target.clone();
cvtColor(test_result, test_result,CV_GRAY2BGR);
for (int i = 0; i < 5; i++)
{
drawContours(test_result,classed_contours[i],-1,color[i],2);
}最後的輪廓分類結果如圖2-6所示:
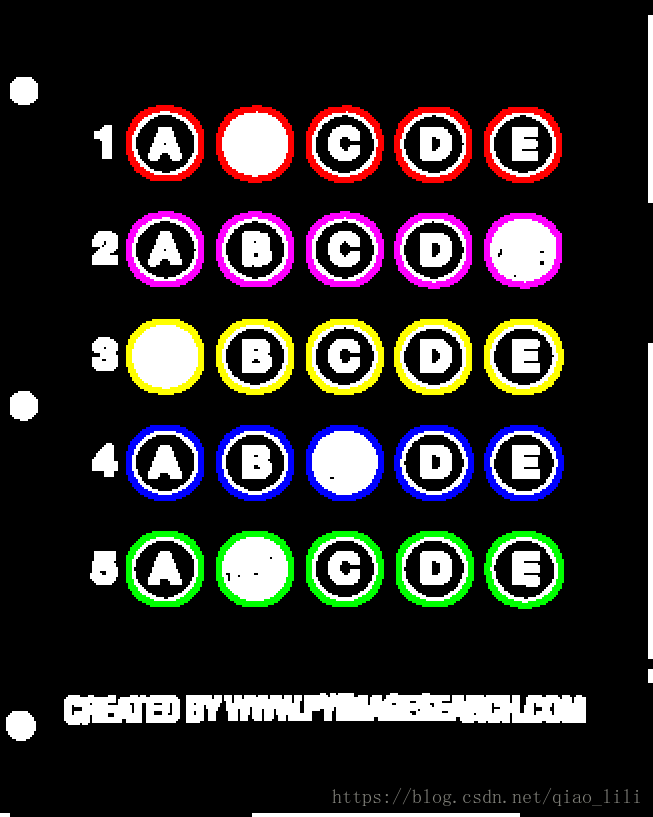
圖2-6 輪廓的分類結果(用不同的顏色表示)
2.5 檢測答題者所作出的選擇,並檢測漏選和多選的情況
我採用了二維陣列的方式來對當前的答案進行統計,用藍色繪製正確答案,紅色繪製錯誤的答案:
//檢測答題者的選項,並檢查多選和漏選
//1.給定正確的選項 1-5 BCECB
int result_count[5][5] = { 0 };
result_count[0][1] = 1;
result_count[1][2] = 1;
result_count[2][4] = 1;
result_count[3][2] = 1;
result_count[4][1] = 1;
//2.檢測答題者的選項
//2.1 確定答題區域非零點的數目
vector<vector<Rect>> re_rect;
re_rect.resize(5,vector<Rect>(5));
Mat count_roi(Size(5, 5), CV_32FC1, Scalar(0));
int min_count = 999;
int max_count = -1;
for (int ii = 0; ii < 5; ii++)
{
for (int jj = 0; jj < 5; jj++)
{
re_rect[ii][jj] = boundingRect(classed_contours[ii][jj]);
Mat tem = target(re_rect[ii][jj]);
int count = countNonZero(tem);
if (count > max_count) max_count = count;
if (count < min_count) min_count = count;
count_roi.at<float>(ii,jj)=count;
}
}
int mean = (max_count+min_count) / 8;
Mat option_diff = abs(count_roi - max_count);
//2.2判斷選項結果,儲存在陣列result_count中
for (int ii = 0; ii < 5; ii++)
{
for (int jj = 0; jj < 5; jj++)
{
if (option_diff.at<float>(ii, jj) < mean) result_count[ii][jj]++;
}
}
Mat label_answer = birdMat.clone();
for (int ii = 0; ii < 5; ii++)
{
bool no_Answer = false;
bool several_Answer = false;
bool wrong_Answer = false;
int row_sum = 0;
int count_no_zero = 0;
for (int m : result_count[ii])
{
row_sum += m;
if (m != 0)count_no_zero++;
}
if (row_sum == 1) no_Answer = true;
if (row_sum >= 2 && count_no_zero > 1) several_Answer = true;
if (row_sum == 2 && count_no_zero == 2) wrong_Answer = true;
//2.3 標記錯誤答案(紅色),標記正確答案(藍色)
if (several_Answer)
{
for (int i = 0; i < 5; i++)
{
if (result_count[ii][i] == 1)
drawContours(label_answer, classed_contours[ii], i, Scalar(0, 0, 255));
}
}
if (wrong_Answer)
{
for (int i = 0; i < 5; i++)
{
if (result_count[ii][i] == 1)
drawContours(label_answer, classed_contours[ii], i, Scalar(0, 0, 255));
}
}
}
drawContours(label_answer, classed_contours[0], 1, Scalar(255, 0, 0));
drawContours(label_answer, classed_contours[1], 2, Scalar(255, 0, 0));
drawContours(label_answer, classed_contours[2], 4, Scalar(255, 0, 0));
drawContours(label_answer, classed_contours[3], 2, Scalar(255, 0, 0));
drawContours(label_answer, classed_contours[4], 1, Scalar(255, 0, 0));最終的效果圖如圖2-7所示:

圖2-7 最終的檢測圖
3.程式碼實現
全部的實現程式碼:
#include<iostream>
#include<opencv2/opencv.hpp>
using namespace cv;
using namespace std;
bool sortBy_x( Point &a, Point &b)
{
return a.x < b.x;
}
bool sortBy_y( Point &a, Point &b)
{
return a.y < b.y;
}
int main()
{
Mat answerSheet = imread("answerSheet.png");
//灰度轉化
Mat gray;
cvtColor(answerSheet,gray,CV_BGR2GRAY);
//進行高斯濾波
Mat blurred;
GaussianBlur(gray,blurred,Size(3,3),0);
//進行canny邊緣檢測
Mat canny;
Canny(blurred,canny,75,200);
	//尋找矩形邊界
	vector<vector<Point>> contours;
	findContours(canny, contours, RETR_EXTERNAL, CHAIN_APPROX_SIMPLE);
	vector<Point>result_contour;
	if (contours.size() == 1)
	{
		result_contour = contours[0];
	}
	else
	{
		int max = -1;
		int index = -1;
		for (int i = 0; i < contours.size(); i++)
		{
			int tem = arcLength(contours[i], true);
			if (tem > max)  max = tem;
			index = i;
		}
		result_contour = contours[index];
	}
	//使用DP演算法擬合答題卡的幾何輪廓,儲存點集pts並順時針排序
	vector<Point> pts;
	approxPolyDP(result_contour,pts,(int)arcLength(result_contour,true)*0.02,true);
	if (pts.size() != 4) return 1;
	sort(pts.begin(), pts.end(), sortBy_x);
	sort(pts.begin(), pts.end(), sortBy_y);
	//進行透視變換
	//1.確定變化尺寸的寬度
	int width;
	int width1 = (pts[0].x - pts[1].x)*(pts[0].x - pts[1].x) + (pts[0].y - pts[1].y)*(pts[0].y - pts[1].y);
	int width2= (pts[2].x - pts[3].x)*(pts[2].x - pts[3].x) + (pts[2].y - pts[3].y)*(pts[2].y - pts[3].y);
	if (width1 > width2) width = sqrt(width1);
	else width = sqrt(width2);
	//2.確定變化尺寸的高度
	int height;
	int height1 = (pts[0].x - pts[3].x)*(pts[0].x - pts[3].x) + (pts[0].y - pts[3].y)*(pts[0].y - pts[3].y);
	int height2 = (pts[2].x - pts[1].x)*(pts[2].x - pts[1].x) + (pts[2].y - pts[1].y)*(pts[2].y - pts[1].y);
	if (height1 > height2) height= sqrt(height1);
	else height = sqrt(height2);
	//3.計算透視變換矩陣
	vector<Point2f> Pts(4);
	Pts[0]=(Point2f(0,0));
	Pts[1]=(Point2f(width-1, 0));
	Pts[2]=(Point2f(width-1, height-1));
	Pts[3]=(Point2f(0, height-1));
	//4.計算透視變換矩陣
	//4.1型別轉化
	Mat src = Mat(pts);
	vector<Point2f> Pt;
	src.convertTo(src,CV_32F);
	Pt = (vector<Point2f>) src;
	//4.2計算M矩陣
	Mat M = getPerspectiveTransform(Pt,Pts);
	//5.進行透視變換
	Mat birdMat;
	warpPerspective(answerSheet,birdMat,M,Size(width,height));
	//OTSU閾值分割
	Mat gray_birdMat;
	cvtColor(birdMat,gray_birdMat,CV_BGR2GRAY);
	Mat target;
	threshold(gray_birdMat, target,0,255,CV_THRESH_BINARY_INV | CV_THRESH_OTSU);
	//輪廓篩選
	//1.改善輪廓
	Mat element = getStructuringElement(MORPH_RECT, Size(3, 3));
	dilate(target,target,element);
	//2.篩選輪廓
	vector<vector<Point>> target_contour;
	vector<vector<Point>> selected_contour;
	findContours(target,target_contour,RETR_EXTERNAL,CHAIN_APPROX_SIMPLE);
	for (auto m : target_contour)
	{
		Rect rect = boundingRect(m);
		double k = (double)rect.height / rect.width;
		if (rect.height > 20 && rect.width > 20 )
		{
			selected_contour.push_back(m);
		}
	}
	//3.驗證結果
	Mat answerSheet_con=target.clone();
	cvtColor(answerSheet_con,answerSheet_con,CV_GRAY2BGR);
	drawContours(answerSheet_con,selected_contour,-1,Scalar(0,0,255),2);
	//輪廓的排序問題
	//1.計算所有外接圓基本資料
	vector<float> radius(selected_contour.size());
	vector<Point2f> center(selected_contour.size());
	for (int i = 0; i < selected_contour.size();i++)
	{
		minEnclosingCircle(selected_contour[i],center[i],radius[i]);
	}
	//2.計算x軸分割間隔
	int x_min = 999;
	int x_max = -1;
	int x_interval = 0;
	for (auto m : center)
	{
		if (m.x < x_min) x_min = m.x;
		if (m.x > x_max) x_max = m.x;
	}
	x_interval = (x_max - x_min) / 4;
	//3.計算y軸分割間隔
	int y_min = 999;
	int y_max = -1;
	int y_interval = 0;
	for (auto m : center)
	{
		if (m.y < y_min) y_min = m.y;
		if (m.y > y_max) y_max = m.y;
	}
	y_interval = (y_max - y_min) / 4;
	//4.分類
	vector<vector<vector<Point>>> classed_contours;
	classed_contours.resize(5,vector<vector<Point>>(5));
	int thresh_x = x_interval / 2;
	int thresh_y = y_interval / 2;
	for (int i = 0; i < center.size();i++)
	{
		Point point = center[i];
		int index_x = round((point.x - x_min) / x_interval);
		int index_y=  round((point.y - y_min) / y_interval);
		classed_contours[index_y][index_x] = selected_contour[i];
	}
	//5.繪製並驗證
	vector<Scalar>color;
	color.push_back(Scalar(0,0,255));
	color.push_back(Scalar(255, 0, 255));
	color.push_back(Scalar(0, 255, 255));
	color.push_back(Scalar(255, 0, 0));
	color.push_back(Scalar(0, 255, 0));
	Mat test_result = target.clone();
	cvtColor(test_result, test_result,CV_GRAY2BGR);
	for (int i = 0; i < 5; i++)
	{
		drawContours(test_result,classed_contours[i],-1,color[i],2);
	}
//檢測答題者的選項,並檢查多選和漏選
	//1.給定正確的選項 1-5 BCECB
	int result_count[5][5] = { 0 };
	result_count[0][1] = 1;
	result_count[1][2] = 1;
	result_count[2][4] = 1;
	result_count[3][2] = 1;
	result_count[4][1] = 1;
	//2.檢測答題者的選項
	//2.1 確定答題區域非零點的數目
	vector<vector<Rect>> re_rect;
	re_rect.resize(5,vector<Rect>(5));
	Mat count_roi(Size(5, 5), CV_32FC1, Scalar(0));
	int min_count = 999;
	int max_count = -1;
	for (int ii = 0; ii < 5; ii++)
	{
		for (int jj = 0; jj < 5; jj++)
		{
			re_rect[ii][jj] = boundingRect(classed_contours[ii][jj]);
			Mat tem = target(re_rect[ii][jj]);
			int count = countNonZero(tem);
			if (count > max_count) max_count = count;
			if (count < min_count) min_count = count;
			count_roi.at<float>(ii,jj)=count;
		}
	}
	int mean = (max_count+min_count) / 8;
	Mat option_diff = abs(count_roi - max_count);
	//2.2判斷選項結果,儲存在陣列result_count中
	for (int ii = 0; ii < 5; ii++)
	{
		for (int jj = 0; jj < 5; jj++)
		{
			if (option_diff.at<float>(ii, jj) < mean) result_count[ii][jj]++;
		}
	}
	Mat label_answer = birdMat.clone();
	for (int ii = 0; ii < 5; ii++)
	{
		bool no_Answer = false;
		bool several_Answer = false;
		bool wrong_Answer = false;
		int row_sum = 0;
		int count_no_zero = 0;
		for (int m : result_count[ii])
		{
			row_sum += m;
			if (m != 0)count_no_zero++;
		}
		if (row_sum == 1) no_Answer = true;
		if (row_sum >= 2 && count_no_zero > 1) several_Answer = true;
		if (row_sum == 2 && count_no_zero == 2) wrong_Answer = true;
	//2.3 標記錯誤答案(紅色),標記正確答案(藍色)
		if (several_Answer)
		{
			for (int i = 0; i < 5; i++)
			{
				if (result_count[ii][i] == 1)
				      drawContours(label_answer, classed_contours[ii], i, Scalar(0, 0, 255));
			}
		}
		if (wrong_Answer)
		{
			for (int i = 0; i < 5; i++)
			{
				if (result_count[ii][i] == 1)
					drawContours(label_answer, classed_contours[ii], i, Scalar(0, 0, 255));
			}
		}
	}
	drawContours(label_answer, classed_contours[0], 1, Scalar(255, 0, 0));
	drawContours(label_answer, classed_contours[1], 2, Scalar(255, 0, 0));
	drawContours(label_answer, classed_contours[2], 4, Scalar(255, 0, 0));
	drawContours(label_answer, classed_contours[3], 2, Scalar(255, 0, 0));
	drawContours(label_answer, classed_contours[4], 1, Scalar(255, 0, 0));
return 0;
}
4.相關資料
1.禾路的部落格園:
https://www.cnblogs.com/jsxyhelu/p/9790979.html
2.opencv convertTo用法:
https://blog.csdn.net/qq_22764813/article/details/52135686
3.vector<Point> 到 vector<Point2f>的型別轉化:
https://stackoverflow.com/questions/7386210/convert-opencv-2-vectorpoint2i-to-vectorpoint2f
4.opencv 中的Rect類:
https://blog.csdn.net/qq_30214939/article/details/65648273
5.opencv中copyTo的應用:
https://www.cnblogs.com/phoenixdsg/p/8420716.html
6.開闢二維的vector向量:
https://blog.csdn.net/zchlww/article/details/44678757