
Spring Cloud Eureka動態擴容
前言
本文心得包括案例基於《重新定義》,動態擴容Eureka是為了不影響已執行服務的情況下進行擴容。
正文
利用了config進行統一管理了eureka服務的配置,首先建立一個父module,主要就是把web工程依賴的jar包含在內,pom如下
<groupId>cn.springcloud.book</groupId>
	<artifactId>ch3-1</artifactId>
	<version>0.0.1-SNAPSHOT</version>
	<packaging>pom</packaging>

	<name>ch3-1</name>
	<description>ch3-1</description>

	<modules>
		<module>ch3-1-config-server</module>
		<module>ch3-1-eureka-server</module>
		<module>ch3-1-eureka-client</module>
	</modules>

	<parent>
		<groupId>org.springframework.boot</groupId>
		<artifactId>spring-boot-starter-parent</artifactId>
		<version>2.0.3.RELEASE</version>
		<relativePath/> <!-- lookup parent from repository -->
	</parent>

	<properties>
		<project.build.sourceEncoding>UTF-8</project.build.sourceEncoding>
		<project.reporting.outputEncoding>UTF-8</project.reporting.outputEncoding>
		<java.version>1.8</java.version>
		<spring-cloud.version>Finchley.RELEASE</spring-cloud.version>
	</properties>

	<dependencyManagement>
		<dependencies>
			<dependency>
				<groupId>org.springframework.cloud</groupId>
				<artifactId>spring-cloud-dependencies</artifactId>
				<version>${spring-cloud.version}</version>
				<type>pom</type>
				<scope>import</scope>
			</dependency>
		</dependencies>
	</dependencyManagement>

	<dependencies>
		<dependency>
			<groupId>org.springframework.boot</groupId>
			<artifactId>spring-boot-starter-actuator</artifactId>
		</dependency>
		<dependency>
			<groupId>org.springframework.boot</groupId>
			<artifactId>spring-boot-starter-web</artifactId>
		</dependency>
		<dependency>
			<groupId>org.springframework.boot</groupId>
			<artifactId>spring-boot-starter-test</artifactId>
			<scope>test</scope>
		</dependency>
	</dependencies>
然後在這個父module下建立ConfigServer 名為:ch3-1-config-server,pom如下
<parent>
        <groupId>cn.springcloud.book</groupId>
        <artifactId>ch3-1</artifactId>
        <version>0.0.1-SNAPSHOT</version>
        <relativePath>../pom.xml</relativePath> <!-- lookup parent from repository -->
    </parent>

    <properties>
        <project.build.sourceEncoding>UTF-8</project.build.sourceEncoding>
        <project.reporting.outputEncoding>UTF-8</project.reporting.outputEncoding>
        <java.version>1.8</java.version>
    </properties>

    <dependencies>
        <dependency>
            <groupId>org.springframework.cloud</groupId>
            <artifactId>spring-cloud-config-server</artifactId>
        </dependency>
    </dependencies>
當前configserver的main方法及配置檔案
@SpringBootApplication
@EnableConfigServer
public class Ch31ConfigServerApplication {

    public static void main(String[] args) {
        SpringApplication.run(Ch31ConfigServerApplication.class, args);
    }
}
spring: application: name: config-server profiles: active: native server: port: 8888
在resources下建立一個目錄叫 config,裡面建立三個yml檔案,這裡為了方便,我建了三個配置檔案。程式碼如下
第一個是eureka的客戶端配置檔案
server:
  port: 8081

spring:
  application:
    name: eureka-client1

eureka:
  client:
    serviceUrl:
#      defaultZone: http://localhost:8761/eureka/ # one eureka server
#      defaultZone: http://localhost:8761/eureka/,http://localhost:8762/eureka/ # two eureka server
      defaultZone: http://localhost:8761/eureka/,http://localhost:8762/eureka/,http://localhost:8763/eureka/ # three eureka server
第二個是eureka服務的peer1檔案
server:
  port: 8761

spring:
  application:
    name: eureka-server
eureka:
  instance:
    hostname: localhost
    preferIpAddress: true
  client:
    registerWithEureka: true
    fetchRegistry: true
    serviceUrl:
#      defaultZone: http://localhost:8761/eureka/ # one eureka server
#      defaultZone: http://localhost:8762/eureka/ # two eureka server
      defaultZone: http://localhost:8762/eureka/,http://localhost:8763/eureka/ # three eureka server
  server:
      waitTimeInMsWhenSyncEmpty: 0
      enableSelfPreservation: false
第三個是eureka服務的peer2檔案
server:
  port: 8762

eureka:
  instance:
    hostname: localhost
    preferIpAddress: true
  client:
    registerWithEureka: true
    fetchRegistry: true
    serviceUrl:
#      defaultZone: http://localhost:8761/eureka/ # two eureka server
      defaultZone: http://localhost:8761/eureka/,http://localhost:8763/eureka/ # three eureka server
  server:
      waitTimeInMsWhenSyncEmpty: 0
      enableSelfPreservation: false
建立EurekaServer 工程名:ch3-1-eureka-server
pom檔案
<groupId>cn.springcloud.book</groupId>
    <artifactId>ch3-1-eureka-server</artifactId>
    <version>0.0.1-SNAPSHOT</version>
    <packaging>jar</packaging>

    <name>ch3-1-eureka-server</name>
    <description>ch3-1-eureka-server</description>

    <parent>
        <groupId>cn.springcloud.book</groupId>
        <artifactId>ch3-1</artifactId>
        <version>0.0.1-SNAPSHOT</version>
        <relativePath>../pom.xml</relativePath> <!-- lookup parent from repository -->
    </parent>

    <properties>
        <project.build.sourceEncoding>UTF-8</project.build.sourceEncoding>
        <project.reporting.outputEncoding>UTF-8</project.reporting.outputEncoding>
        <java.version>1.8</java.version>
    </properties>

    <dependencies>
        <dependency>
            <groupId>org.springframework.cloud</groupId>
            <artifactId>spring-cloud-starter-netflix-eureka-server</artifactId>
        </dependency>
        <dependency>
            <groupId>org.springframework.cloud</groupId>
            <artifactId>spring-cloud-starter-config</artifactId>
        </dependency>
    </dependencies>
eureka服務的兩個配置檔案如下,分別是bootstrap.yml 和application.yml
spring:
  application:
    name: eureka-server
  cloud:
    config:
      uri: http://localhost:8888
management:
  endpoints:
    web:
      exposure:
        include: '*'
eureka:
server:
peer-eureka-nodes-update-interval-ms: 10000 #預設是10分鐘即600000,這裡為了驗證改為10秒main方法啟動類
@SpringBootApplication
@EnableEurekaServer
public class Ch31EurekaServerApplication {

    public static void main(String[] args) {
        SpringApplication.run(Ch31EurekaServerApplication.class, args);
    }
}
最後一個就是建立eurakaClient
他的配置檔案和eureka服務的兩個配置檔案都一樣分別是bootstrap.yml 和application.yml ,區別是
spring:
  application:
    name: eureka-client
eurekaClient 的啟動類
@SpringBootApplication
@EnableDiscoveryClient
public class Ch31EurekaClientApplication {

    public static void main(String[] args) {
        SpringApplication.run(Ch31EurekaClientApplication.class, args);
    }
}
現在所有程式碼都準備好了,我們來首先啟動configServer
然後,下面的操作很關鍵,大家一定跟上,我會說的很清楚的
啟動時會有報錯資訊,不要管,最後的結果是啟動成功就ok

訪問 http://localhost:8761/,可以看到註冊成功

下面就開始進行對eureka-server進行動態擴容了
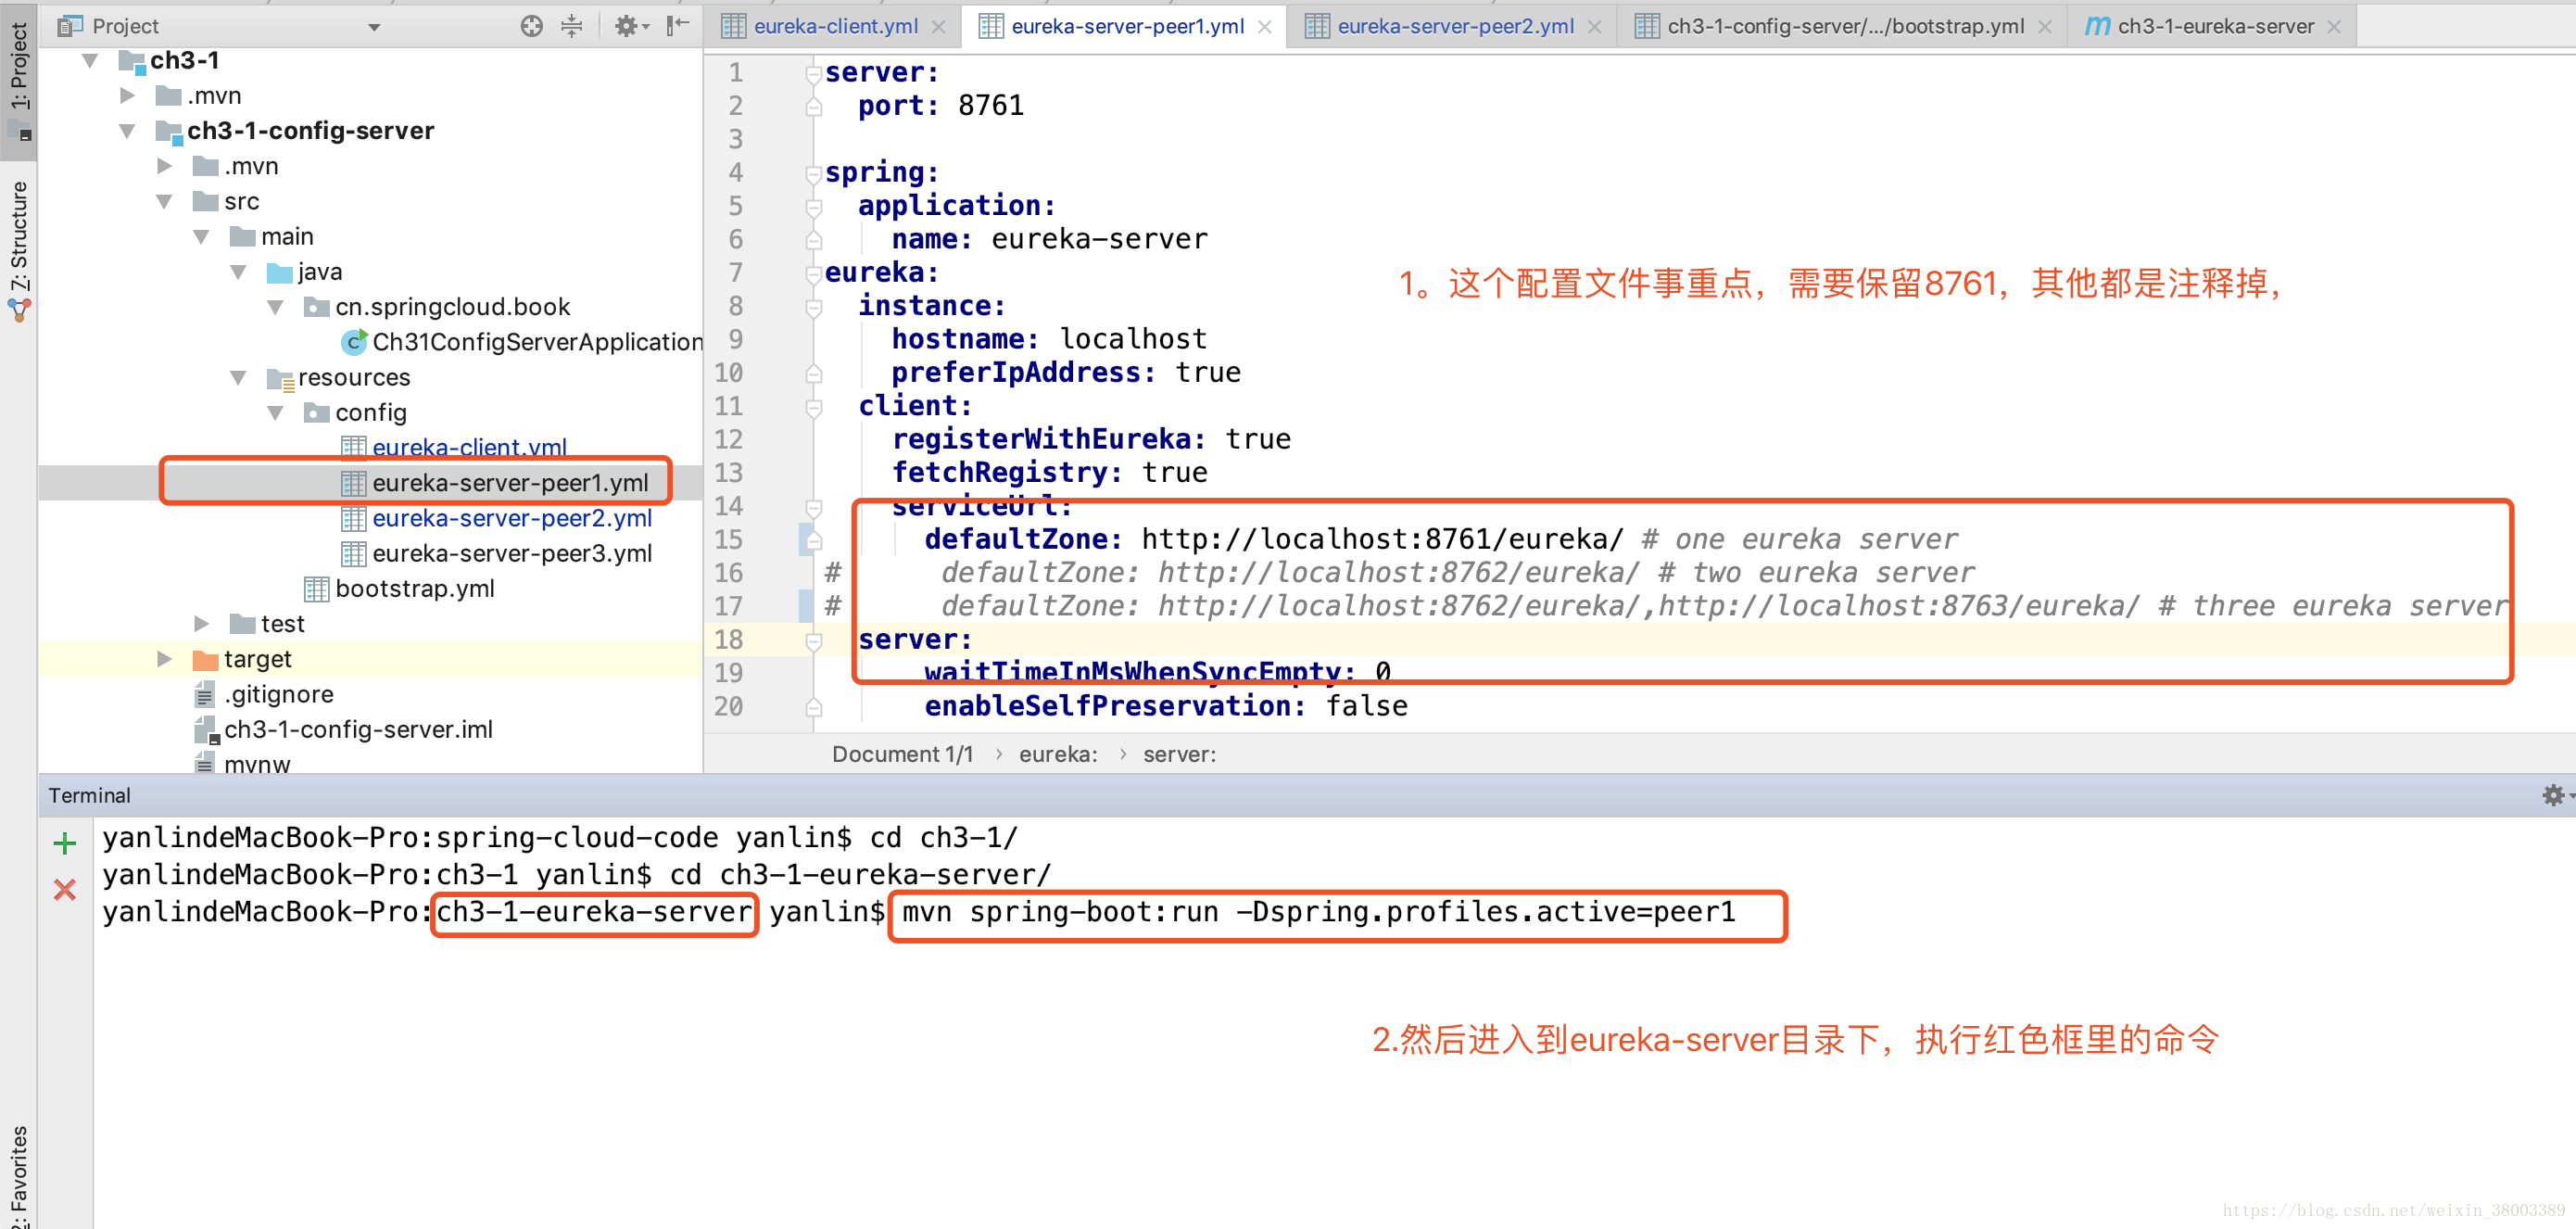
我們來修改peer1檔案

然後修改peer2檔案


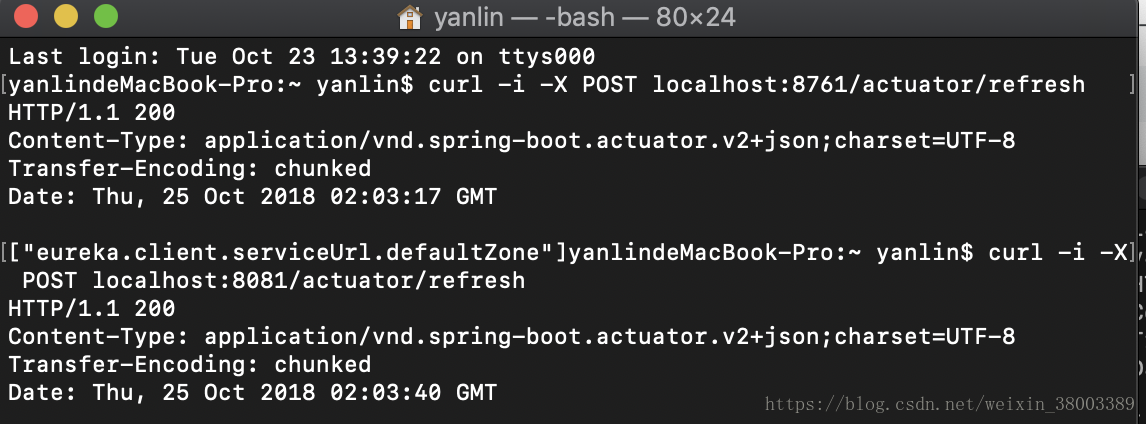
然後我們重啟config-server,使配置生效。然後用如下命令分別重新整理eureka-client以及eureka-server-peer1
分別訪問http://localhost:8761/ ,和http://localhost:8762/,這裡只截一個圖了。

動態擴容成功
注:對本文有異議或不明白的地方微信探討,wx:15524579896