Android ORM框架GreenDao入門學習
阿新 • • 發佈:2018-11-05
最近想了解一下關於Android ORM的東西,在網上一搜,框架還真不少,很多人都說GreenDao效能不錯,這週末就好好搞了下。
現在Goodle推出了Android studio這款開發利器,是用Gradle構建,感覺還不錯。以下專案都是用Android studio 0.8.14開發。
具體build.gradle請參照給出程式碼。因為是首次使用,所以開發中遇過不少問題,我會在最後跟大家分享一下。
測試程式碼是直接拿的人家的,https://github.com/greenrobot/greenDAO,因為版本問題直接用不行,所以程式碼我有改動。
Step1:建立Project-GreenDao
Step2:建立一個普通Java工程
在Project-GreenDao下建立一個Module,型別選擇Java library。此處我建立的是dao-example-generator。在該Module下新建一個類ExampleDaoGenerator,原始碼如下:
build.gradle內容如下:package com.ssp.greendao.generator; import de.greenrobot.daogenerator.DaoGenerator; import de.greenrobot.daogenerator.Entity; import de.greenrobot.daogenerator.Property; import de.greenrobot.daogenerator.Schema; import de.greenrobot.daogenerator.ToMany; public class ExampleDaoGenerator { public static void main(String[] args) throws Exception { Schema schema = new Schema(1, "com.ssp.greendao.dao"); addNote(schema); addCustomerOrder(schema); new DaoGenerator().generateAll(schema, "./app/src/main/java"); } private static void addNote(Schema schema) { Entity note = schema.addEntity("Note"); note.addIdProperty(); note.addStringProperty("text").notNull(); note.addStringProperty("comment"); note.addDateProperty("date"); } private static void addCustomerOrder(Schema schema) { Entity customer = schema.addEntity("Customer"); customer.addIdProperty(); customer.addStringProperty("name").notNull(); Entity order = schema.addEntity("Order"); order.setTableName("ORDERS"); // "ORDER" is a reserved keyword order.addIdProperty(); Property orderDate = order.addDateProperty("date").getProperty(); Property customerId = order.addLongProperty("customerId").notNull().getProperty(); order.addToOne(customer, customerId); ToMany customerToOrders = customer.addToMany(order, customerId); customerToOrders.setName("orders"); customerToOrders.orderAsc(orderDate); } }
apply plugin: 'java'

repositories {
    mavenLocal()
    mavenCentral()
}

dependencies {
    compile 'de.greenrobot:greendao-generator:1.3.1'
}

sourceSets {
    main {
        java {
            srcDir 'src/main/java'
        }
    }
}
artifacts {
    archives jar
}new DaoGenerator().generateAll(schema, "./app/src/main/java");
Step3:在app中建立NoteActivity測試
NoteActivity程式碼如下:
package com.ssp.greendao;

import android.app.ListActivity;
import android.app.LoaderManager;
import android.content.Context;
import android.content.CursorLoader;
import android.content.Loader;
import android.database.Cursor;
import android.database.sqlite.SQLiteDatabase;
import android.os.Bundle;
import android.text.Editable;
import android.text.TextWatcher;
import android.util.Log;
import android.view.KeyEvent;
import android.view.View;
import android.view.inputmethod.EditorInfo;
import android.widget.CursorAdapter;
import android.widget.EditText;
import android.widget.ListView;
import android.widget.SimpleCursorAdapter;
import android.widget.TextView;

import com.ssp.greendao.dao.DaoMaster;
import com.ssp.greendao.dao.DaoSession;
import com.ssp.greendao.dao.Note;
import com.ssp.greendao.dao.NoteDao;

import java.text.DateFormat;
import java.util.Date;


public class NoteActivity extends ListActivity {
    private static SQLiteDatabase db;
    private EditText editText;
    private DaoMaster daoMaster;
    private DaoSession daoSession;
    private static NoteDao noteDao;
    private Cursor cursor;
    private SimpleCursorAdapter adapter;
    private MyCursorLoader my;
    private LoaderManager manager;

    public static class MyCursorLoader extends CursorLoader{
        public MyCursorLoader(Context context) {
            super(context);

        }
        public Cursor loadInBackground(){
            return db.query(noteDao.getTablename(),noteDao.getAllColumns(), null, null, null, null, null);
        }
    }

    public LoaderManager.LoaderCallbacks<Cursor> callbacks = new LoaderManager.LoaderCallbacks<Cursor>() {
        @Override
        public Loader<Cursor> onCreateLoader(int id, Bundle args) {

            return new MyCursorLoader(getApplicationContext());
        }

        @Override
        public void onLoadFinished(Loader<Cursor> loader, Cursor cursor) {
            String textColumn = NoteDao.Properties.Text.columnName;
            String[] from = { textColumn, NoteDao.Properties.Comment.columnName };
            int[] to = { android.R.id.text1, android.R.id.text2 };

            adapter = new SimpleCursorAdapter(getApplicationContext(), android.R.layout.simple_list_item_2, cursor, from,
                    to, CursorAdapter.FLAG_REGISTER_CONTENT_OBSERVER);

            setListAdapter(adapter);

        }

        @Override
        public void onLoaderReset(Loader<Cursor> loader) {

        }
    };

    @Override
    public void onCreate(Bundle savedInstanceState) {
        super.onCreate(savedInstanceState);

        setContentView(R.layout.activity_note);

        DaoMaster.DevOpenHelper helper = new DaoMaster.DevOpenHelper(this, "notes-db", null);
        db = helper.getWritableDatabase();
        daoMaster = new DaoMaster(db);
        daoSession = daoMaster.newSession();
        noteDao = daoSession.getNoteDao();

        manager = getLoaderManager();
        manager.initLoader(1,null,callbacks);

        editText = (EditText) findViewById(R.id.editTextNote);
        addUiListeners();
    }

    protected void addUiListeners() {
        editText.setOnEditorActionListener(new TextView.OnEditorActionListener() {

            @Override
            public boolean onEditorAction(TextView v, int actionId, KeyEvent event) {
                if (actionId == EditorInfo.IME_ACTION_DONE) {
                    addNote();
                    return true;
                }
                return false;
            }
        });

        final View button = findViewById(R.id.buttonAdd);
        button.setEnabled(false);
        editText.addTextChangedListener(new TextWatcher() {

            @Override
            public void onTextChanged(CharSequence s, int start, int before, int count) {
                boolean enable = s.length() != 0;
                button.setEnabled(enable);
            }

            @Override
            public void beforeTextChanged(CharSequence s, int start, int count, int after) {
            }

            @Override
            public void afterTextChanged(Editable s) {
            }
        });
    }

    public void onMyButtonClick(View view) {
        addNote();
    }

    private void addNote() {
        String noteText = editText.getText().toString();
        editText.setText("");

        final DateFormat df = DateFormat.getDateTimeInstance(DateFormat.MEDIUM, DateFormat.MEDIUM);
        String comment = "Added on " + df.format(new Date());
        Note note = new Note(null, noteText, comment, new Date());
        noteDao.insert(note);
        Log.d("DaoExample", "Inserted new note, ID: " + note.getId());

        //cursor.requery();
        //cursor = my.loadInBackground();
        manager.restartLoader(1,null,callbacks);
    }

    @Override
    protected void onListItemClick(ListView l, View v, int position, long id) {
        noteDao.deleteByKey(id);
        Log.d("DaoExample", "Deleted note, ID: " + id);
        //cursor.requery();
        //cursor = my.loadInBackground();
        manager.restartLoader(1,null,callbacks);
    }

}
layout/activity_note.xml內容如下:
<?xml version="1.0" encoding="utf-8"?>
<LinearLayout
xmlns:android="http://schemas.android.com/apk/res/android"
android:orientation="vertical"
android:layout_width="fill_parent"
android:layout_height="fill_parent">
<LinearLayout
    android:layout_width="fill_parent"
    android:layout_height="wrap_content"
    android:id="@+id/linearLayout1"
    android:orientation="horizontal">
    <EditText
        android:layout_height="wrap_content"
        android:layout_weight="1"
        android:layout_width="wrap_content"
        android:inputType="text"
        android:imeOptions="actionDone"
        android:id="@+id/editTextNote"
        android:hint="Enter new note"></EditText>
    <Button
        android:layout_height="wrap_content"
        android:layout_width="wrap_content"
        android:text="Add"
        android:id="@+id/buttonAdd"
        android:onClick="onMyButtonClick"></Button>
</LinearLayout>
<ListView
    android:layout_height="wrap_content"
    android:id="@android:id/list"
    android:layout_width="fill_parent"></ListView>
</LinearLayout>
build.gradle內容如下:
apply plugin: 'com.android.application'

android {
    compileSdkVersion 20
    buildToolsVersion "20.0.0"

    defaultConfig {
        applicationId "com.ssp.greendao"
        minSdkVersion 15
        targetSdkVersion 20
        versionCode 1
        versionName "1.0"
    }
    buildTypes {
        release {
            runProguard false
            proguardFiles getDefaultProguardFile('proguard-android.txt'), 'proguard-rules.pro'
        }
    }
    compileOptions {
        sourceCompatibility JavaVersion.VERSION_1_6
        targetCompatibility JavaVersion.VERSION_1_7
    }
    dexOptions {
        incremental true
    }
}

dependencies {
    //classpath 'com.android.tools.build:gradle:0.13.2'
    compile('de.greenrobot:greendao:1.3.0') {
        exclude module: 'support-v4'
        exclude module: 'junit'
        exclude module: 'android-test'
        exclude module: 'annotations'
        exclude module: 'android'
    }
    //compile 'com.android.support:support-v4:20.0.+'
    compile 'com.android.support:appcompat-v7:20.0.+'
}

sourceSets {
    main {
        java {
            srcDir 'src/main/java'
        }
    }
}
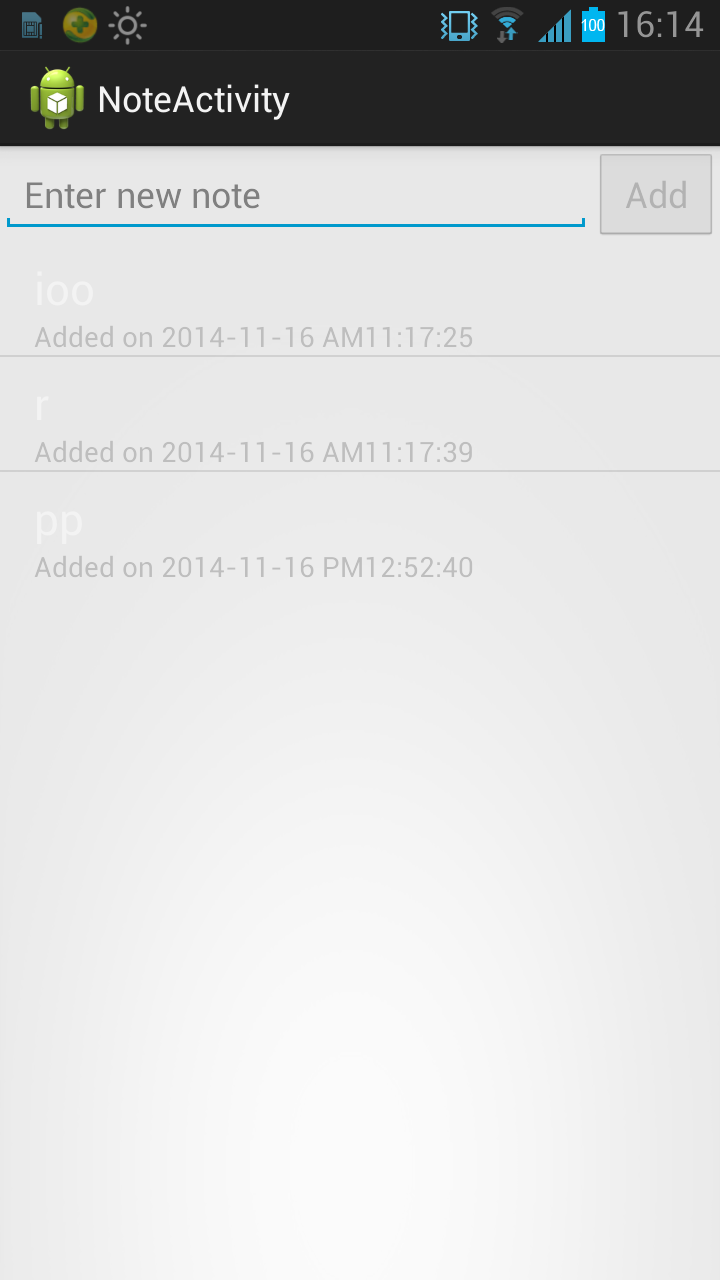
如果以上幾步都已成功構建,執行app就可以操作了。效果圖如下:

問題及使用注意點:
- File->Settings->Gradle->Project-level-settings ,我選擇了Use default gradle wrapper(recommended),好處官網上好像有解釋
- Project根下的build.gradle裡,我在依賴裡添加了classpath 'com.android.tools.build:gradle:0.13.2',注意gradle/wrapper/gradle-wrapper.properties內容
- 依賴包引入多次的問題,可以在終端用命令檢視依賴關係:gradlew -q dependencies。使用方法可以參照我上面的配置。
- 編譯執行時出現一些莫名其妙的問題,可以試試先clean->Snyc Project with Gradle Files->run。
