
Python語言程式設計(北京理工大學MOOC)6-8周
第六週
資料基本處理源程式
def get_num():
    num = []
    numstr = input("請輸入數字,回車鍵結束:")
    while numstr != "":
        num.append(eval(numstr))
        numstr = input("請輸入數字,回車鍵結束:")
    return num
# 求平均值
def mean(num):
    sum = 0.0
    for number in num:
        sum += number
    return sum/len(num)
#求中位數
def median(num):
    sorted(num)
    size = len(num)
    if size%2 ==0:
        med = (num[size//2-1] + num[size//2])/2
    else:
        med = num[size//2]
    return med
#求方差
def dev(num,med):
    sdev = 0.0
    for number in num:
        sdev = sdev + (number - med)**2
    return pow(sdev/(len(num)-1), 0.5)


n = get_num()
m = mean(n)
d = dev(n, m)
print("平均值為{:.2f},中位數為:{},方差為:{:.2f}".format(m, median(n), d))
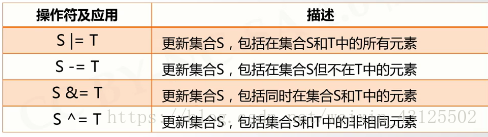
- 集合特點
-集合用大括號{}表示,元素間用逗號分離
-集合中每一個元素位移,不存在相同元素
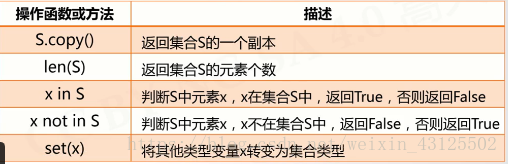
-集合元素之間無序 - 集合的操作方法
四個操作符
再加上兩個關係操作符
是S<=T或S<T 返回True/False,判斷S和T的子集關係
是S>=T或S>T 返回True/False,判斷S和T的包含關係
還有四個增強操作符
|操作函式或方法|描述 |
|–|--|
| S.add(x) | 如果x不在集合中則將x增加到S |
| S.discard(x) | 移除S中元素x,如果x不在集合S中,不報錯 |
| S.remove(x) | 移除S中元素x,如果x不在集合S中,產生KeyError異常|
| S.clear(x) | 移除S中所有元素 |
| S.pop(x) | 隨機返回S的一個元素,更新S,若S為空產生KeyError異常 |
經典用法:資料去重ls = [‘P’, ‘Y’, ‘P’, ‘Y’, 123]
s = set(ls)
lt = list(s)
輸出 [‘P’, ‘Y’, 123] - jieba庫
jieba是優秀的中文分詞第三方庫,需要額外安裝
jieba庫提供三種分詞模式,最簡單隻需掌握一個函式
jieba分詞的原理
Jieba分詞依靠中文詞庫
利用一箇中文詞庫,確定漢字之間的關聯概率
漢字間概率大的組成片語,形成分詞結果
除了分詞,使用者還可以新增自定義的片語
最常用的就是:
jieba.lcut(s) :精確模式,返回一個列表型別的分詞結果
jieba.lcut(“中國是一個偉大的國家”)
[‘中國’, ‘是’, ‘一個’, ‘偉大’, ‘的’, ‘國家’]

尋找哈姆雷特高頻詞彙源程式
def getText():
    txt = open("hamlet.txt", "r").read()# 開啟檔案
    txt = txt.lower()# 全部轉化為小寫字母
    for i in '!#$%^&*()_-+=/`~{}[]:;"?<>,.':#去掉全部標點符號用空格代替
        txt = txt.replace(i, " ")
    return txt

hamletTxt = getText()
words = hamletTxt.split()# split 預設用空格將字串分隔並以列表形式返回
counts = {}
for i in words:
    # 計算單詞出現的次數,get函式就是尋找i這個鍵,如果在字典中找到了就返回對應的值,後面那個引數就是default值
    counts[i] = counts.get(i, 0) + 1
# item函式即以列表返回可遍歷的(鍵, 值) 元組陣列([key:value],[key:value],[key:value])
# 再次使用list函式將元祖轉化為列表
items = list(counts.items())
#對列表按照鍵值對的第二個元素進行從大到小的排列
items.sort(key=lambda x:x[1], reverse=True)
for i in range(10):
    word, count = items[i]
    print("{:10}{:5}".format(word, count))#{:10}指定了該域的寬度為10,避免單詞與次數列印效果重複
尋找三國演義人物出場次數源程式
import jieba
txt = open("threekingdoms.txt", "r", encoding="utf-8").read()# 開啟檔案
excludes = {'將軍', '卻說', '荊州', '二人', '不可', '不能', '如此', '商議', '如何', '主公','軍士', '左右', '軍馬', '引兵',\
            '次日', '大喜', '天下', '東吳', '於是', '今日', '不敢', '魏兵', '陛下', '一人', '都督', '人馬', '不知' }
words = jieba.lcut(txt)# 以列表的形式返回
counts = {}
for word in words:
    if len(word) == 1:
        continue
    elif word == "諸葛亮" or word == "孔明曰":
        reword = "孔明"
    elif word == "關公" or word == "雲長":
        reword = "關羽"
    elif word == "玄德" or word == "玄德曰":
        reword = "劉備"
    elif word == "孟德" or word == "丞相":
        reword = "曹操"
    else:
        reword = word
    # 計算單詞出現的次數,get函式就是尋找i這個鍵,如果在字典中找到了就返回對應的值
    counts[reword] = counts.get(reword, 0) + 1
for word in excludes:
   del counts[word]
# item函式即以列表返回可遍歷的(鍵, 值) 元組陣列([key:value],[key:value],[key:value])
# 再次使用list函式將元祖轉化為列表
items = list(counts.items())
#對列表按照鍵值對的第二個元素進行從大到小的排列
items.sort(key=lambda x:x[1], reverse=True)
for i in range(10):
    word, count = items[i]
    print("{:10}{:5}".format(word, count))# {:10}指定了該域的寬度為10
明明已經下載jieba庫但是pycha提示沒找到怎麼辦?
file-settings-project-project interpreter,找到右邊的綠色加號,把jieba新增進來就可以了
提示TXT檔案無法讀取怎麼辦?
把檔案另存為uf-8格式就行了
一行程式碼太長怎麼辦?
用“\”符號就行了!
第七週
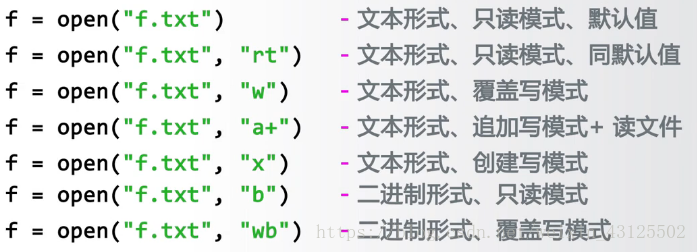
- 檔案操作
<變數名> = open(<檔名>,<開啟模式>)
檔案最好跟程式在同一個目錄下,這樣就不用再指定檔案地址
檔案開啟模式主要有以下幾種:
使用具體方法

檔案關閉:<變數名>.close()
檔案一旦被開啟,如果沒有對應的關閉語句就是在程式中一直被開啟,只有在程式退出時才會被自動關閉
2. 檔案內容讀取
| 操作方法 | 描述 |
|---|---|
| <檔名>.read(size=-1) | 讀入全部內容,如果給出引數,讀入前size長度,size為2,就是讀前兩個字元 |
| <檔名>.readline(size=-1) | 讀入一行內容,如果給出引數,讀入改行前size長度,size為2,就是讀改行前兩個字元 |
| <檔名>.readlines(hint=-1) | 讀入檔案所有行,以每行行為元素形成列表,如果給出引數,讀入前hint行 |
- seek()內建函式
引數為0:指標回到檔案開頭
引數為1:指標回到當前位置
引數為2:指標回到檔案結尾 - 檔案寫的時候注意事項:
fo = open(“ls.txt”,"w+)# 開啟檔案,文字形式,覆蓋寫模式+讀檔案
fo.writelines(ls)# 讀入檔案所有行
fo.seek(0)# 將指標退回到檔案開頭
for line on fo:# 逐行列印
print(line)
fo.close#檔案關閉
fo.seek(0)# 將指標退回到檔案開頭這一步非常重要,如果沒有退回指標,那麼打印出來的就沒有結果。
上面這個程式也給出了遍歷全文的一種常用的程式碼模板,要牢記。
檔案驅動繪圖程式
import turtle
turtle.title("資料驅動繪圖")
turtle.color("red")
turtle.setup(800,800)
turtle.pensize(5)

# 資料獲取,一組五個引數
# 300,0,144,1,0,0
# 前進距離,(0:左轉,1:右轉),轉向的絕對角度,rgb對應的三個引數(0-1之間的小數)
data = []
f = open("datals.txt")
for line in f:
    line = line.replace("\n", " ")
    data.append(list(map(eval,line.split(","))))
f.close()
# 繪圖
for i in range(len(data)):
    turtle.fd(data[i][0])
    turtle.color(data[i][3], data[i][4], data[i][5])
    if data[i][1]:
        turtle.right(data[i][2])
    else:
        turtle.left(data[i][2])
首次使用檔案驅動程式,將資料與程式分離,建立介面大大提高了程式碼的適應性。麻煩的是需要將輸入的資料進行處理。該程式中資料處理關鍵語句:
for line in f:
    line = line.replace("\n", " ")
    data.append(list(map(eval,line.split(","))))
資料傳輸進來,首先就將該行的換行符換為空格。然後資料是以字串的形式傳進來,使用spilt()函式將整個大的字串資料,使用逗號“,”進行分隔成小的字串。然後為了程式處理的資料均為數字,再使用eval函式將每個小的字串去掉引號變成數字。(map(a,b)函式就是使用a函式對b中的每個元素進行函式操作。)再使用list將轉化為數字的資料變成一個列表。最後使用append函式將輸入檔案的每一行進行拼接。最後形成的就是類似這種結構[[],[],[],[],[]]的一個列表。
- str.join(元組、列表、字典、字串)
用想要的符號進行分隔
list=[‘1’,‘2’,‘3’,‘4’,‘5’]
print(’’.join(list))
12345
- wordcloud
安裝詞雲 :pip install wordcloud
構建詞雲物件
class wordcloud.WordCloud(font_path=None, width=400, height=200, margin=2, ranks_only=None, prefer_horizontal=0.9, mask=None, scale=1, color_func=None, max_words=200, min_font_size=4, stopwords=None, random_state=None, background_color=‘black’, max_font_size=None, font_step=1, mode=‘RGB’, relative_scaling=0.5, regexp=None, collocations=True, colormap=None, normalize_plurals=True)
| 引數 | 型別 | 描述 |
|---|---|---|
| font_path | string | 指定字型的位置(可以在網上下載OTF或者TTF格式),預設使用DroidSansMono path |
| width | int(default=400) | 圖片寬度,越大越精細 |
| height | int (default=200) | 圖片高度,越大越精細 |
| prefer_horizontal | float (default=0.90) | 越接近1說明越喜歡水平的字,則字就不會為了適合展示而翻轉成水平的 |
| mask : | nd-array or None (default=None) | 將詞雲畫在遮罩上 |
| scale : | float (default=1) | 計算和畫圖的比例,當做大圖的時候使用scale代替height和width速度會快,但會影響詞之間的擬合度 |
| min_font_size : | int (default=4) | 最小頻率詞的大小 |
| font_step : | int (default=1) | 字型步長,如果大於1,可以增快計算速度,但是擬合度會下降 |
| max_words : | number (default=200) | 圖片容納詞語的上限 |
| stopwords : | set of strings or None | 設定停用詞,如果不設定則使用預設的停用詞 |
| background_color : | color value (default=”black”) | 背景顏色設定 |
| max_font_size : | int or None (default=None) | 最大的詞語的大小 |
| mode : | string (default=”RGB”) | 當使用”RGBA”時,背景將變成透明的 |
| relative_scaling : | float (default=.5) | 當relative_scaling=0時,詞的大小是按照排名計算的,當relative_scaling=1時候則會按詞頻的倍數計算大小。 |
| color_func : | callable, default=None | 根據每個詞的font_size, position, orientation, font_path, random_state等屬性為詞語生成特定的顏色,具體參考matplotlib colormap |
| regexp : | string or None (optional) | |
| collocations : | bool, default=True | 是否考慮詞語的搭配 |
| colormap : | string or matplotlib colormap, default=”viridis” | Matplotlib colormap,如果color_func引數被指定,則此引數無效 |
| normalize_plurals : | bool, default=True | 是否忽略複數 |
| words_ | (dict of string to float) | 返回詞頻 |
| layout_ | (list of tuples (string, int, (int, int), int, color))) | 詞雲詞的屬性資訊 |
詞雲源程式
import jieba
import wordcloud
from scipy.misc import imread
mask = imread("china.png")
f = open("新時代中國特色社會主義.txt","r",encoding="utf-8")
t = f.read()
f.close()
# 將輸入的詞用空格分隔,才能被識別
ls = jieba.lcut(t)
txt = " ".join(ls)
# 設定引數
w = wordcloud.WordCloud(font_path="msyh.ttc",mask=mask,\
                        width=1000, height=700, background_color = "white")
w.generate(txt)# 生成詞雲
w.to_file("grwordcloud.png")# 輸出生成的詞雲圖片
只實現了最最基本的內容,而且scrip這個庫需要匯入,且遇到了版本太低的問題,而且圖片的匯入方式也不好,使用image庫可能處理更加規範方便。
於是自行編寫了以下程式:
import jieba
import wordcloud
from matplotlib import pyplot as plt
from  PIL import Image
import numpy as np


# 文字輸入格式化
def word_txt(txt):
    f = open(txt, "r" ,encoding="utf-8")# 開啟檔案
    t = f.read()
    f.close()
    ls = jieba.lcut(t)# 將輸入的詞用空格分隔,才能被識別
    txt = " ".join(ls)
    return txt


# 讀入背景圖片
def image_deal(img):
    img = Image.open(img)
    img_array = np.array(img)# 將圖片轉化成陣列
    return img_array

# 設定詞雲的引數
def wordcloud_set():
    word = wordcloud.WordCloud( font_path="simsun.ttc",\
                        mask = image_deal('wade6.jpg'),\
                        width=800, height=800,\
                        background_color = "black",\
                        stopwords=[],\
                        max_words=1000, \
                        min_font_size=5,\
                        max_font_size=200,\
                        scale=10,\
                        random_state=50)
    return word

word = wordcloud_set()
word.generate(word_txt('新時代中國特色社會主義.txt')) # 生成詞雲
word.to_file("grwordcloud.png")# 輸出生成的詞雲圖片
plt.imshow(word)
plt.axis('off')
plt.show()
第八週
1 Python庫安裝
第三方安裝庫網站:http://pypi.org/
三種方法:
方法一(主要方法,需要聯網):使用pip命令
電腦自帶cmd命令下進行操作:
| 作用 | 操作方法 |
|---|---|
| 安裝庫 | pip install <第三方庫名> |
| 更新庫 | pip install -U<第三方庫名> |
| 解除安裝庫 | pip uninstall <第三方庫名> |
| 檢視庫的詳細資訊 | pip show <第三方庫名> |
| 根據關鍵詞在名稱和介紹中搜索第三方庫 | pip search <關鍵詞> |
方法二:整合安裝方法
*Anaconda :https//www.continuum.io
*支援800個第三方庫
*包含多個主流工具
*適合資料計算領域開發
方法三:檔案安裝方法
對於有些庫可以用pip下載,但是不能安裝,為什麼?
由於某些第三方庫下載後,需要編譯再安裝,如果作業系統沒有編譯環境,則能下載但不能安裝。
解決辦法:

模擬比賽源程式
import random
import time
def printInformation():
    print("程式模擬A和B兩個運動員之間的競技比賽")
    print("程式輸入為A、B選手的能力值(0至1之間的小數)及模擬場數N")


def getvalue():
    player_a = eval(input("請輸入A選手能力值:"))
    player_b = eval(input("請輸入B選手能力值:"))
    N = eval(input("請輸入模擬場數:"))
    return player_a, player_b, N


def play_one_game(ability_a, ability_b, star_game):
    time.sleep(0.0001)
    a_win, b_win = 0, 0
    random_num = random.random()
    if star_game == "a" and (random_num < ability_a):
        a_win = 10.
        nx_star_game = "a"
    elif star_game == "a" and (random_num > ability_a):
        a_win = 0
        nx_star_game = "b"
    elif star_game == "b" and (random_num < ability_b):
        b_win = 1
        nx_star_game = "b"
    elif star_game == "b" and (random_num > ability_b):
        b_win = 0
        nx_star_game = "a"
    return a_win, b_win, nx_star_game


def play_n_game(ability_a, ability_b, n):
    num_a, num_b = 0, 0
    star_game = "a"
    while num_a + num_b != n :
        a_win, b_win, nx_star_game = play_one_game(ability_a, ability_b, star_game)
        num_a += a_win
        num_b += b_win
        star_game = nx_star_game
    return num_a, num_b


def result(num_a, num_b):
    n = num_a + num_b
    print("共模擬{}場比賽".format(n))
    print("選手A贏得{}場,勝率為:{:.1f}%".format(num_a, num_a*100/n))
    print("選手B贏得{}場,勝率為:{:.1f}%".format(num_b, num_b*100/n))


def main():
    printInformation()
    ability_a, ability_b, n = getvalue()
    num_a, num_b = play_n_game(ability_a, ability_b, n)
    result(num_a, num_b)


main()
程式碼與視訊中的程式碼存在不同,是我自己看完寫的,沒有用視訊的。
值得注意的是random()函式在最開始使用的for迴圈中出現了產生相同隨機數的情況。也就是第四周中提到的偽隨機數,我的解決辦法是在函式中插入time.sleep(time),由於在不指定隨機數種子的情況下,random()使用的是系統時間作為種子,時間精度為微秒。因此我進行sleep一定時間後再取隨機數即可。看網上大神有更專業的處理方式或者不將其放到for迴圈之中,但是由於程式比較簡單那就用簡單一些的方式處理吧。