
Spring Boot從簡入深(一)
阿新 • • 發佈:2018-11-05
簡介
Spring Boot來簡化SPring應用開發,約定大於配置,去繁從簡,just run就能建立一個獨立的,產品級別應用
背景:
J2EE笨重的開發、繁多的配置、低下的開發效率、發雜的部署流程、第三方技術整合難度發
解決:
"Spring全家桶時代" SPring Boot——>J2EE一站式解決方案 Spring Cloud——>分散式整體解決方案(自己的話就是:簡化Spring應用開發的一個框架,整個Spring技術棧的一個大整合,J2EE開發的一站式解決方案)
優點:
- 快速建立獨立執行的Spring專案以及主流框架整合
- 使用嵌入式的Servlet容器,應用無需打成WAR包
- starters自動依賴與版本控制
- 大量的自動配置,簡化開發,也可以修改預設值
- 無需配置XML,無程式碼生成,開箱即用
- 準備生產環境的執行時應用監控
- 與雲端計算的天然整合
微服務
2014,martin fowler 微服務:架構風格
一個應用應該是一組小型服務;可以通過HTTP的方式進行互通;
每一個功能元素最終都是一個可獨立替換和獨立升級軟體的單元
環境約束:
- jdk1.8:Spring Boot 1.7及以上:java version "1.8.0_162"
- maven3.x:maven 3.3以上版本:Apache Maven 3.5.4
- IntellijlDEA2018:IntelliJ IDEA 2018.2、STS
- SpringBoot 1.5.9.ReLEASE:2.1.0;
- 統一環境;
1.MAVEN設定:
給maven的settings.xml配置檔案的profiles標籤新增
<profiles> <profile> <id>jdk-1.8</id> <activation> <activeByDefault>true</activeByDefault> <jdk>1.8</jdk> </activation> <properties> <maven.compiler.source>1.8</maven.compiler.source> <maven.compiler.target>1.8</maven.compiler.target> <maven.compiler.compilerVersion>1.8</maven.compiler.compilerVersion> </properties> </profile> </profiles>
2.IDEA示例
1.Spring Boot HelloWord
2.匯入依賴
<parent>
        <groupId>org.springframework.boot</groupId>
        <artifactId>spring-boot-starter-parent</artifactId>
        <version>1.5.9.RELEASE</version>
    </parent>
    <dependencies>
        <dependency>
            <groupId>org.springframework.boot</groupId>
            <artifactId>spring-boot-starter-web</artifactId>
        </dependency>
    </dependencies>
3.編寫一個主程式:啟動Spring Boot應用
/**
 * @SpringBootApplication 來標註一個主程式類,說明這是一個Spring Boot應用
 */
@SpringBootApplication
public class HelloWorLdMainApplication {
    public static void main(String[] args) {
        //Spring應用啟動起來
        SpringApplication.run(HelloWorLdMainApplication.class,args);
        }
4.編寫相關的Cotroller、Service
@Controller
public class HelloController {
    @ResponseBody
    @RequestMapping("/hello")
    public String hello(){
        return "Hello World";
    }
}
5.執行主程式測試
6.簡化部署
<!--這個外掛,可以將應用打包成一個可執行的jar包;-->
    <build>
        <plugins>
            <plugin>
                <groupId>org.springframework.boot</groupId>
                <artifactId>spring-boot-maven-plugin</artifactId>
            </plugin>
        </plugins>
    </build>
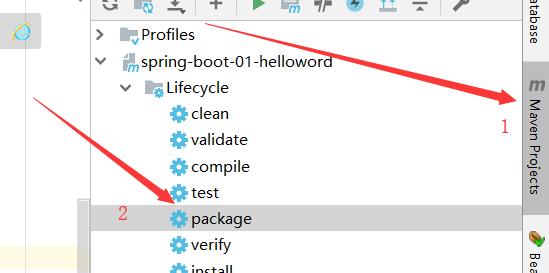
點選右邊的Maven Project-package將這個應用打成jar
通過cmd直接使用java-jar的命令進行執行;
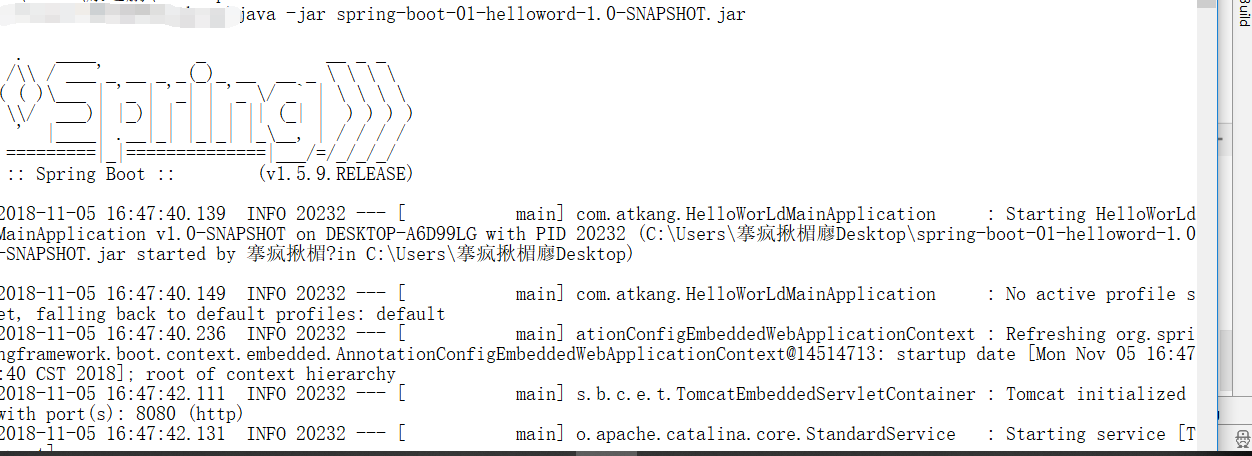
完成效果
