
Faster RCNN演算法訓練程式碼解析(2)
接著上篇的部落格,我們獲取imdb和roidb的資料後,就可以搭建網路進行訓練了。
我們回到trian_rpn()函式裡面,此時執行完了roidb, imdb = get_roidb(imdb_name),取得了imdb和roidb資料。
先進入第一階段的訓練:
print '~~~~~~~~~~~~~~~~~~~~~~~~~~~~~~~~~~~~~~~~~~~~~~~~~~~~~~~~~~' print 'Stage 1 RPN, init from ImageNet model' print '~~~~~~~~~~~~~~~~~~~~~~~~~~~~~~~~~~~~~~~~~~~~~~~~~~~~~~~~~~' cfg.TRAIN.SNAPSHOT_INFIX = 'stage1' mp_kwargs = dict( queue=mp_queue, imdb_name=args.imdb_name, init_model=args.pretrained_model, solver=solvers[0], max_iters=max_iters[0], cfg=cfg) p = mp.Process(target=train_rpn, kwargs=mp_kwargs) ##建立執行緒物件 p.start() ##開始程序 rpn_stage1_out= mp_queue.get() ##從程序裡面獲取執行結果 p.join() ##等待子程序結束
進入子程序train_rpn:
def train_rpn(queue=None, imdb_name=None, init_model=None, solver=None, max_iters=None, cfg=None): """Train a Region Proposal Network in a separate training process. """ # Not using any proposals, just ground-truth boxescfg.TRAIN.HAS_RPN = True cfg.TRAIN.BBOX_REG = False # applies only to Fast R-CNN bbox regression cfg.TRAIN.PROPOSAL_METHOD = 'gt' cfg.TRAIN.IMS_PER_BATCH = 1 print 'Init model: {}'.format(init_model) print('Using config:') pprint.pprint(cfg) import caffe _init_caffe(cfg) roidb, imdb = get_roidb(imdb_name) ##獲取roidb和imdb格式的資料集 print 'roidb len: {}'.format(len(roidb)) output_dir = get_output_dir(imdb) ##訓練的輸出路徑:'py-faster-rcnn/output/faster_rcnn_alt_opt/voc_2007_trainval' print 'Output will be saved to `{:s}`'.format(output_dir) model_paths = train_net(solver, roidb, output_dir, ##進入訓練網路,其實裡面還包裹了一層solver,定義該物件之後才進行訓練。 pretrained_model=init_model, max_iters=max_iters) # Cleanup all but the final model for i in model_paths[:-1]: ##除了最後一個快照,把所有其他的快照都清除掉 os.remove(i) rpn_model_path = model_paths[-1] # Send final model path through the multiprocessing queue queue.put({'model_path': rpn_model_path}) ##將最後的快照儲存到執行緒裡面,進行執行緒通訊。
接著我們執行到了model_paths = train_net(solver, roidb, output_dir, pretrained_model=init_model, max_iters=max_iters)函式,我們進入該函式裡面看看:
def train_net(solver_prototxt, roidb, output_dir,
              pretrained_model=None, max_iters=40000):
    """Train a Fast R-CNN network."""

    roidb = filter_roidb(roidb)  ##過濾部分roidb,具體判斷一個圖片的roidb是否合格:前景大於某個值,背景在某個範圍內,不符合則過濾掉
    sw = SolverWrapper(solver_prototxt, roidb, output_dir,
                       pretrained_model=pretrained_model)

    print 'Solving...'
    model_paths = sw.train_model(max_iters)  ##開始訓練函式
    print 'done solving'
    return model_paths
接著我們進入sw = SolverWrapper(solver_prototxt, roidb, output_dir, pretrained_model=pretrained_model) 函式:
class SolverWrapper(object):
    """A simple wrapper around Caffe's solver.
    This wrapper gives us control over he snapshotting process, which we
    use to unnormalize the learned bounding-box regression weights.
    """

    def __init__(self, solver_prototxt, roidb, output_dir,
                 pretrained_model=None):
        """Initialize the SolverWrapper."""
        self.output_dir = output_dir

        if (cfg.TRAIN.HAS_RPN and cfg.TRAIN.BBOX_REG and
            cfg.TRAIN.BBOX_NORMALIZE_TARGETS):
            # RPN can only use precomputed normalization because there are no
            # fixed statistics to compute a priori
            assert cfg.TRAIN.BBOX_NORMALIZE_TARGETS_PRECOMPUTED

        if cfg.TRAIN.BBOX_REG:
            print 'Computing bounding-box regression targets...'
            self.bbox_means, self.bbox_stds = \
                    rdl_roidb.add_bbox_regression_targets(roidb)
            print 'done'

        self.solver = caffe.SGDSolver(solver_prototxt)   ##該函式主要是用來建造層的,這裡建立ROI層和anchors層
        if pretrained_model is not None:   ##如果存在'data/imagenet_models/ZF.v2.caffemodel'則載入進來
            print ('Loading pretrained model '
                   'weights from {:s}').format(pretrained_model)
            self.solver.net.copy_from(pretrained_model)

        self.solver_param = caffe_pb2.SolverParameter()
        with open(solver_prototxt, 'rt') as f:   ##載入py-faster-rcnn/models/pascal_voc/ZF/faster_rcnn_alt_opt/stage1_rpn_solver60k80k.pt檔案引數
            pb2.text_format.Merge(f.read(), self.solver_param)

        self.solver.net.layers[0].set_roidb(roidb)  ##建立該包裹物件的時候把外部的roidb設定進包裹函式的self.solver.net.layers[0]裡面,用以訓練

    def snapshot(self):
        """Take a snapshot of the network after unnormalizing the learned
        bounding-box regression weights. This enables easy use at test-time.
        """
        net = self.solver.net

        scale_bbox_params = (cfg.TRAIN.BBOX_REG and
                             cfg.TRAIN.BBOX_NORMALIZE_TARGETS and
                             net.params.has_key('bbox_pred'))

        if scale_bbox_params:
            # save original values
            orig_0 = net.params['bbox_pred'][0].data.copy()
            orig_1 = net.params['bbox_pred'][1].data.copy()

            # scale and shift with bbox reg unnormalization; then save snapshot
            net.params['bbox_pred'][0].data[...] = \
                    (net.params['bbox_pred'][0].data *
                     self.bbox_stds[:, np.newaxis])
            net.params['bbox_pred'][1].data[...] = \
                    (net.params['bbox_pred'][1].data *
                     self.bbox_stds + self.bbox_means)

        infix = ('_' + cfg.TRAIN.SNAPSHOT_INFIX
                 if cfg.TRAIN.SNAPSHOT_INFIX != '' else '')
        filename = (self.solver_param.snapshot_prefix + infix +
                    '_iter_{:d}'.format(self.solver.iter) + '.caffemodel')
        filename = os.path.join(self.output_dir, filename)

        net.save(str(filename))
        print 'Wrote snapshot to: {:s}'.format(filename)

        if scale_bbox_params:
            # restore net to original state
            net.params['bbox_pred'][0].data[...] = orig_0
            net.params['bbox_pred'][1].data[...] = orig_1
        return filename

    def train_model(self, max_iters):...
def get_training_roidb(imdb):...
def filter_roidb(roidb): ...
def train_net(solver_prototxt, roidb, output_dir,
              pretrained_model=None, max_iters=40000):...
這裡我們可以發現SolverWrapper是一個類,作者這裡使用新的solverwrapper來包裹原來的solver,這樣就能在原來的基礎上新增部分功能。以便於控制了網路的快照過程,以用來對bounding-box 迴歸的權重進行非歸一化。
該類的核心語句其實就是self.solver = caffe.SGDSolver(solver_prototxt),這裡的solver_prototxt=py-faster-rcnn/tools/../lib/roi_data_layer;
上面的SGDSolver函式裡面建立類class RoIDataLayer(caffe.Layer),該類是caffe layer的一個擴充套件實現,用於fast rcnn訓練。
進入該層class RoIDataLayer(caffe.Layer)看看:
class RoIDataLayer(caffe.Layer):
    """Fast R-CNN data layer used for training."""

    def _shuffle_roidb_inds(self):...def _get_next_minibatch_inds(self):...
    def _get_next_minibatch(self):...def set_roidb(self, roidb):...
        def setup(self, bottom, top):
        """Setup the RoIDataLayer."""

        # parse the layer parameter string, which must be valid YAML
        layer_params = yaml.load(self.param_str_)  ##獲取該層的引數 layer_params={'num_classes': 21}

        self._num_classes = layer_params['num_classes']

        self._name_to_top_map = {}

        # data blob: holds a batch of N images, each with 3 channels
        idx = 0
        top[idx].reshape(cfg.TRAIN.IMS_PER_BATCH, 3,
            max(cfg.TRAIN.SCALES), cfg.TRAIN.MAX_SIZE)
        self._name_to_top_map['data'] = idx
        idx += 1

        if cfg.TRAIN.HAS_RPN:
            top[idx].reshape(1, 3)
            self._name_to_top_map['im_info'] = idx
            idx += 1

            top[idx].reshape(1, 4)
            self._name_to_top_map['gt_boxes'] = idx
            idx += 1
        else: # not using RPN
            # rois blob: holds R regions of interest, each is a 5-tuple
            # (n, x1, y1, x2, y2) specifying an image batch index n and a
            # rectangle (x1, y1, x2, y2)
            top[idx].reshape(1, 5)
            self._name_to_top_map['rois'] = idx
            idx += 1

            # labels blob: R categorical labels in [0, ..., K] for K foreground
            # classes plus background
            top[idx].reshape(1)
            self._name_to_top_map['labels'] = idx
            idx += 1

            if cfg.TRAIN.BBOX_REG:
                # bbox_targets blob: R bounding-box regression targets with 4
                # targets per class
                top[idx].reshape(1, self._num_classes * 4)
                self._name_to_top_map['bbox_targets'] = idx
                idx += 1

                # bbox_inside_weights blob: At most 4 targets per roi are active;
                # thisbinary vector sepcifies the subset of active targets
                top[idx].reshape(1, self._num_classes * 4)
                self._name_to_top_map['bbox_inside_weights'] = idx
                idx += 1

                top[idx].reshape(1, self._num_classes * 4)
                self._name_to_top_map['bbox_outside_weights'] = idx
                idx += 1

        print 'RoiDataLayer: name_to_top:', self._name_to_top_map
        assert len(top) == len(self._name_to_top_map)

def forward(self, bottom, top):...
def backward(self, top, propagate_down, bottom):...
def reshape(self, bottom, top):...
對於上面我們主要分析下setup函式,我們這裡設定了RPN層,所以結構上有三個輸入:data(1 3 600 1000)、im_info(1 3)、gt_boxes(1 4)
RoiDataLayer: name_to_top: {'gt_boxes': 2, 'data': 0, 'im_info': 1}
rpn_cls_score_rpn_cls_score_0_split:1 18 39 64 ##9個anchors × 2個前後景
rpn_cls_score_reshape:1 2 351 64 ##reshape成前後景兩類的概率
rpn_bbox_pred:1 36 39 64 ##9個anchors × 4個座標值
此時系統開始構造該roi網路結構,然後進入類class AnchorTargetLayer(caffe.Layer):
class AnchorTargetLayer(caffe.Layer):
    """
    Assign anchors to ground-truth targets. Produces anchor classification
    labels and bounding-box regression targets.
    """

    def setup(self, bottom, top):
        layer_params = yaml.load(self.param_str_)   ##獲取該層引數layers_params={'feat_stride': 16},這裡是anchors的其中一個比例(8,16,32)
        anchor_scales = layer_params.get('scales', (8, 16, 32))
        self._anchors = generate_anchors(scales=np.array(anchor_scales))
        self._num_anchors = self._anchors.shape[0]   ##9
        self._feat_stride = layer_params['feat_stride']  ##16

        if DEBUG:
            print 'anchors:'
            print self._anchors
            print 'anchor shapes:'
            print np.hstack((
                self._anchors[:, 2::4] - self._anchors[:, 0::4],
                self._anchors[:, 3::4] - self._anchors[:, 1::4],
            ))
            self._counts = cfg.EPS
            self._sums = np.zeros((1, 4))
            self._squared_sums = np.zeros((1, 4))
            self._fg_sum = 0
            self._bg_sum = 0
            self._count = 0

        #設為0,則取出任何超過影象邊界的proposals,只要超出一點點,都要去除
        self._allowed_border = layer_params.get('allowed_border', 0)

        height, width = bottom[0].data.shape[-2:]   ## 39,64
        if DEBUG:
            print 'AnchorTargetLayer: height', height, 'width', width

        A = self._num_anchors   ## 9
        # labels
        top[0].reshape(1, 1, A * height, width)  ##將labels輸出層reshape成(1,1,9×39,64)
        # bbox_targets
        top[1].reshape(1, A * 4, height, width)  ##將bbox_targets輸出層reshape成(1,9*4,39,64)
        # bbox_inside_weights
        top[2].reshape(1, A * 4, height, width)  ##將bbox_inside_weights輸出層reshape成(1,9*4,39,64)
        # bbox_outside_weights
        top[3].reshape(1, A * 4, height, width)  ##將bbox_outside_weights輸出層reshape成(1,9*4,39,64)

    def forward(self, bottom, top):...def backward(self, top, propagate_down, bottom):...
    def reshape(self, bottom, top):...
我們進入self._anchors = generate_anchors(scales=np.array(anchor_scales))函式來產生anchors,進入該函式。該函式主要是產生9個anchors:
def generate_anchors(base_size=16, ratios=[0.5, 1, 2],
                     scales=2**np.arange(3, 6)):
    """
    Generate anchor (reference) windows by enumerating aspect ratios X
    scales wrt a reference (0, 0, 15, 15) window.
    """

    base_anchor = np.array([1, 1, base_size, base_size]) - 1  ##設定基礎anchor,左上座標為(1,1),右下座標為(16,16),即寬為15
    ratio_anchors = _ratio_enum(base_anchor, ratios)
    anchors = np.vstack([_scale_enum(ratio_anchors[i, :], scales)
                         for i in xrange(ratio_anchors.shape[0])])
    return anchors
進入ratio_anchors = _ratio_enum(base_anchor, ratios)函式:
def _ratio_enum(anchor, ratios):
    """
    Enumerate a set of anchors for each aspect ratio wrt an anchor.
    """

    w, h, x_ctr, y_ctr = _whctrs(anchor)  ##返回一個anchor的寬,高, xy 中心點  (16,16,7.5,7.5)
    size = w * h   ##size=256
    size_ratios = size / ratios  ##size_ratios =[ 512.  256.  128.],此時ratios=[0.5, 1, 2]
    ws = np.round(np.sqrt(size_ratios))  ##ws=[23. 16. 11.]
    hs = np.round(ws * ratios)   ##hs=[ 12.  16.  22.]
    anchors = _mkanchors(ws, hs, x_ctr, y_ctr)
    return anchors

def _whctrs(anchor):  ##返回一個anchor的寬,高, xy 中心點
    """
    Return width, height, x center, and y center for an anchor (window).
    """

    w = anchor[2] - anchor[0] + 1
    h = anchor[3] - anchor[1] + 1
    x_ctr = anchor[0] + 0.5 * (w - 1)
    y_ctr = anchor[1] + 0.5 * (h - 1)
    return w, h, x_ctr, y_ctr

def _mkanchors(ws, hs, x_ctr, y_ctr):  ##根據中心點和尺度ws和hs組成的組合,來建立anchors,返回四個座標點
    """
    Given a vector of widths (ws) and heights (hs) around a center
    (x_ctr, y_ctr), output a set of anchors (windows).
    """

    ws = ws[:, np.newaxis]
    hs = hs[:, np.newaxis]
    anchors = np.hstack((x_ctr - 0.5 * (ws - 1),
                         y_ctr - 0.5 * (hs - 1),
                         x_ctr + 0.5 * (ws - 1),
                         y_ctr + 0.5 * (hs - 1)))
    return anchors
建造的anchors如下,行代表三個anchors,列代表2個座標點(左上xy,右下xy)
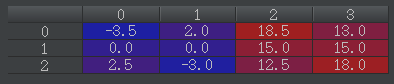
這裡得到三個anchors,然後取其中一個anchor為基礎建立另三個anchors,另一個anchor為基礎建立另三個anchors,這樣我們加上原來的3個就得到了9個anchors。
然後我們回到self.solver = caffe.SGDSolver(solver_prototxt),到這裡為止我們建立完RoIDataLayer層、AnchorTargetLayer層。程式碼看上面的class SolverWrapper(object)。
繼續後面的程式執行,接著載入預訓練模型ZF.v2.caffemodel和載入引數檔案stage1_rpn_solver60k80k.pt,接著進入set_roidb(self, roidb)函式。該函式主要對roidb進行順序打亂。
    def set_roidb(self, roidb):
        """Set the roidb to be used by this layer during training."""
        self._roidb = roidb
        self._shuffle_roidb_inds()  ##對水平圖+垂直圖進行隨機打亂
        if cfg.TRAIN.USE_PREFETCH:  ##跳過
            self._blob_queue = Queue(10)
            self._prefetch_process = BlobFetcher(self._blob_queue,
                                                 self._roidb,
                                                 self._num_classes)
            self._prefetch_process.start()
            # Terminate the child process when the parent exists
            def cleanup():
                print 'Terminating BlobFetcher'
                self._prefetch_process.terminate()
                self._prefetch_process.join()
            import atexit
            atexit.register(cleanup)
此時看看sloverwrapper包裹函式的變數:
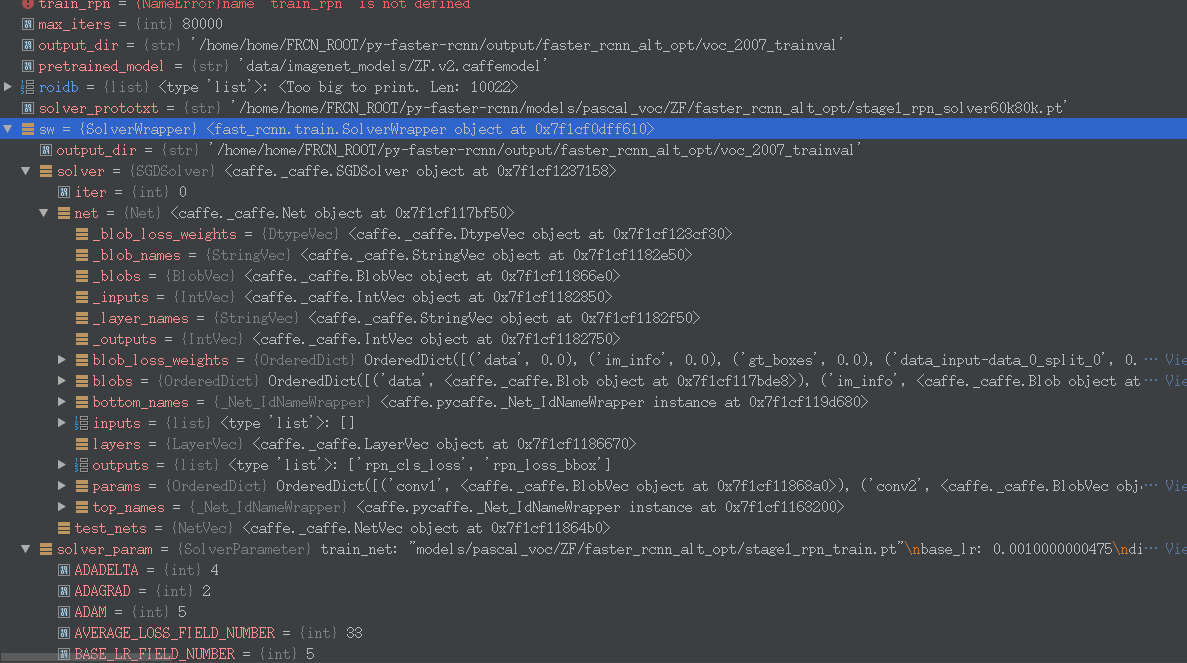
然後我們進入函式model_paths = sw.train_model(max_iters),從而進入訓練。下面的函式大概是每20次顯示一次,然後每10000次儲存一次快照。
    def train_model(self, max_iters):  ##80000
        """Network training loop."""
        last_snapshot_iter = -1
        timer = Timer()
        model_paths = []
        while self.solver.iter < max_iters:
            # Make one SGD update
            timer.tic()
            self.solver.step(1)
            timer.toc()
            if self.solver.iter % (10 * self.solver_param.display) == 0:   ##10000 % 200,具體是每20次顯示一次
                print 'speed: {:.3f}s / iter'.format(timer.average_time)

            if self.solver.iter % cfg.TRAIN.SNAPSHOT_ITERS == 0:  ##10000 % 10000 ,具體是每10000次儲存一次快照
                last_snapshot_iter = self.solver.iter
                model_paths.append(self.snapshot())

        if last_snapshot_iter != self.solver.iter:
            model_paths.append(self.snapshot())
        return model_paths
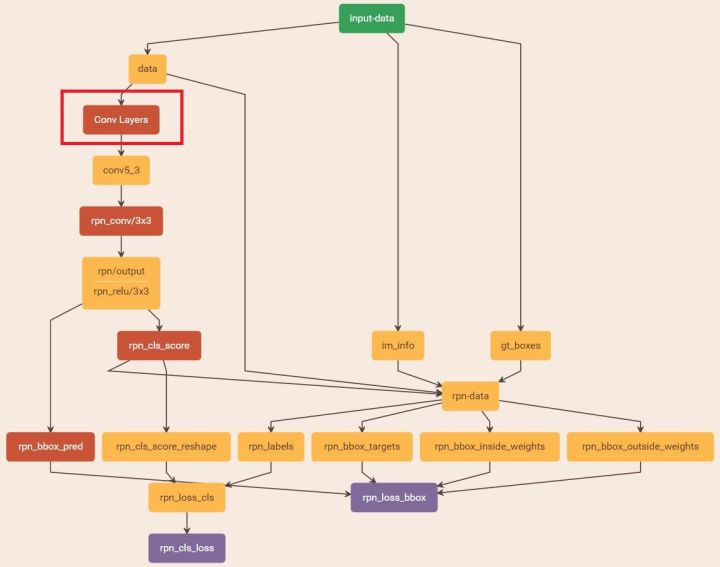
至此,我們已經對第一階段的訓練完成。總的網路圖為下圖。總覽一下,其實就是輸入三個[data(pascal_voc格式)、im_info(圖片維度)、gt_boxes]; 輸出就是分類和迴歸得分。這裡主要目的是獲取訓練完的模型 zf_rpn_stage1_iter_80000.caffemodel,以便後面的使用。
Stage 1 RPN, init from ImageNet model:

接著我們進入第二階段的訓練。先回到train_faster_rcnn_alt_opt.py函式:
    print '~~~~~~~~~~~~~~~~~~~~~~~~~~~~~~~~~~~~~~~~~~~~~~~~~~~~~~~~~~'
    print 'Stage 1 RPN, generate proposals'
    print '~~~~~~~~~~~~~~~~~~~~~~~~~~~~~~~~~~~~~~~~~~~~~~~~~~~~~~~~~~'

    mp_kwargs = dict(
            queue=mp_queue,
            imdb_name=args.imdb_name,
            rpn_model_path=str(rpn_stage1_out['model_path']),
            cfg=cfg,
            rpn_test_prototxt=rpn_test_prototxt)
    p = mp.Process(target=rpn_generate, kwargs=mp_kwargs)
    p.start()
    rpn_stage1_out['proposal_path'] = mp_queue.get()['proposal_path']
    p.join()
進入子程序rpn_generate()函式:
def rpn_generate(queue=None, imdb_name=None, rpn_model_path=None, cfg=None,
                 rpn_test_prototxt=None):
    """Use a trained RPN to generate proposals.
    """

    cfg.TEST.RPN_PRE_NMS_TOP_N = -1     # no pre NMS filtering
    cfg.TEST.RPN_POST_NMS_TOP_N = 2000  # NMS後保留2000個框
    print 'RPN model: {}'.format(rpn_model_path)
    print('Using config:')
    pprint.pprint(cfg)  ##cfg除了上面改過的兩項,其他都不變

    import caffe
    _init_caffe(cfg)

    # NOTE: the matlab implementation computes proposals on flipped images, too.
    # We compute them on the image once and then flip the already computed
    # proposals. This might cause a minor loss in mAP (less proposal jittering).
    imdb = get_imdb(imdb_name)  ##重新獲取imdb資料
    print 'Loaded dataset `{:s}` for proposal generation'.format(imdb.name)

    # Load RPN and configure output directory
    rpn_net = caffe.Net(rpn_test_prototxt, rpn_model_path, caffe.TEST)  ##載入rpn_test_prototxt=
                        ##'py-faster-rcnn/models/pascal_voc/ZF/faster_rcnn_alt_opt/rpn_test.pt'
                        ##第一階段的訓練完畢的rpn_model_path=
                           ##py-faster-rcnn/output/faster_rcnn_alt_opt/voc_2007_trainval/zf_rpn_stage1_iter_80000.caffemodel

    output_dir = get_output_dir(imdb)  ##'py-faster-rcnn/output/faster_rcnn_alt_opt/voc_2007_trainval'
    print 'Output will be saved to `{:s}`'.format(output_dir)
    # Generate proposals on the imdb
    rpn_proposals = imdb_proposals(rpn_net, imdb)
    # Write proposals to disk and send the proposal file path through the
    # multiprocessing queue
    rpn_net_name = os.path.splitext(os.path.basename(rpn_model_path))[0]
    rpn_proposals_path = os.path.join(
        output_dir, rpn_net_name + '_proposals.pkl')
    with open(rpn_proposals_path, 'wb') as f:
        cPickle.dump(rpn_proposals, f, cPickle.HIGHEST_PROTOCOL)
    print 'Wrote RPN proposals to {}'.format(rpn_proposals_path)
    queue.put({'proposal_path': rpn_proposals_path})
進入rpn_net = caffe.Net()函式,該函式主要是建立caffe.Net,裡面首先根據pt檔案建立網路,網路最後一層是建立層ProposalLayer,進入該類的建立:
class ProposalLayer(caffe.Layer):
    """
    Outputs object detection proposals by applying estimated bounding-box
    transformations to a set of regular boxes (called "anchors").
    """

    def setup(self, bottom, top):
        # parse the layer parameter string, which must be valid YAML
        layer_params = yaml.load(self.param_str_)  ##載入該層引數layer_params={'feat_stride': 16},其實也即16的scale

        self._feat_stride = layer_params['feat_stride']  ##16
        anchor_scales = layer_params.get('scales', (8, 16, 32))  ##(8,16,32)
        self._anchors = generate_anchors(scales=np.array(anchor_scales))
        self._num_anchors = self._anchors.shape[0]  ## 9

        if DEBUG:
            print 'feat_stride: {}'.format(self._feat_stride)
            print 'anchors:'
            print self._anchors

        # rois blob: holds R regions of interest, each is a 5-tuple
        # (n, x1, y1, x2, y2) specifying an image batch index n and a
        # rectangle (x1, y1, x2, y2)
        top[0].reshape(1, 5)  ##將rois blob輸出層reshape成(1,5),列為(圖片index,4個座標值)

        # scores blob: holds scores for R regions of interest
        if len(top) > 1:  ##如果存在兩個輸出層,則將 scores blob 輸出層reshape 成(1,1,1,1)???
            top[1].reshape(1, 1, 1, 1)

    def forward(self, bottom, top):...def backward(self, top, propagate_down, bottom):...
    def reshape(self, bottom, top):...
接著我們進入rpn_proposals = imdb_proposals(rpn_net, imdb)函式,該函式作用是讀取所有圖片並返回每張圖片的imdb_boxes[i], scores:
def imdb_proposals(net, imdb):
    """Generate RPN proposals on all images in an imdb."""

    _t = Timer()
    imdb_boxes = [[] for _ in xrange(imdb.num_images)]
    for i in xrange(imdb.num_images):
        im = cv2.imread(imdb.image_path_at(i))
        _t.tic()
        imdb_boxes[i], scores = im_proposals(net, im)
        _t.toc()
        print 'im_proposals: {:d}/{:d} {:.3f}s' \
              .format(i + 1, imdb.num_images, _t.average_time)
        if 0:
            dets = np.hstack((imdb_boxes[i], scores))
            # from IPython import embed; embed()
            _vis_proposals(im, dets[:3, :], thresh=0.9)
            plt.show()

    return imdb_boxes
接著我們進入imdb_boxes[i], scores = im_proposals(net, im)函式:
def im_proposals(net, im):
    """Generate RPN proposals on a single image."""
    blobs = {}
    blobs['data'], blobs['im_info'] = _get_image_blob(im)
    net.blobs['data'].reshape(*(blobs['data'].shape))
    net.blobs['im_info'].reshape(*(blobs['im_info'].shape))
    blobs_out = net.forward(
            data=blobs['data'].astype(np.float32, copy=False),
            im_info=blobs['im_info'].astype(np.float32, copy=False))

    scale = blobs['im_info'][0, 2]
    boxes = blobs_out['rois'][:, 1:].copy() / scale
    scores = blobs_out['scores'].copy()
    return boxes, scores
繼續進入blobs['data'], blobs['im_info'] = _get_image_blob(im)函式:
def _get_image_blob(im):
    """Converts an image into a network input.

    Arguments:
        im (ndarray): a color image in BGR order

    Returns:
        blob (ndarray): a data blob holding an image pyramid
        im_scale_factors (list): list of image scales (relative to im) used
            in the image pyramid
    """
    im_orig = im.astype(np.float32, copy=True)
    im_orig -= cfg.PIXEL_MEANS

    im_shape = im_orig.shape   ##(375,500,3)
    im_size_min = np.min(im_shape[0:2])
    im_size_max = np.max(im_shape[0:2])

    processed_ims = []

    assert len(cfg.TEST.SCALES) == 1
    target_size = cfg.TEST.SCALES[0]

    im_scale = float(target_size) / float(im_size_min)   ##下面主要意思是圖的最大邊不能超過1000,目標是寬或高為600,另一個高或寬低於1000就行
    # Prevent the biggest axis from being more than MAX_SIZE
    if np.round(im_scale * im_size_max) > cfg.TEST.MAX_SIZE:
        im_scale = float(cfg.TEST.MAX_SIZE) / float(im_size_max)
    im = cv2.resize(im_orig, None, None, fx=im_scale, fy=im_scale,
                    interpolation=cv2.INTER_LINEAR)    ##對原始圖片進行擴充,這裡採用線性插值的方法
    im_info = np.hstack((im.shape[:2], im_scale))[np.newaxis, :]  ##[[ 600.   800.     1.6]]
    processed_ims.append(im)

    # Create a blob to hold the input images
    blob = im_list_to_blob(processed_ims)  ##轉化圖片成blob格式

    return blob, im_info  ##返回該圖片的blob格式資料和im_info圖片資訊,比如(600,800,3)
繼續進入blob = im_list_to_blob(processed_ims)函式:
def im_list_to_blob(ims):
    """Convert a list of images into a network input.

    Assumes images are already prepared (means subtracted, BGR order, ...).
    """
    max_shape = np.array([im.shape for im in ims]).max(axis=0)
    num_images = len(ims)   ## 1張圖
    blob = np.zeros((num_images, max_shape[0], max_shape[1], 3),
                    dtype=np.float32)
    for i in xrange(num_images):  ##將所有圖片轉換成caffe中blob的格式
        im = ims[i]
        blob[i, 0:im.shape[0], 0:im.shape[1], :] = im
    # Move channels (axis 3) to axis 1
    # Axis order will become: (batch elem, channel, height, width)
    channel_swap = (0, 3, 1, 2)     ##交換axis=3和axis=1 列
    blob = blob.transpose(channel_swap)  ##最終變為(batch elem, channel, height, width),注意這裡的高和寬放到了後面,這是caffe中blob的格式
    return blob
回到im_proposals(net, im)函式,現在我們獲得一張圖片的blobs['data']和blobs['im_info'],繼續往下執行。
def im_proposals(net, im):
    """Generate RPN proposals on a single image."""
    blobs = {}
    blobs['data'], blobs['im_info'] = _get_image_blob(im)
    net.blobs['data'].reshape(*(blobs['data'].shape))  ##將第一階段的網路模型更改下輸入結構,改成該圖片的維度結構,比如(1,3,600,800)
    net.blobs['im_info'].reshape(*(blobs['im_info'].shape))  ##(1,3)
    blobs_out = net.forward(
            data=blobs['data'].astype(np.float32, copy=False),
            im_info=blobs['im_info'].astype(np.float32, copy=False))

    scale = blobs['im_info'][0, 2]  ##1.6
    boxes = blobs_out['rois'][:, 1:].copy() / scale
    scores = blobs_out['scores'].copy()
    return boxes, scores  ##返回2000個boxes的座標和得分
接著進入net.forward()函式,執行該網路的前向傳播函式。在終端的顯示是im_proposals: 1/5011 2476.064s,即有5011張圖片,每張返回2000個propals和boxes。
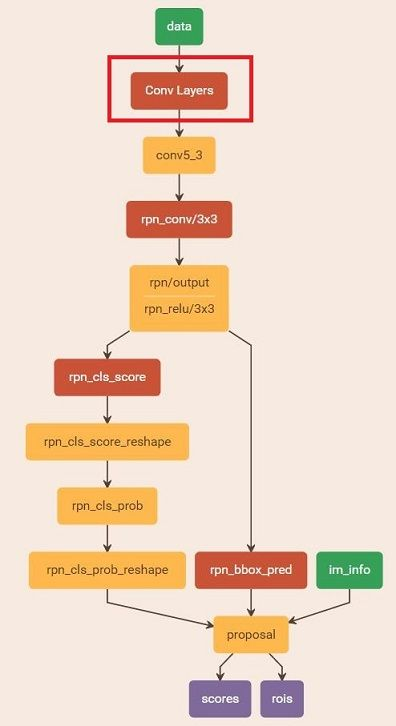
這些proposals儲存在檔案'output/faster_rcnn_alt_opt/voc_2007_trainval/zf_rpn_stage1_iter_80000_proposals.pkl' 中,留著等下面的訓練。最後把該路徑通過程序傳給下一個程序。總的網路圖:
Stage 1 RPN, generate proposal
終於來到最後一個階段了。先看看主程式碼:
    print '~~~~~~~~~~~~~~~~~~~~~~~~~~~~~~~~~~~~~~~~~~~~~~~~~~~~~~~~~~'
    print 'Stage 1 Fast R-CNN using RPN proposals, init from ImageNet model'
    print '~~~~~~~~~~~~~~~~~~~~~~~~~~~~~~~~~~~~~~~~~~~~~~~~~~~~~~~~~~'

    cfg.TRAIN.SNAPSHOT_INFIX = 'stage1'
    mp_kwargs = dict(
            queue=mp_queue,
            imdb_name=args.imdb_name,
            init_model=args.pretrained_model,
            solver=solvers[1],
            max_iters=max_iters[1],
            cfg=cfg,
            rpn_file=rpn_stage1_out['proposal_path'])
    p = mp.Process(target=train_fast_rcnn, kwargs=mp_kwargs)
    p.start()
    fast_rcnn_stage1_out = mp_queue.get()
    p.join()
我們進入子程序train_fast_rcnn()函式,其實這裡的大部分內容和前面的相似,就不重複累述。
def train_fast_rcnn(queue=None, imdb_name=None, init_model=None, solver=None,
                    max_iters=None, cfg=None, rpn_file=None):
    """Train a Fast R-CNN using proposals generated by an RPN.
    """

    cfg.TRAIN.HAS_RPN = False           # 這次訓練不需要RPN層了
    cfg.TRAIN.PROPOSAL_METHOD = 'rpn'   # 使用之前的propasals來訓練
    cfg.TRAIN.IMS_PER_BATCH = 2
    print 'Init model: {}'.format(init_model)
    print 'RPN proposals: {}'.format(rpn_file)
    print('Using config:')
    pprint.pprint(cfg)

    import caffe
    _init_caffe(cfg)

    roidb, imdb = get_roidb(imdb_name, rpn_file=rpn_file)  ##不重複分析了,就是獲取圖片集的roidb和imdb格式的資料
    output_dir = get_output_dir(imdb)
    print 'Output will be saved to `{:s}`'.format(output_dir)
    # Train Fast R-CNN
    model_paths = train_net(solver, roidb, output_dir,
                            pretrained_model=init_model,
                            max_iters=max_iters)
    # Cleanup all but the final model
    for i in model_paths[:-1]:
        os.remove(i)
    fast_rcnn_model_path = model_paths[-1]
    # Send Fast R-CNN model path over the multiprocessing queue
    queue.put({'model_path': fast_rcnn_model_path})
最後階段的圖如下所示:
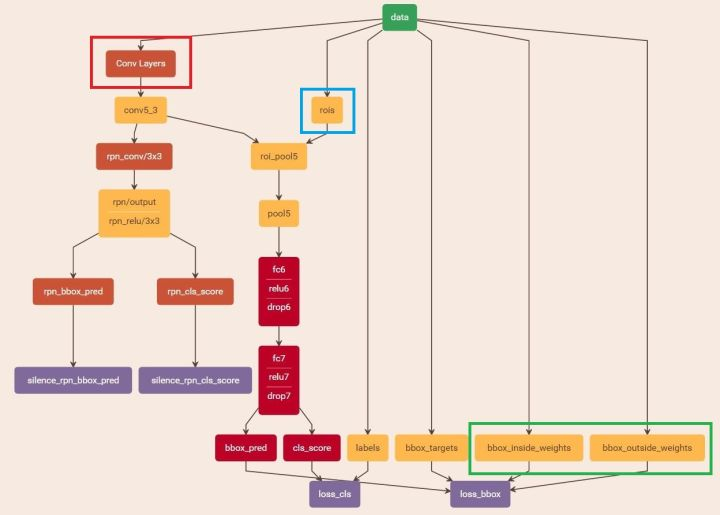
由圖知我們設定不使用rpn層,將提取的proposals作為rois和前面VGG16(或者ZF)網路提取的最後特徵(conv5_3)傳入網路,計算bbox_inside_weights+bbox_outside_weights,作用與RPN一樣,傳入soomth_L1_loss layer,如圖綠框。
這樣就可以訓練最後的識別softmax與最終的bounding box regression了。