maven搭建struts2框架
Struts2的核心是什麼?它和Servlet的關係是什麼?
Struts2的核心是interceptor(攔截器);Struts2將Servlet注入到Action中,他們不存在依賴關係。
搭建struts2的步驟
1.首先到官網下載struts2的原始碼,在其lib中找到所需要的jar包
2.struts所需的依賴:
commons-io
commons-fileupload
commons-lang3
javassist
關鍵包
struts2-core
xwork-core
ognl----依賴於-->commons-lang3-->commons-fileupload-->commons-io
freemaker-->使用的就是ognl
3.在專案的編譯根目錄建立固定名稱:(struts.xml)配置檔案
4.在web.xml中配置struts2的啟動過濾器
開始搭建struts2框架並實現檔案上傳和下載
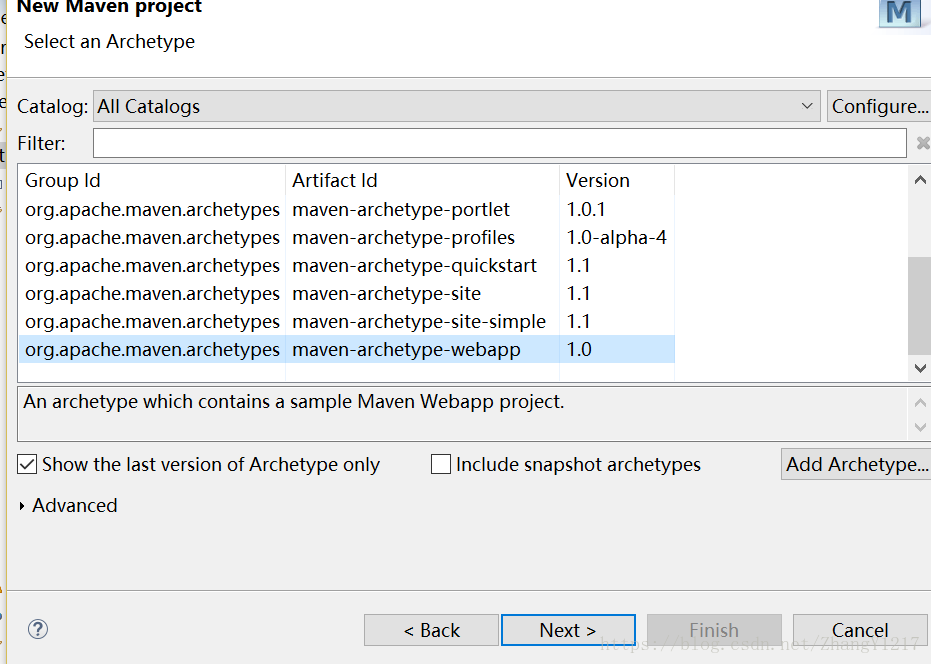
1.建立maven專案
選則webapp那一項,點選next,輸入Group Id 和 Artifact Id.點選finish
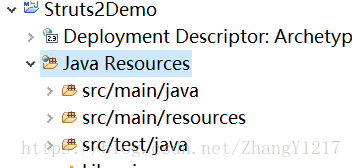
當我們建立好了之後會發現一個問題那就是Java Resources中只有一個原資料夾,我們只需要選中專案右鍵build path,將紅圈的勾取消掉然後apply在ok就好了。
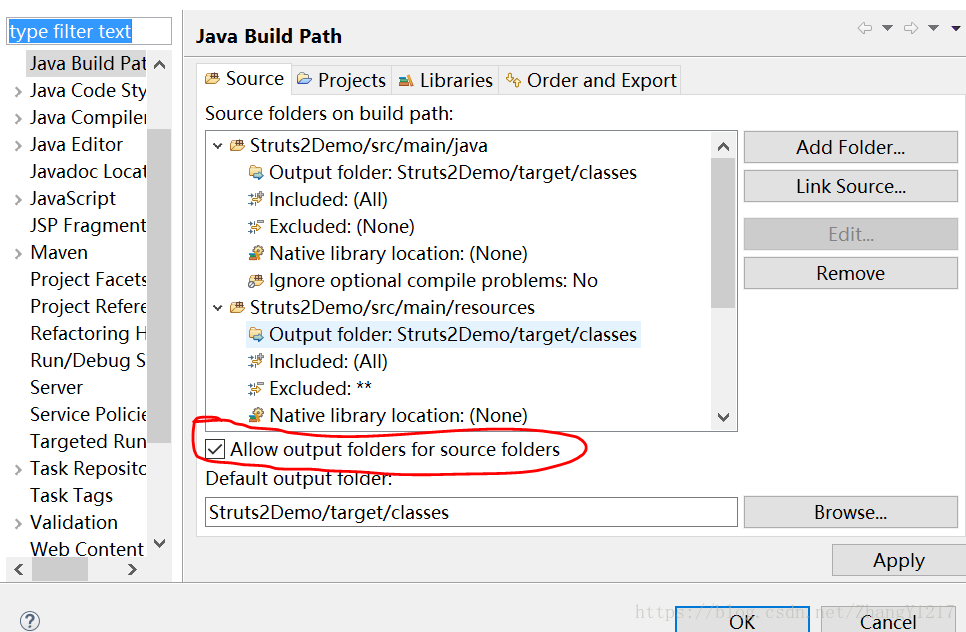
正確如下圖:
2.在pom.xml中新增依賴:
maven中只需要新增三個依賴就可以了:struts2-core;xwork-core;javassist。我們可以在
<!-- https://mvnrepository.com/artifact/javax.servlet/jstl -->
<dependency>
<groupId>javax.servlet</groupId>
<artifactId>jstl</artifactId>
<version>1.2</version>
</dependency>
<!-- https://mvnrepository.com/artifact/javax.servlet/jsp-api -->
<dependency>
<groupId>javax.servlet</groupId>
<artifactId>jsp-api</artifactId>
<version>2.0</version>
<scope>provided</scope>
</dependency>
<!-- https://mvnrepository.com/artifact/javax.servlet/javax.servlet-api -->
<dependency>
<groupId>javax.servlet</groupId>
<artifactId>javax.servlet-api</artifactId>
<version>3.1.0</version>
<scope>provided</scope>
</dependency>
<!-- 這是strust基本的依賴 -->
<!-- https://mvnrepository.com/artifact/org.apache.struts/struts2-core -->
<dependency>
<groupId>org.apache.struts</groupId>
<artifactId>struts2-core</artifactId>
<version>2.3.16.3</version>
</dependency>
<!-- https://mvnrepository.com/artifact/org.javassist/javassist -->
<dependency>
<groupId>org.javassist</groupId>
<artifactId>javassist</artifactId>
<version>3.20.0-GA</version>
</dependency>
<!-- https://mvnrepository.com/artifact/org.apache.struts.xwork/xwork-core -->
<dependency>
<groupId>org.apache.struts.xwork</groupId>
<artifactId>xwork-core</artifactId>
<version>2.3.16.3</version>
</dependency>
<!-- 這是strust基本的依賴end -->
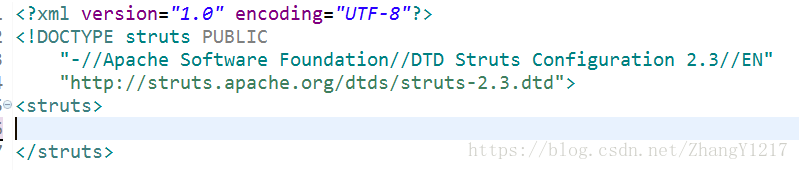
3. 在專案的編譯根目錄建立固定名稱:(struts.xml)配置檔案
在src/main/resources中建立struts.xml檔案,並且在其中新增檢查頭dtd,在jar中找到該頭部,放進struts.xml中,並且定義根節點
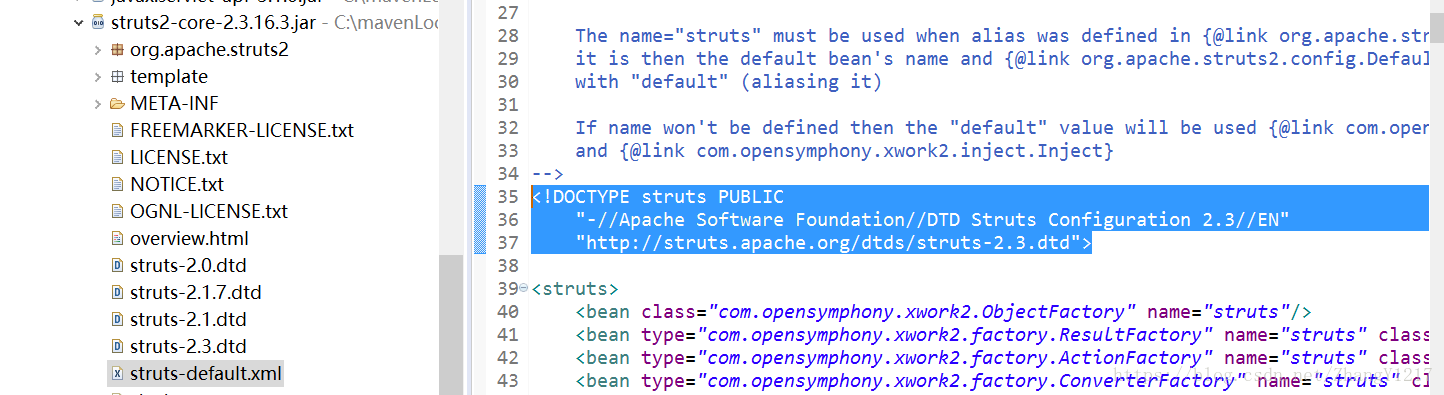
如下圖:
4.在web.xml中配置struts2的啟動過濾器,配置只有字尾為.do的才處理
<!DOCTYPE web-app PUBLIC
"-//Sun Microsystems, Inc.//DTD Web Application 2.3//EN"
"http://java.sun.com/dtd/web-app_2_3.dtd" ><web-app>
<display-name>Archetype Created Web Application</display-name>
<!-- 過濾器,只有字尾為do的才能通過請求 -->
<filter>
<filter-name>struts2</filter-name>
<filter-class>org.apache.struts2.dispatcher.ng.filter.StrutsPrepareAndExecuteFilter</filter-class>
</filter>
<filter-mapping>
<filter-name>struts2</filter-name>
<!-- /*:過濾所有
*.do:過濾字尾為do的對映
-->
<url-pattern>*.do</url-pattern>
</filter-mapping>
<!-- 配置啟動專案時進入的頁面,不配置時預設為index.jsp -->
<welcome-file-list>
<welcome-file>index.jsp</welcome-file>
</welcome-file-list>
</web-app>
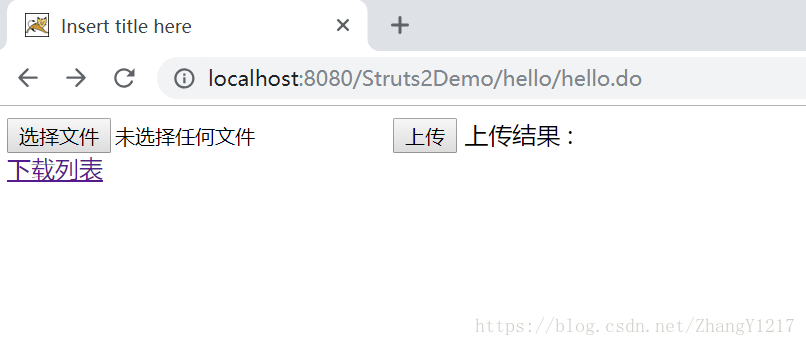
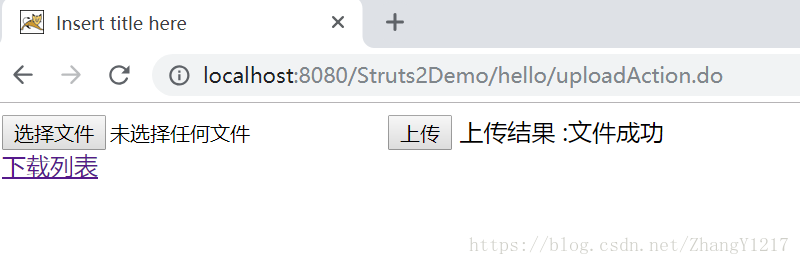
以上struts2就簡單的搭建完成了,可以啟動一下,如果不報錯就沒有問題了。接下來就進行開發檔案上傳和下載。
1.首先建立一個hello.jsp裡面
<%@ page language="java" contentType="text/html; charset=UTF-8"
    pageEncoding="UTF-8"%>
    <!--使用jstl標籤, maven必要新增的東西 -->
<%@taglib prefix="c" uri="http://java.sun.com/jsp/jstl/core" %>
<%@page isELIgnored="false" %>
<!DOCTYPE html PUBLIC "-//W3C//DTD HTML 4.01 Transitional//EN" "http://www.w3.org/TR/html4/loose.dtd">
<html>
<head>
<meta http-equiv="Content-Type" content="text/html; charset=UTF-8">
<title>Insert title here</title>
</head>
<body>
<form action="${pageContext.request.contextPath }/hello/uploadAction.do" method="post" enctype="multipart/form-data">
<input type="file" name="upload"/>
<input type="submit" value="上傳"/>
上傳結果 :${message}<br>
<a href="downloadAction.do">下載列表</a>
</form>
</body>
</html>
建立對應的action類,出來請求
package com.action;
/**
 *用於處理使用者請求的類
 * @author zy
 *
 */
public class HelloAction {
//定義處理使用者請求的方法:public String 方法名(){}
	public String sayHello(){
//success對應於struts.xml的result節點的name
		return "success";
	}

}
在struts.xml中配置action:
<!-- 更改struts2的預設請求字尾:action 或者是 空 -->
<constant name="struts.action.extension" value="do"></constant>
<!-- name:用於繼承,唯一標識
namespace:名稱空間用於區別同一包下的相同action
-->
<package name="pkg" extends="struts-default" namespace="/hello">
<!-- action->的name:可以理解為servlet中的 對映路徑
對映路徑:位址列中專案名之後的則為對映路徑
-->
<action name="hello" class="com.action.HelloAction" method="sayHello">
<result name="success">/WEB-INF/hello.jsp</result>
</action>
</package>
<!-- 訪問路徑:http://localhost:8080/Struts2Demo/hello/hello.do
專案路徑:http://127.0.0.1:8080/Struts2Demo
名稱空間:/hello
action:/hello
字尾.do
-->
</struts>
xml中的<constant name="struts.action.extension" value="do"></constant>的struts.action.extension是常量,也是在struts2-core的jar包中/org/apache/struts2/default.properties中定義的,還包含了上傳檔案大小限制等常量。
2.檔案上傳對應的action
先建立一個常量類
package com.constant;
/**
 * 常量類
 * @author zy
 *
 */
public class Constant {
public static final String UPLOAD_PATH="/files/upload";
}
再建立處理上傳的action
package com.action;

import java.io.File;
import java.io.IOException;

import org.apache.commons.io.FileUtils;
import org.apache.struts2.ServletActionContext;

import com.constant.Constant;
import com.opensymphony.xwork2.ActionContext;

public class UploadAction {
	/**
	 * 通過struts2的fileupload攔截器獲取file和filename
	 * upload是前臺頁面中的name
	 * uploadFileName中的xxFileName是固定的
	 * 並且要生成對應的set和get方法組
	 * @author zy
	 *
	 */
	private File upload;
	private String uploadFileName;

	public File getUpload() {
		return upload;
	}
	public void setUpload(File upload) {
		this.upload = upload;
	}
	public String getUploadFileName() {
		return uploadFileName;
	}
	public void setUploadFileName(String uploadFileName) {
		this.uploadFileName = uploadFileName;
	}
	//定義處理上傳的方法
	public String upload(){
		//業務處理
		//獲取伺服器端檔案上傳的路徑
		String realPath = ServletActionContext.getServletContext().getRealPath(Constant.UPLOAD_PATH);
		//判斷路徑是否存在
		File fileSave=new File(realPath);
		if(!fileSave.exists()){
			fileSave.mkdirs();
		}
		//判斷檔案是否存在
		if(upload!=null){
			//在伺服器端建立空白檔案
			File saveFile=new File(fileSave, uploadFileName);
			//使用工具類完成檔案內容拷貝
			try {
				FileUtils.copyFile(upload, saveFile);
				ActionContext.getContext().put("message", "檔案成功");
			} catch (IOException e) {
				ActionContext.getContext().put("message", "檔案失敗");
				e.printStackTrace();
			}
		}else{
			ActionContext.getContext().put("message", "請選擇上傳檔案");
		}
		return "upload";
	}
}
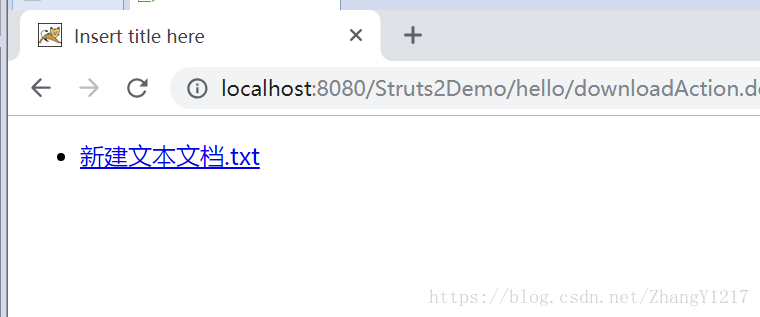
3.建立下載頁面和處理進入該下載頁面的action
<%@ page language="java" contentType="text/html; charset=UTF-8"
    pageEncoding="UTF-8"%>
<%@taglib prefix="c" uri="http://java.sun.com/jsp/jstl/core" %>
<%@page isELIgnored="false" %>
<!DOCTYPE html PUBLIC "-//W3C//DTD HTML 4.01 Transitional//EN" "http://www.w3.org/TR/html4/loose.dtd">
<html>
<head>
<meta http-equiv="Content-Type" content="text/html; charset=UTF-8">
<title>Insert title here</title>
</head>
<body>
<ul>
<c:forEach items="${files }" var="file">
<li><a href="${pageContext.request.contextPath }/download/downloadFile.do?fileName=${file.name}">${file.name}</a></li>
</c:forEach>
</ul>
</body>
</html>
package com.action;
import java.io.File;
import java.util.Arrays;
import java.util.List;
import org.apache.struts2.ServletActionContext;
import com.constant.Constant;
public class DownloadAction {
private List<File> files;
public List<File> getFiles() {
return files;
}
public void setFiles(List<File> files) {
this.files = files;
}
/**
* 定義請求處理
*/
public String download(){
//獲取伺服器端檔案上傳的路徑
String realPath = ServletActionContext.getServletContext().getRealPath(Constant.UPLOAD_PATH);
//判斷路徑是否存在,當沒有上傳檔案時就點選下載列表
File downloadFile=new File(realPath);
if(!downloadFile.exists()){
//建立目錄
downloadFile.mkdirs();
}
File[] files2 = downloadFile.listFiles();
setFiles(Arrays.asList(files2));
return "download";
}
}
4.建立實現下載的action
package com.action;

import java.io.BufferedInputStream;
import java.io.File;
import java.io.FileInputStream;
import java.io.InputStream;

import javax.servlet.ServletOutputStream;
import javax.servlet.http.HttpServletResponse;

import org.apache.struts2.ServletActionContext;

import com.constant.Constant;

/**
 * 檔案下載處理類
 * @author zy
 *
 */
public class DownloadFileAction {
/**
 * 下載請求處理方法
 */
	public String downloadFile(){
		//獲取伺服器端檔案上傳的路徑
		String realPath = ServletActionContext.getServletContext().getRealPath(Constant.UPLOAD_PATH);
		//獲取檔名稱
		String fileName = ServletActionContext.getRequest().getParameter("fileName");
		//將檔案裝換成流
		try {
			// 讀出檔案到i/o流
			File file = new File(realPath+"/"+fileName);
			InputStream inputStream=new FileInputStream(file);
			BufferedInputStream buf=new BufferedInputStream(inputStream);
			//獲取request
			HttpServletResponse response = ServletActionContext.getResponse();
			// 設定response的編碼方式
			response.setContentType("application/x-msdownload");
			response.setCharacterEncoding("utf-8");
			// 設定附加檔名
			response.setHeader("Content-Disposition", "attachment;filename="
					+ new String(fileName.getBytes("utf-8"), "iso-8859-1"));
			// 從response物件中得到輸出流,準備下載
			ServletOutputStream outputStream = response.getOutputStream();
			byte[] by=new byte[1024];// 相當於我們的快取
			int k=0;// 該值用於計算當前實際下載了多少位元組
			// 開始迴圈下載
			while(k<file.length()){
				int i = buf.read(by, 0, 1024);
				k+=i;
				// 將b中的資料寫到客戶端的記憶體
				outputStream.write(by, 0, i);
			}
			// 將寫入到客戶端的記憶體的資料,重新整理到磁碟
			outputStream.flush();
			outputStream.close();
			buf.close();
		} catch (Exception e) {
			// TODO Auto-generated catch block
			e.printStackTrace();
		}
		/**
		 * java.lang.IllegalStateException: getOutputStream() has already been called for this response
		 *是web容器生成的servlet程式碼中有out.write(""),這個和JSP中呼叫的
			response.getOutputStream()產生衝突.即Servlet規範說明,不能既呼叫
			response.getOutputStream(),又呼叫response.getWriter(),無論先呼叫哪一個,在呼叫第二個時候應會丟擲
			IllegalStateException,因為在jsp中,out變數實際上是通過response.getWriter得到的,你的程式中既用了
			response.getOutputStream,又用了out變數,故出現以上錯誤。

			解決方案:在程式的最後新增:
			out.clear();
			out = pageContext.pushBody();

			Struts2中解決辦法

			直接讓action中的處理方法返回null,問題就解決啦!!!

		 */
		return null;
	}
}
最後的struts.xml
<?xml version="1.0" encoding="UTF-8"?>
<!DOCTYPE struts PUBLIC
"-//Apache Software Foundation//DTD Struts Configuration 2.3//EN"
"http://struts.apache.org/dtds/struts-2.3.dtd">
<struts>
<!-- 檔案上傳大小最大為2097152位元組即2M-->
<constant name="struts.multipart.maxSize" value="2097152000"></constant>
<!-- 更改struts2的預設請求字尾:action 或者是 空 -->
<constant name="struts.action.extension" value="do"></constant>
<!-- name:用於繼承,唯一標識
namespace:名稱空間用於區別同一包下的相同action
-->
<package name="pkg" extends="struts-default" namespace="/hello">
<!-- action->的name:可以理解為servlet中的 對映路徑
對映路徑:位址列中專案名之後的則為對映路徑
-->
<action name="hello" class="com.action.HelloAction" method="sayHello">
<result name="success">/WEB-INF/hello.jsp</result>
</action>
<action name="uploadAction" class="com.action.UploadAction" method="upload">
<result name="upload">/WEB-INF/hello.jsp</result>
</action>
<action name="downloadAction" class="com.action.DownloadAction" method="download">
<result name="download">/WEB-INF/download.jsp</result>
</action>
</package>
<!-- 下載檔案配置 -->
<package name="download" extends="struts-default" namespace="/download">
<action name="downloadFile" class="com.action.DownloadFileAction" method="downloadFile">
</action>
</package>
<!-- 訪問路徑:http://localhost:8080/Struts2Demo/hello/hello.do
專案路徑:http://127.0.0.1:8080/Struts2Demo
名稱空間:/hello
action:/hello
字尾.do
-->
</struts>
執行截圖:雖然介面有點low,但是功能實現了