國際物流雲專案day6
一、講阿里巴巴的FastJson
二、講javaMmail
1、手動編寫傳送郵件類
2、做一個傳送郵件的工具類
https://blog.csdn.net/shishize55/article/details/83754840
三、javaMail與Spring整合開發

1、導包
mava下

web 下

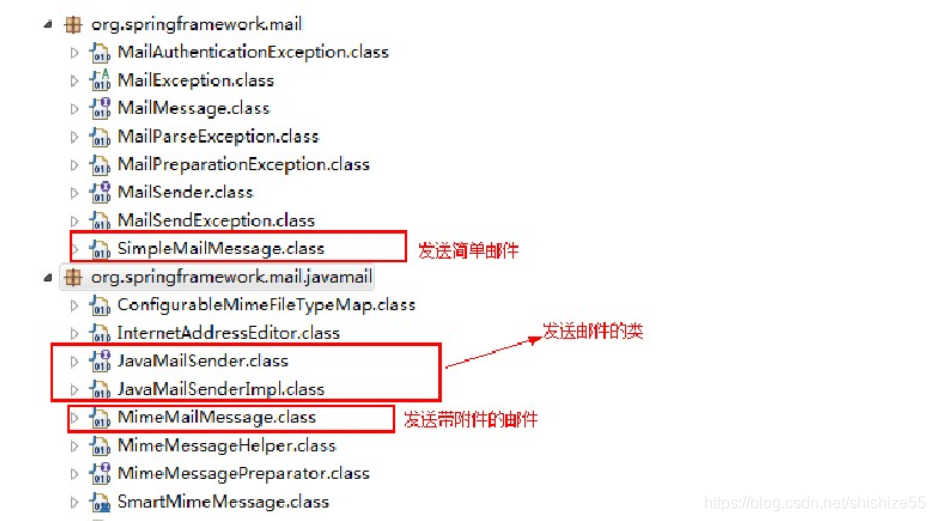
2、Spring對javaMail的API支援

3、建立郵件的配置檔案 mail.properties
mail.host=smtp.163.com
mail.username=傳送郵件使用者名稱
mail.password=外部發送郵件的 授權密碼
mail.from=管理員郵箱
4、spring與javaMail整合配置檔案 applicationContext-mail.xml
https://blog.csdn.net/shishize55/article/details/83755721
5、測試
@Test
public void fun(){
//獲取配置檔案
ApplicationContext ac = new ClassPathXmlApplicationContext("classpath:applicationContext-mail.xml");
JavaMailSender sender = (JavaMailSender) ac.getBean("mailSender");
SimpleMailMessage message = (SimpleMailMessage) ac.getBean("mailMessage");
message.setTo(" 6、發郵件帶附件
import java.io.File;
import javax.mail.MessagingException;
import javax.mail.internet.MimeMessage;
import org.springframework.context.ApplicationContext;
import org.springframework.context.support.ClassPathXmlApplicationContext;
import org.springframework.core.io.FileSystemResource;
import org.springframework.mail.javamail.JavaMailSender;
import org.springframework.mail.javamail.MimeMessageHelper;
public class SpringMailTest1 {
public static void main(String[] args) throws MessagingException {
ApplicationContext ac = new ClassPathXmlApplicationContext("applicationContext-mail.xml");
JavaMailSender sender = (JavaMailSender) ac.getBean("mailSender");
MimeMessage message = sender.createMimeMessage();
MimeMessageHelper helper = new MimeMessageHelper(message,true); //true帶圖片帶附件必須設定
helper.setFrom(" 四、HttpClient應用

2、HttpClient 導包
2.1引人HttpClient開發座標
	<dependency>
		<groupId>org.apache.httpcomponents</groupId>
		<artifactId>httpclient</artifactId>
		<version>4.4</version>
	</dependency>
3、Httpclient開發步驟
使用HTTPClient 傳送請求、接收響應很簡單,一般有如下幾步
1、建立HttpClient物件
	HttpClient client = new HttpClient();
2、建立請求方法的例項,並指定請求URL。
	如果需要傳送GET請求,建立HTTPGet物件,
	如果需要傳送POST請求,建立HTTPPost物件、
3、如果需要傳送請求引數,可呼叫HttpGet、HttpPost共同的
	String params = EntityUtils.toString(new UrlEncodedFormEntity(List.Consts.UTF_8));
	再通過?實現url拼接
	HttpPost物件,也可以呼叫setEntity(HttpEntity entity)方法來設定請求引數;
4、呼叫HttpClient物件的 execute(HttpUrlRequest request)傳送請求
	該方法返回一個HttpResponse響應
5、呼叫HttpResponse 的getAllHeaders(),getHeaders(String name)等方法可回去伺服器的響應頭,
   呼叫HttpResponse的getEntity()方法可獲取HttpEntity物件 ,該物件包裝類伺服器的響應內容,程式可通過該物件獲取伺服器響應的內容
 6、釋放連線、無論執行方法是否成功,都必須釋放連線
4、HTTPClient 傳送請求
4.1 Get 傳送請求 不帶引數 測試
https://blog.csdn.net/shishize55/article/details/83759118
4.2 Get 傳送請求 帶引數 測試
https://blog.csdn.net/shishize55/article/details/83759142
4.3 Post 傳送請求 不帶引數 測試
https://blog.csdn.net/shishize55/article/details/83759165
4.4 Post 傳送請求 帶引數 測試
https://blog.csdn.net/shishize55/article/details/83759176
4.5 Post 以表單提交方式請求 帶引數 測試
https://blog.csdn.net/shishize55/article/details/83759196
