Android入門 File檔案儲存
分享一下我老師大神的人工智慧教程!零基礎,通俗易懂!http://blog.csdn.net/jiangjunshow
也歡迎大家轉載本篇文章。分享知識,造福人民,實現我們中華民族偉大復興!
資料的儲存有多種方式,比如資料庫儲存、SharedPreferences儲存、檔案儲存等;
這裡我們將要介紹最簡單的檔案儲存方式;
檔案儲存簡單的來說就是一般的JAVASE中的IO流,只是把他應用於Android手機中而已;
一、檔案儲存核心程式碼
檔案儲存
(1)FileOutputStream out = context.openFileOutput(String filename,int mode); 以mode模式獲得檔案輸出流
(2)out.write(byte[]b);
FileOutputStream out = null;out = context.openFileOutput(filename, Context.MODE_***);out.write(filecontent.getBytes("UTF-8"));out.close();檔案讀取
(1)FileInputStream in = context.openFileInput(String filename); 獲得某個檔案的檔案流
(2)int length = in.read(byte[]);
/* 每次讀取固定的位元組,並將此位元組輸出到位元組輸出流中,當全部讀取完畢後,將位元組流中的內容一併輸出*/FileInputStream in = null;ByteArrayOutputStream bout = null;byte[]buf = new byte[1024];bout = new ByteArrayOutputStream();int 注意:預設會讀取/data/data/package/files的檔案;
二、檔案模式介紹
1.Context.MODE_PRIVATE:私有覆蓋模式 - rw- rw- ---
只能被當前應用訪問,並且如果寫入,則覆蓋;
2.Context.MODE_APPEND:私有追加模式 - rw- rw- ---
只能被當前應用訪問,並且如果寫入,則追加;
3.Context,MODE_WORLD_READABLE:公有隻讀模式 - rw- rw- r--
可以被其他應用讀取;
4.Context.MODE_WORLD_WRITEABLE:公有可寫模式 - rw- rw- -w-
可以被其他應用寫入,但不能讀取;
注意,如果希望其他使得檔案模式疊加,則可以使用加號連線;
比如:Context.MODE_WORLD_READABLE + Context.MODE_WORLD_WRITEABLE 表示其他應用讀寫;
三、簡單應用例項
1.效果圖
目標:當點選儲存時,將以特定的檔名稱和特定的檔案內容儲存內容,點選讀取時,將讀取特定的檔案的檔案內容顯示到檔案內容文字框;
當點選儲存之後,效果如下:
MainActivity.java
package org.xiazdong.file;import java.io.ByteArrayOutputStream;import java.io.FileInputStream;import java.io.FileNotFoundException;import java.io.FileOutputStream;import android.app.Activity;import android.content.Context;import android.os.Bundle;import android.view.View;import android.view.View.OnClickListener;import android.widget.Button;import android.widget.EditText;public class MainActivity extends Activity { private Button saveButton,readButton; private EditText filenameEt,filecontentEt; private Context context = this; private OnClickListener listener = new OnClickListener(){ @Override public void onClick(View v) { if(v==saveButton){ String filename = filenameEt.getText().toString(); String filecontent = filecontentEt.getText().toString(); FileOutputStream out = null; try { out = context.openFileOutput(filename, Context.MODE_PRIVATE); out.write(filecontent.getBytes("UTF-8")); } catch (Exception e) { e.printStackTrace(); } finally{ try { out.close(); } catch (Exception e) { e.printStackTrace(); } } } else if(v==readButton){ String filename = filenameEt.getText().toString(); //獲得讀取的檔案的名稱 FileInputStream in = null; ByteArrayOutputStream bout = null; byte[]buf = new byte[1024]; bout = new ByteArrayOutputStream(); int length = 0; try { in = context.openFileInput(filename); //獲得輸入流 while((length=in.read(buf))!=-1){ bout.write(buf,0,length); } byte[] content = bout.toByteArray(); filecontentEt.setText(new String(content,"UTF-8")); //設定文字框為讀取的內容 } catch (Exception e) { e.printStackTrace(); } filecontentEt.invalidate(); //重新整理螢幕 try{ in.close(); bout.close(); } catch(Exception e){} } } }; @Override public void onCreate(Bundle savedInstanceState) { super.onCreate(savedInstanceState); setContentView(R.layout.main); saveButton = (Button)this.findViewById(R.id.saveButton); readButton = (Button)this.findViewById(R.id.readButton); filenameEt = (EditText)this.findViewById(R.id.filename); filecontentEt = (EditText)this.findViewById(R.id.filecontent); saveButton.setOnClickListener(listener); readButton.setOnClickListener(listener); }}四、將檔案儲存到SDCard
如果一個檔案很大,則不適用於存放在手機的儲存中;
如果手機存在sdcard,則sdcard的目錄為/mnt/sdcard目錄;
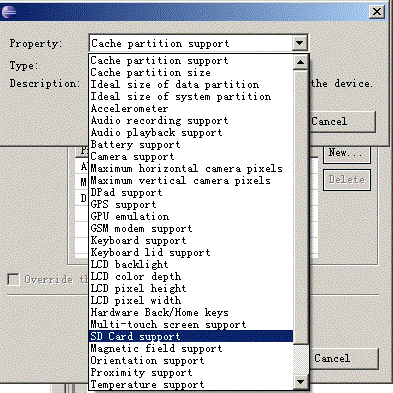
步驟1:設定模擬器支援sdcard

此時模擬器已經支援sdcard了;
步驟2:在應用中設定許可權
在AndroidManifest.xml中設定:
<uses-permission android:name="android.permission.MOUNT_UNMOUNT_FILESYSTEMS"></uses-permission> <uses-permission android:name="android.permission.WRITE_EXTERNAL_STORAGE"></uses-permission> <application.../>儲存到sdcard核心程式碼:
File f = new File(Environment.getExternalStorageDirectory(),filename);out = new FileOutputStream(f,true);out.write(filecontent.getBytes("UTF-8"));讀取sdcard核心程式碼:
File f = new File(Environment.getExternalStorageDirectory(),filename);in = new FileInputStream(f);while((length=in.read(buf))!=-1){ bout.write(buf,0,length);}byte[] content = bout.toByteArray();其實主要就是儲存目錄問題;
注意:
在Android中1.5、1.6的sdcard目錄為/sdcard,而Android2.0以上都是/mnt/sdcard,因此如果我們在儲存時直接寫具體目錄會不妥,因此我們可以使用:
Environment.getExternalStorageDirectory();獲取sdcard目錄;
建議:
(1)不能純粹使用sdcard儲存法,因為如果不能判定一部手機是否存在sdcard,如果沒有,則需要提供其他解決方法,比如
儲存到手機儲存;
提示不存在sdcard;
可以使用:if(Environment.getExternalStorageState().equals(Environment.MEDIA_MOUNTED)){ //執行儲存sdcard方法}else{ //儲存到手機中,或提示}給我老師的人工智慧教程打call!http://blog.csdn.net/jiangjunshow

