Spring自動檢測Bean——Componet-Scan
一、自動檢測
自動檢測(autodiscovery) 讓Spring能夠自動識別哪些類需要被裝配成SpringBean 從而減少在xml配置檔案對 元素的使用。
注:自動檢測和是否使用註解無關,它並不侷限應用於註解方式的程式設計(包括註解自動裝配bean以及註解註冊bean)
第一步、標識用於裝配的bean
要想把類標識成可用於@Autowired自動裝配的bean的類,採用以下註解可實現:
@Component 通用的註解,可標註任意類為spring元件。
@Controller 標識將該類定義為spring MVC 控制器
@Repository 標識將該類定義為資料倉庫(在使用資料庫的時候可以用到該註解)
@Service 標識將該類定義為服務
上面的註解內部都是用@Component標註的,所以實際上可以在任何地方使用@Component, 但是為了表達更加清晰的設計意圖,強烈建議根據不同情況使用不同的註解。
使用自動檢測後掃描到的類,容器會將類名且第一個字母小寫來作為bean的id
@Component
public class NotifyServiceByCellPhoneImpl implements NotifyService{
    @Override
    public void sendMessage(String message) {
        System.out.println("傳送手機簡訊:"+message);
    }
}
在上面的例子中NotifyServiceByCellPhoneImpl的id將被設定為預設的notifyServiceByCellPhoneImpl
也可以在@Component註解中指定Bean的id</fon他》
@Component("notifyservice")
public class NotifyServiceByCellPhoneImpl implements NotifyService{
    @Override
    public void sendMessage(String message) {
        System.out.println("傳送手機簡訊:"+message);
    }
}
第二步、開啟自動掃描(將等待裝配的bean註冊進容器)
自動檢測可以讓Spring從指定的包中,自動掃描需要被裝配到容器當中的bean。
開啟自動掃描,需要在spring的配置檔案當中配置如下的程式碼(可配置多條):
<context:component-scan base-package="twm.spring.start" />
<context:component-scan base-package="twm.spring.pojo" />
這樣,spring會自動檢測twm.spring.start包和twm.spring.pojo包中的所有標識可以被註冊為spring bean的類。
同樣要記得在xml檔案新增context名稱空間並指定schema:
<beans xmlns="http://www.springframework.org/schema/beans"
    xmlns:context="http://www.springframework.org/schema/context"
    xmlns:xsi="http://www.w3.org/2001/XMLSchema-instance"
    xmlns:c="http://www.springframework.org/schema/c"
    xsi:schemaLocation="http://www.springframework.org/schema/beans
    http://www.springframework.org/schema/beans/spring-beans.xsd
    http://www.springframework.org/schema/context
    http://www.springframework.org/schema/context/spring-context-4.2.xsd">
<context:component-scan/>包含了自動注入的幾個功能,因此當使用<context:component-scan/>後,可將上一篇自動裝配用到的<context:annotation-config/>省去。
二、filter子標籤
<context:component-scan>提供的兩個子標籤:<context:include-filter>和<context:exclude-filter>,它們分別代表引入和排除。
<context:include-filter>標籤:
<context:component-scan base-package="twm.spring.start">
     <context:include-filter type="regex" expression="twm\.spring\.start\.*Impl" />
</context:component-scan>
這樣在twm.spring.start包下所有名稱以”Impl”結尾的類,都將被註冊到容器中去。
<context:exclude-filter>標籤:
<context:component-scan base-package="twm.spring.start">
        <context:exclude-filter type="regex" expression="twm\.spring\.start\.Test_*Impl" />
</context:component-scan>
這樣在twm.spring.start包下所有名稱以”Test_”開頭且以”Impl”結尾的類,都將被排除,不會註冊到容器中去。
關於expression表示式的書寫要注意兩點:
1、可以採用完全限定名的方式(絕對路徑),如上例中的:expression=“twm.spring.start.*Impl”,twm.spring.start.NotifyServiceByCellPhoneImpl
2、可以採用基於base-package包的方式(相對路徑),如:
<context:component-scan base-package="twm.spring.start" >
     <context:include-filter type="regex" expression="\.*Impl" />
</context:component-scan>
<context:component-scan/>有個屬性use-default-filters,將屬性值設定為false,意即在base-package所有被標識了@Component和@Service等註解的Class不予註冊到容器,權權交給filter子標籤來決定。如果設為true,那就兩種註冊方式都包含了。
如果不想在類前面加@Component、@Service這些註解,又要讓類被裝配到容器中,可以使用filter子標籤。
這樣把NotifyServiceByCellPhoneImpl類前面的@Component去掉,它也能註冊到容器中。使用<context:exclude-filter>則相反,把匹配的排除不給註冊,剩下的全部註冊到容器。
千萬要注意控制註冊到容器的包,不要出現註冊多個同類型的bean,這樣在注入時(byType)會出現錯誤。典型的現象就是,一個介面有多個實現,某個Bean需要注入這個介面的實現類,如果將介面的實現類一股腦註冊到容器中,就會出問題。
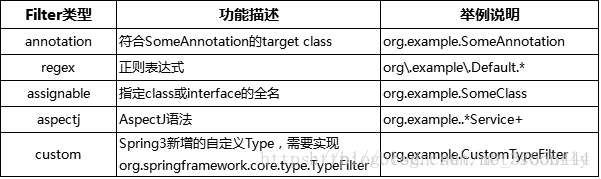
在子標籤中,出現了type這個屬性。上面的例子用到了type=”regex”(常用)。在spring中,這裡的type有五種可選項: