Java學習不走彎路教程(23 整合SSM)
整合SSM
一. 前言
在前上一章教程中,我們實現了springmvc框架。
本章將在上一章的基礎上,進一步擴充套件程式。
注:
1.本文針對初學Java的同學訓練學習思路,請不要太糾結於細節問題。
2.本文旨在達到拋磚引玉的效果,希望大家擴充套件本例子,以學到更多知識的精髓。
學習本章需要準備的知識:
1.讀完本系列教程的前面章節。
2.瞭解SSM的基本用法。
二. 步入正題
話不多說,大家自己理解,下面步入正題:
我們將SpringMVC,Spring,Mybatis整合到一起。
首先把如下Jar包下載並放到工程的lib目錄下:
com.mysql.jdbc_5.1.5.jar
commons-dbcp-1.4.jar
commons-logging-1.2.jar
commons-pool-1.6.jar
mybatis-3.4.6.jar
mybatis-spring-1.3.2.jar
spring-aop-5.1.0.RELEASE.jar
spring-beans-5.1.0.RELEASE.jar
spring-context-5.1.0.RELEASE.jar
spring-core-5.1.0.RELEASE.jar
spring-expression-5.1.0.RELEASE.jar
spring-jdbc-5.1.0.RELEASE.jar
spring-tx-5.1.0.RELEASE.jar
spring-web-5.1.0.RELEASE.jar
spring-webmvc-5.1.0.RELEASE.jar
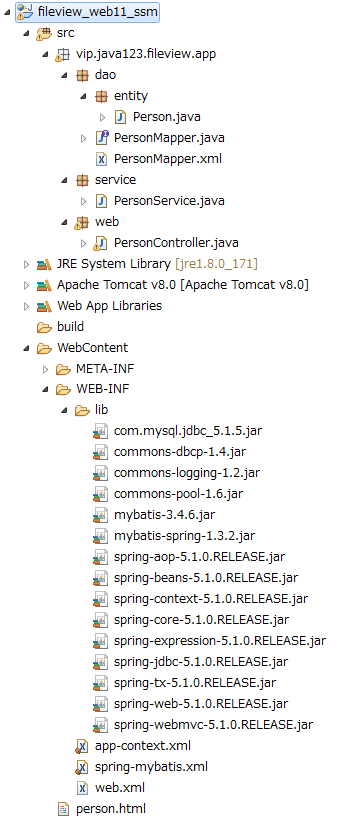
工程的包結構如下:
1.整合SpringMVC和Spring
我們採用註解的方式宣告Service,修改PersonService.java如下:
1 package vip.java123.fileview.app.service; 2 3 import org.springframework.beans.factory.annotation.Autowired; 4 import org.springframework.stereotype.Service; 5 6 import vip.java123.fileview.app.dao.PersonMapper;7 import vip.java123.fileview.app.dao.entity.Person; 8 9 /** 10 * 11 * @author http://www.java123.vip 12 * 13 */ 14 @Service 15 public class PersonService { 16 17 @Autowired 18 private PersonMapper personDao; 19 20 public Person getPerson(String personid) { 21 Person person = personDao.selectPerson(personid);22 return person; 23 } 24 }
然後讓Spring掃描我們的service包即可:
app-context.xml
<?xml version="1.0" encoding="UTF-8"?>
<beans xmlns="http://www.springframework.org/schema/beans"
    xmlns:mvc="http://www.springframework.org/schema/mvc"
    xmlns:xsi="http://www.w3.org/2001/XMLSchema-instance"
    xmlns:p="http://www.springframework.org/schema/p"
    xmlns:context="http://www.springframework.org/schema/context"
    xsi:schemaLocation="
        http://www.springframework.org/schema/beans
        http://www.springframework.org/schema/beans/spring-beans.xsd
        http://www.springframework.org/schema/context
        http://www.springframework.org/schema/context/spring-context.xsd
        http://www.springframework.org/schema/mvc
        http://www.springframework.org/schema/mvc/spring-mvc.xsd">


    <context:component-scan base-package="vip.java123.fileview.app.web"/>
    <context:component-scan base-package="vip.java123.fileview.app.service"/>
    <mvc:annotation-driven/>

    <import resource="spring-mybatis.xml"/>

</beans>
2.整合Spring和Mybatis
我們需要把Mybatis的SessionFactory和Mapper讓Spring來識別並進行管理.
首先我們把dao換成Mapper介面,然後讓Spring載入Mapper介面即可。
程式碼如下:
 1 package vip.java123.fileview.app.dao;
 2
 3 import vip.java123.fileview.app.dao.entity.Person;
 4
 5 /**
 6  *
 7  * @author http://www.java123.vip
 8  *
 9  */
10 public interface PersonMapper {
11
12     public Person selectPerson(String personid);
13 }
PersonMapper.xml
<?xml version="1.0" encoding="UTF-8" ?>
<!DOCTYPE mapper
  PUBLIC "-//mybatis.org//DTD Mapper 3.0//EN"
  "http://mybatis.org/dtd/mybatis-3-mapper.dtd">
<mapper namespace="vip.java123.fileview.app.dao.PersonMapper">
  <select id="selectPerson" resultType="vip.java123.fileview.app.dao.entity.Person">
    select * from person where id = #{arg0}
  </select>
</mapper>
spring-mybatis.xml
<?xml version="1.0" encoding="UTF-8"?> <beans xmlns="http://www.springframework.org/schema/beans" xmlns:xsi="http://www.w3.org/2001/XMLSchema-instance" xmlns:tx="http://www.springframework.org/schema/tx" xmlns:aop="http://www.springframework.org/schema/aop" xsi:schemaLocation=" http://www.springframework.org/schema/beans http://www.springframework.org/schema/beans/spring-beans-3.0.xsd http://www.springframework.org/schema/tx http://www.springframework.org/schema/tx/spring-tx-3.0.xsd http://www.springframework.org/schema/aop http://www.springframework.org/schema/aop/spring-aop-3.0.xsd "> <!-- 配置資料來源 --> <bean name="dataSource" class="org.apache.commons.dbcp.BasicDataSource"> <property name="driverClassName" value="com.mysql.jdbc.Driver"/> <property name="url" value="jdbc:mysql://localhost:3306/test?useUnicode=true&characterEncoding=UTF-8"/> <property name="username" value="root"/> <property name="password" value="1qaz2wsx"/> <!-- 初始化連線大小 --> <property name="initialSize" value="0" /> <!-- 連線池最大使用連線數量 --> <property name="maxActive" value="20" /> <!-- 連線池最大空閒 --> <property name="maxIdle" value="20" /> <!-- 連線池最小空閒 --> <property name="minIdle" value="0" /> <!-- 獲取連線最大等待時間 --> <property name="maxWait" value="60000" /> </bean> <!-- 配置SqlSessionFactory --> <bean id="sqlSessionFactory" class="org.mybatis.spring.SqlSessionFactoryBean"> <property name="dataSource" ref="dataSource" /> <!-- 配置mapper.xml --> <property name="mapperLocations" value="classpath:vip/java123/fileview/app/dao/*.xml" /> </bean> <!-- 配置Mapper介面 --> <bean class="org.mybatis.spring.mapper.MapperScannerConfigurer"> <property name="basePackage" value="vip.java123.fileview.app.dao" /> <property name="sqlSessionFactoryBeanName" value="sqlSessionFactory" /> </bean> <!-- 配置Spring的事務管理器 --> <bean id="transactionManager" class="org.springframework.jdbc.datasource.DataSourceTransactionManager"> <property name="dataSource" ref="dataSource" /> </bean> <!-- 註解方式配置事物 --> <tx:annotation-driven transaction-manager="transactionManager" /> </beans>
3.其他檔案
其他檔案和上一章一樣,不需要改動,我把他們貼在下面:
web.xml
<?xml version="1.0" encoding="UTF-8"?>
<web-app xmlns:xsi="http://www.w3.org/2001/XMLSchema-instance" xmlns="http://java.sun.com/xml/ns/javaee" xsi:schemaLocation="http://java.sun.com/xml/ns/javaee http://java.sun.com/xml/ns/javaee/web-app_3_0.xsd" id="WebApp_ID" version="3.0">
  <display-name>fileview_web05</display-name>

    <listener>
        <listener-class>org.springframework.web.context.ContextLoaderListener</listener-class>
    </listener>

    <context-param>
        <param-name>contextConfigLocation</param-name>
        <param-value>/WEB-INF/app-context.xml</param-value>
    </context-param>

    <servlet>
        <servlet-name>app</servlet-name>
        <servlet-class>org.springframework.web.servlet.DispatcherServlet</servlet-class>
        <init-param>
            <param-name>contextConfigLocation</param-name>
            <param-value></param-value>
        </init-param>
        <load-on-startup>1</load-on-startup>
    </servlet>

    <servlet-mapping>
        <servlet-name>app</servlet-name>
        <url-pattern>*.do</url-pattern>
    </servlet-mapping>

</web-app>
 1 package vip.java123.fileview.app.web;
 2
 3 import org.springframework.beans.factory.annotation.Autowired;
 4 import org.springframework.stereotype.Controller;
 5 import org.springframework.web.bind.annotation.RequestMapping;
 6 import org.springframework.web.bind.annotation.RequestMethod;
 7 import org.springframework.web.bind.annotation.RequestParam;
 8 import org.springframework.web.bind.annotation.ResponseBody;
 9
10 import vip.java123.fileview.app.dao.entity.Person;
11 import vip.java123.fileview.app.service.PersonService;
12
13 /**
14  *
15  * @author http://www.java123.vip
16  *
17  */
18 @Controller
19 public class PersonController {
20
21     @Autowired
22     private PersonService personService;
23
24     @RequestMapping(value = "/person.do", method = RequestMethod.GET)
25     @ResponseBody
26     public String query(@RequestParam("personid")String personId) {
27         System.out.println("in query");
28         Person personResult = personService.getPerson(personId);
29
30         StringBuffer result = new StringBuffer();
31         result.append("id:"+personResult.id);
32         result.append("<br/>username:"+personResult.username);
33         result.append("<br/>password:"+personResult.passwd);
34
35         return result.toString();
36     }
37 }
person.html
<!DOCTYPE html PUBLIC "-//W3C//DTD HTML 4.01 Transitional//EN" "http://www.w3.org/TR/html4/loose.dtd">
<html>
<head>
<meta http-equiv="Content-Type" content="text/html; charset=UTF-8">
<title>Insert title here</title>
<script type="text/javascript">
function doQuery(){
    document.getElementById("result").innerHTML = "loading...";
    var xmlhttp = new XMLHttpRequest();

    xmlhttp.onreadystatechange = function() {
        if (xmlhttp.readyState == XMLHttpRequest.DONE) {   // XMLHttpRequest.DONE == 4
           if (xmlhttp.status == 200) {
               document.getElementById("result").innerHTML = xmlhttp.responseText;
           }else {
               document.getElementById("result").innerHTML = "loading data error.";
           }
        }
    };

    var personid = document.getElementById("personid").value;
    xmlhttp.open("GET", "person.do?personid="+personid, true);
    xmlhttp.send();
}
</script>
</head>
<body>
<form action="/person" method="get">
please input personid:<input id="personid" name="personid"/><input type="button" value="query" onclick="doQuery()"/>
</form>
<div id="result">
</div>
</body>
</html>
三. 測試
啟動伺服器:
向伺服器請求person.html檔案,在瀏覽器端輸入1,點query按鈕:
顯示查詢結果:
完整程式請大家從[這裡]下載
如有問題,大家來我的網站進行提問。
https://www.java123.vip/qa
版權宣告:本教程版權歸java123.vip所有,禁止任何形式的轉載與引用。
