c# quartz定時任務框架的使用
阿新 • • 發佈:2018-11-12
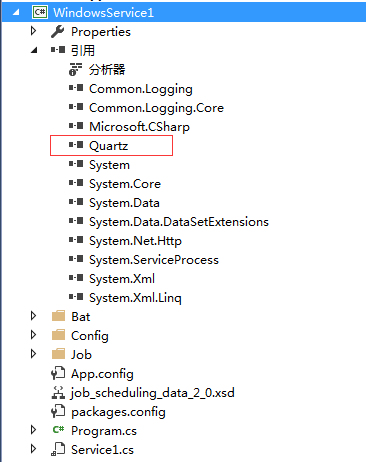
一、新建windows服務專案,並從nuget引用下圖示記的類庫:

二、滑鼠右鍵單擊Service1.cs,點選檢視程式碼,把類檔案修改成如下:
Service1.cs
    public partial class Service1 : ServiceBase
    {
        private IScheduler scheduler;

        public Service1()
        {
            InitializeComponent();

            #region Quartz
            try
            {
                //排程器
                ISchedulerFactory schedulerFactory = new StdSchedulerFactory();
                scheduler = schedulerFactory.GetScheduler();
                //任務、觸發器執行配置
                XMLSchedulingDataProcessor processor = new XMLSchedulingDataProcessor(new SimpleTypeLoadHelper());
                Stream s = new StreamReader(AppDomain.CurrentDomain.BaseDirectory + @"\Config\quartz_jobs.xml").BaseStream;
                processor.ProcessStream(s, null);
                processor.ScheduleJobs(scheduler);
            }
            catch (Exception ex)
            {
                //log 啟動Quartz失敗
            }
            #endregion
        }

        protected override void OnStart(string[] args)
        {
            scheduler.Start();
            //log 服務啟動
        }

        protected override void OnStop()
        {
            if (scheduler != null)
            {
                scheduler.Shutdown(false);
            }
            //log 服務結束
        }
    }
三、在windows服務專案下建一個Config資料夾,並新增quartz_jobs.xml配置檔案如下:
quartz_jobs.xml
<?xml version="1.0" encoding="utf-8" ?>
<!-- This file contains job definitions in schema version 2.0 format -->

<job-scheduling-data xmlns="http://quartznet.sourceforge.net/JobSchedulingData" xmlns:xsi="http://www.w3.org/2001/XMLSchema-instance" version="2.0">
  <processing-directives>
    <overwrite-existing-data>true</overwrite-existing-data>
  </processing-directives>
  <schedule>
    <!--TestJob Start-->
    <job>
      <name>TestJob</name>
      <group>JobGroup</group>
      <description>測試定時任務</description>
      <job-type>WindowsService1.Job.TestJob,WindowsService1</job-type>
      <durable>true</durable>
      <recover>false</recover>
    </job>
    <trigger>
      <!--<simple>
        <name>TestTrigger</name>
        <group>TriggerGroup</group>
        <job-name>TestJob</job-name>
        <job-group>JobGroup</job-group>
        <misfire-instruction>SmartPolicy</misfire-instruction>
        <repeat-count>-1</repeat-count>
        <repeat-interval>1000</repeat-interval>
      </simple>-->
      <cron>
        <name>TestTrigger</name>
        <group>TriggerGroup</group>
        <job-name>TestJob</job-name>
        <job-group>JobGroup</job-group>
        <start-time>2018-10-12T06:00:00+08:00</start-time>
        <cron-expression>0 0/1 * * * ?</cron-expression>
      </cron>
    </trigger>
    <!--TestJob End-->
  </schedule>
</job-scheduling-data>
四、在windows服務專案下建一個Job資料夾,並新增TestJob.cs檔案如下:
TestJob.cs
    [PersistJobDataAfterExecution]//儲存執行狀態
    [DisallowConcurrentExecution]//不允許併發執行
    public class TestJob : IJob
    {
        public void Execute(IJobExecutionContext context)
        {
            //to do...
        }
    }
五、在windows服務專案下建一個Bat資料夾,並新增如下批處理檔案:
install.bat
sc create 服務名稱 binPath= "E:\WindowsService1.exe" start= auto
sc description 服務名稱 "服務描述"
pause
start.bat
net start 服務名稱
pause
stop.bat
net stop 服務名稱
pause
uninstall.bat
sc delete 服務名稱
pause
