
TcpTrace實現的基本原理
前面的幾篇文章,我們學習了怎麼開發WCF應用程式與服務,也學習瞭如何進行WCF的配置。對於Web Service與WCF服務應用,服務端與客戶端的通訊是通過收發SOAP Message進行,我們如何有效而快速的獲取通訊資訊呢?這就是本文要介紹的一個工具。
一、TcpTrace實現的基本原理
在對Web Service和WCF進行除錯時,可以使用Soap Trace 工具對Soap Message進行深入捕獲並進行分析。經常使用的工具有TcpTrace與Microsoft Soap Toolkit中的Soap Trace Utility。
對於希望對WCF的訊息交換有一個深層次瞭解的開發者來說,TcpTracer絕對是一個不可多得好工具。我們將TcpTracer置於服務和服務代理之間,TcpTracer會幫助我們接獲、顯示和轉發流經他的訊息。
首先來講講TcpTrace實現的基本原理。說簡單點,TcpTracer就是一個監聽/轉發器(Listening/Forwarding),就是一個路由器。當啟動的時候,我們需要設定兩個埠:監聽埠(Listening Port)和目的主機(Destination Server)與目的埠(Destination Port),然後TcpTracer就會在本機的監聽埠進行網路監聽。一旦有針對該監聽埠的請求抵達,他會截獲整個請求的訊息,並將整個訊息顯示到訊息面板上。隨後,TcpTracer會將該訊息原封不動地轉發給目的主機與目的埠。在另一方面,從目的主機與目的埠傳送給原埠的訊息,也同樣被TcpTracer截獲、顯示和轉發。 說白了就是把要發的訊息先給我們檢視和備份,再轉發出去。
接下來我們我們通過下面的步驟演示如何通過TcpTracer在WCF中進行訊息的路由。
1) 為了演示TcpTracer在WCF中的應用,還是用我們前面做的書籍查詢示例的WCF服務應用(BookService),具體參見WCF學習之旅——第一個WCF示例(一)與WCF學習之旅—WCF第二個示例(五)。
2) 示例中的終結點的地址為:http://127.0.0.1:8888/BookService(Port為8888)。
3) 同時這個服務端的配置檔案資訊如下:

<?xml version="1.0" encoding="utf-8"?>
<configuration>
  <configSections>
    <!-- For more information on Entity Framework configuration, visit http://go.microsoft.com/fwlink/?LinkID=237468 -->
    <section name="entityFramework" type="System.Data.Entity.Internal.ConfigFile.EntityFrameworkSection, EntityFramework
, Version=6.0.0.0, Culture=neutral, PublicKeyToken=b77a5c561934e089" requirePermission="false" />

  </configSections>
  <entityFramework>
    <defaultConnectionFactory type="System.Data.Entity.Infrastructure.SqlConnectionFactory, EntityFramework" />
    <providers>
      <provider invariantName="System.Data.SqlClient" type="System.Data.Entity.SqlServer.SqlProviderServices, EntityFramework.SqlServer" />
    </providers>
  </entityFramework>
  <system.serviceModel>
    <diagnostics>
      <messageLogging logEntireMessage="true" logKnownPii="false" logMalformedMessages="true"
        logMessagesAtServiceLevel="true" logMessagesAtTransportLevel="true" />
      <endToEndTracing propagateActivity="true" activityTracing="true"

        messageFlowTracing="true" />
    </diagnostics>
    <behaviors>
      <serviceBehaviors>

        <behavior name="metadataBehavior">
          <serviceMetadata httpGetEnabled="true" httpGetUrl="http://127.0.0.1:8888/BookService/metadata" />
          <serviceDebug includeExceptionDetailInFaults="True" />

        </behavior>
      </serviceBehaviors>
    </behaviors>
    <services>

      <service behaviorConfiguration="metadataBehavior" name="SCF.WcfService.BookService">
        <endpoint address="http://127.0.0.1:8888/BookService" binding="wsHttpBinding"
        contract="SCF.Contracts.IBookService" />

      </service>
    </services>
  </system.serviceModel>
  <startup>

    <supportedRuntime version="v4.0" sku=".NETFramework,Version=v4.5.2" />
  </startup>
<system.diagnostics>
  <sources>
    <source name="System.ServiceModel" switchValue="Warning" propagateActivity="true">
      <listeners>
        <add name="xml" />
      </listeners>
    </source>
  </sources>
  <sharedListeners>
    <add name="xml" type="System.Diagnostics.XmlWriterTraceListener" initializeData="D:\wcf.svclog" />
  </sharedListeners>
</system.diagnostics>
</configuration>
4) 客戶端的配置資訊如下:
<?xml version="1.0" encoding="utf-8" ?>
<configuration>
    <startup>
        <supportedRuntime version="v4.0" sku=".NETFramework,Version=v4.5.2" />
    </startup>
    <system.serviceModel>
        <bindings>
            <wsHttpBinding>
                <binding name="WSHttpBinding_IBookService" />
                <binding name="WSHttpBinding_IBookService1" />
            </wsHttpBinding>
        </bindings>
        <client>
            <endpoint address="http://127.0.0.1:8888/BookService" binding="wsHttpBinding"
                bindingConfiguration="WSHttpBinding_IBookService" contract="SCF.Contracts.IBookService"
                name="WSHttpBinding_IBookService">
                <identity>
                    <userPrincipalName value="DEVELOPER\Administrator" />

                </identity>
            </endpoint>
            <endpoint address="http://127.0.0.1:8888/BookService" binding="wsHttpBinding"
                bindingConfiguration="WSHttpBinding_IBookService1" contract="BookServiceRef.IBookService"

                name="WSHttpBinding_IBookService1">
                <identity>
                    <userPrincipalName value="DEVELOPER\Administrator" />

                </identity>
            </endpoint>
        </client>
    </system.serviceModel>
</configuration>
5) 但是通過上面的設定之後,實際上還是不能夠進行資料的捕捉,如下圖,無論如何在客戶端呼叫WCF應用,TcpTrace是無法捕捉到任何資料的。

這是為什麼呢?請往下看。
二、通過ClientViaBehavior實現基於TcpTracer的訊息路由
在我們建立的WCF服務來說,整個服務訪問只涉及到兩方:服務(BookService)和服務的呼叫者(客戶端)。從訊息交換的角度來看,服務的呼叫者呼叫者將請求訊息直接傳送到服務端,計算結果也以回覆訊息的形式直接返回到服務的呼叫者。
現在我們需要將TcpTracer作為一個路由器引入到服務(BookService)和服務的呼叫者 (客戶端)之間,那麼我們需要解決的是:服務呼叫者傳送的訊息不能直接傳送到服務端,而應該先發送給TcpTracer,再由TcpTracer轉發給服務。我們可以通過ClientViaBehavior實現邏輯地址和實體地址的分離——邏輯地址指向最終的服務,而實體地址則指向 TcpTracer。
具體的原理如下圖所示:我們將TcpTracer的監聽埠(Listening Port)和目的埠(Destination port)設定成8080和8888(BookService地址所在的埠)。通過ClientViaBehavior將實體地址的埠設成 8080(TcpTracer監聽埠)。

注:對於訊息傳送方來說,SOAP訊息的To報頭對應的地址由傳送端的終結點地址(邏輯地址)決定。
基於上面的實現原理,我們需要修改客戶端的配置, 在<system.serviceModel>/<behaviors>/<endpointBehaviors> 新增ClientViaBehavior,將viaUri的埠指定為8080:http://127.0.0.1:8080/BookService。並將該EndpointBehavior應用到終結點中。
1) 配置檔案資訊修改一下,如下面。請仔細比較一下面的客戶端配置檔案與上篇文章最後的客戶端配置檔案的區別:
<?xml version="1.0" encoding="utf-8" ?>
<configuration>
    <startup>
        <supportedRuntime version="v4.0" sku=".NETFramework,Version=v4.5.2" />
    </startup>

    <system.serviceModel>
        <bindings>
            <wsHttpBinding>
                <binding name="WSHttpBinding_IBookService" />
                <binding name="WSHttpBinding_IBookService1" />

            </wsHttpBinding>
        </bindings>
          <behaviors>
             <endpointBehaviors>
                 <behavior name="bookServiceEndpointBehavior">
                     <clientVia viaUri="http://localhost:8080/BookService" />

                 </behavior>
             </endpointBehaviors>
         </behaviors>
        <client>
            <endpoint address="http://127.0.0.1:8888/BookService" binding="wsHttpBinding" behaviorConfiguration="bookServiceEndpointBehavior"
                bindingConfiguration="WSHttpBinding_IBookService" contract="SCF.Contracts.IBookService"
                name="WSHttpBinding_IBookService">
                <identity>
                    <userPrincipalName value="DEVELOPER\Administrator" />

                </identity>
            </endpoint>
            <endpoint address="http://127.0.0.1:8888/BookService" binding="wsHttpBinding" behaviorConfiguration="bookServiceEndpointBehavior"
                bindingConfiguration="WSHttpBinding_IBookService1" contract="BookServiceRef.IBookService"
                name="WSHttpBinding_IBookService1">
                <identity>
                    <userPrincipalName value="DEVELOPER\Administrator" />

                </identity>
            </endpoint>
        </client>
    </system.serviceModel>
</configuration>
2) 經過修改儲存之後,現在可以進行Soap Trace了,現在我們再次啟動TcpTrace。進行如下的設定,如下圖。
監聽埠(Listen On Port#):可以自由設定,但是不能夠與服務的埠重合,並且該埠還需要在客戶端註冊。在這裡設定成8080
目標埠(Destination Port #):服務埠。在這裡設定成8888。

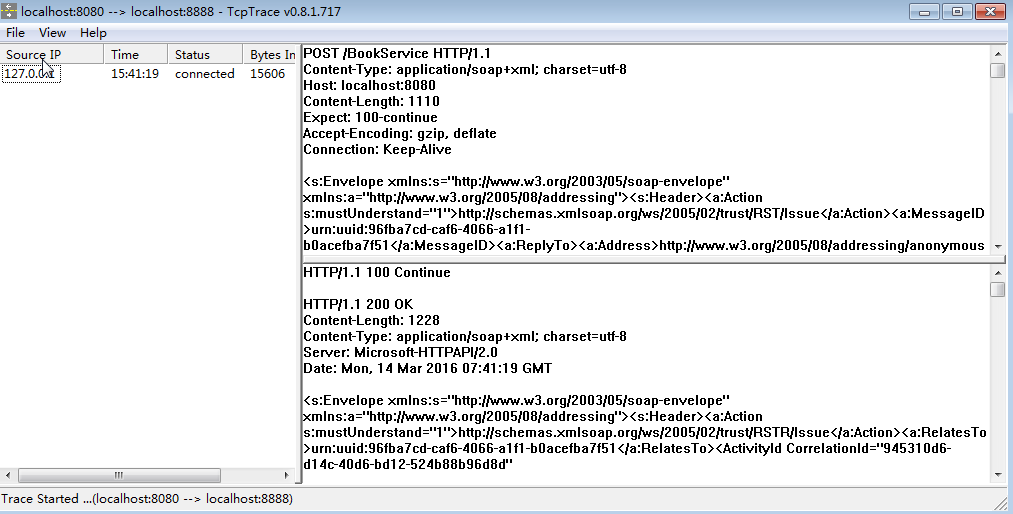
3) 先執行Hosting程式,然後執行WinClient,在WinClient中發起請求,這時請求訊息和回覆訊息將會顯示到TcpTracer的訊息顯示面板中,如下圖所示:
4) 我們還可以通過日誌,把資訊記錄下來,記錄日誌的配置如下圖。

5) 當關閉tcpTrace時相應的內容被記錄到我們指定的Log檔案中:
