mini2440 SPI驅動移植(轉)
按照下面帖子的方法,本人試驗成功,只需按照下面步驟進行就行了。
原帖地址: http://blog.csdn.net/lxmky/article/details/6858322
注:原文最後短接的MISO和MOSI指的是SPI1的,區別於SPI0
mini2440中,SPI0和SPI1的四個功能引腳均接有上拉電阻10K到3.3V。
| 引腳 |
SPICLK0 |
SPIMISO0 |
SPIMOSI0 |
nSS0/GPG2/EINT10 |
| 複用功能 |
GPE13 |
GPE11 |
GPE12 |
Only for slave mode P23 |
| CON4 引腳 |
27 |
25 |
26 |
28 |
SPI1同時接到開發板上的按鍵
| 引腳 |
SPICLK1 |
SPIMISO1 |
SPIMOSI1 |
nSS1/GPG3/EINT11 |
| 複用功能 |
GPG7/EINT15 |
GPG5/EINT13 |
GPG6/EINT14 |
Only for slave mode P23 |
| CON4 引腳 |
21 |
19 |
20 |
18 |
最近專案需要,需要在mini2440上移植SPI驅動,板子需要驅動SPI裝置,上網找了很多資源,但是很多都是有問題,最終在基本理解驅動結構的前提下,將SPI驅動順利移植到mini2440。
,我使用的核心版本是2.6.32.2,這個版本和2.6。29不一樣,網上很多版本都是關於2.6.29,如果完全按照網上步驟,編譯會出現問題,我做的步驟如下:
1,在Linux Source Code中修改arch/arm/mach-s3c2440/mach-mini2440.c檔案,加入標頭檔案:
[cpp] view plain copy
- #include <linux/spi/spi.h>
- #include <../mach-s3c2410/include/mach/spi.h>
[cpp] view plain copy
- static struct spi_board_info s3c2410_spi0_board[] =
- {
- [0] = {
- .modalias = "spidev",
- .bus_num = 0,
- .chip_select = 0,
- .irq = IRQ_EINT9,
- .max_speed_hz = 500 * 1000,
- }
- };
- static struct s3c2410_spi_info s3c2410_spi0_platdata = {
- .pin_cs = S3C2410_GPG(2),
- .num_cs = 1,
- .bus_num = 0,
- .gpio_setup = s3c24xx_spi_gpiocfg_bus0_gpe11_12_13,
- };
- static struct spi_board_info s3c2410_spi1_board[] =
- {
- [0] = {
- .modalias = "spidev",
- .bus_num = 1,
- .chip_select = 0,
- .irq = IRQ_EINT2,
- .max_speed_hz = 500 * 1000,
- }
- };
- static struct s3c2410_spi_info s3c2410_spi1_platdata = {
- .pin_cs = S3C2410_GPG(3),
- .num_cs = 1,
- .bus_num = 1,
- .gpio_setup = s3c24xx_spi_gpiocfg_bus1_gpg5_6_7,
- };
在mini2440_devices[]平臺數組中新增如下程式碼:
[cpp] view plain copy
- &s3c_device_spi0,
- &s3c_device_spi1,
[cpp] view plain copy
- s3c_device_spi0.dev.platform_data= &s3c2410_spi0_platdata;
- spi_register_board_info(s3c2410_spi0_board, ARRAY_SIZE(s3c2410_spi0_board));
- s3c_device_spi1.dev.platform_data= &s3c2410_spi1_platdata;
- spi_register_board_info(s3c2410_spi1_board, ARRAY_SIZE(s3c2410_spi1_board));
最後需要修改arch/arm/plat-s3c24xx/KConfig檔案
找到如下程式碼段:
[cpp] view plain copy
- config S3C24XX_SPI_BUS0_GPE11_GPE12_GPE13
- bool
- help
- SPI GPIO configuration code for BUS0 when connected to
- GPE11, GPE12 and GPE13.
- config S3C24XX_SPI_BUS1_GPG5_GPG6_GPG7
- bool
- help
- SPI GPIO configuration code for BUS 1 when connected to
- GPG5, GPG6 and GPG7.
修改為 [cpp] view plain copy
- config S3C24XX_SPI_BUS0_GPE11_GPE12_GPE13
- bool "S3C24XX_SPI_BUS0_GPE11_GPE12_GPE13"
- help
- SPI GPIO configuration code for BUS0 when connected to
- GPE11, GPE12 and GPE13.
- config S3C24XX_SPI_BUS1_GPG5_GPG6_GPG7
- bool "S3C24XX_SPI_BUS1_GPG5_GPG6_GPG7"
- help
- SPI GPIO configuration code for BUS 1 when connected to
- GPG5, GPG6 and GPG7.
[cpp] view plain copy
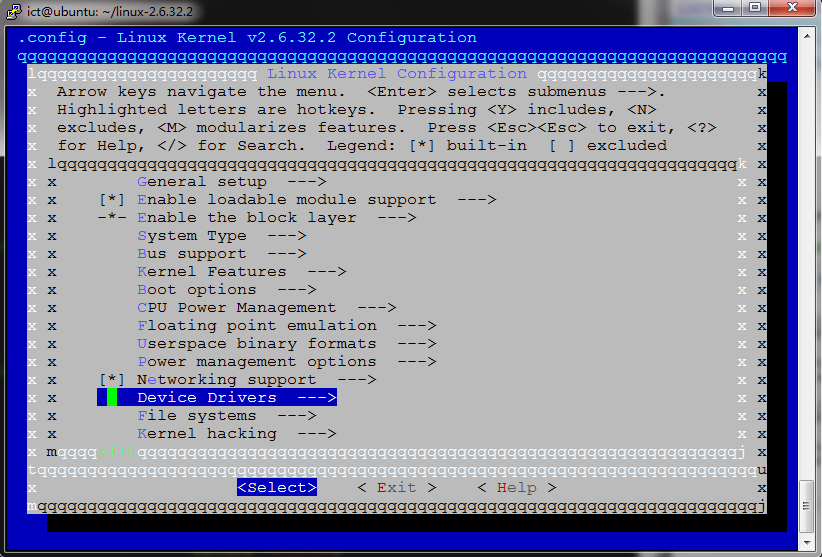
- make menuconfig

圖2

圖3

圖4

圖5

最後編譯核心
[cpp] view plain copy- make zImage
交叉編譯:
[cpp] view plain copy
- arm-linux-gcc -I ~/linux-2.6.32.2/include/ spidev_test.c
[cpp] view plain copy
- FF FF FF FF FF FF
- 40 00 00 00 00 95
- FF FF FF FF FF FF
- FF FF FF FF FF FF
- FF FF FF FF FF FF
- DE AD BE EF BA AD
- F0 0D
總結:這裡敘述的是驅動移植詳細過程,程式碼的具體含義以及開發板的針腳對應圖需要自己去查閱相關資料,這裡不再詳述。
地址:http://blog.csdn.net/lxmky/article/details/6858322
