
一個ip繫結多個域名
阿新 • • 發佈:2018-11-13
一個ip繫結一個域名
-
apache伺服器文章中我有介紹apache配置網站,講解一個ip繫結一個域名的步驟和方法。
-
配置過程:
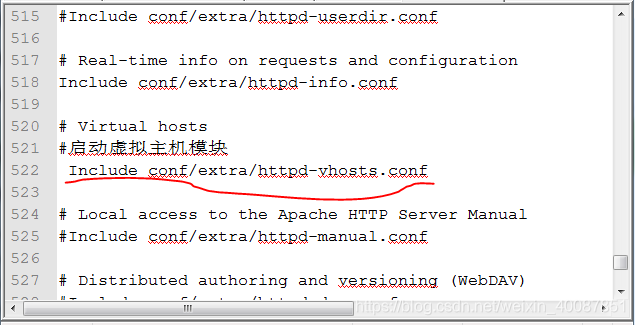
- 啟動httpd-vhosts.conf(在httpd.conf檔案中,找到Virtual hosts虛擬主機)
- 在httpd-vhosts.conf中配置
- 修改host檔案(路徑+修改)


- 在httpd.conf檔案中加入url(url組成格式:https://www.cnblogs.com/woodyblog/p/6005414.html):

- 預設埠是80,如果之前大家沒有改埠號,上面的步驟請不要改動埠號。
- 測試
- 啟動httpd-vhosts.conf(在httpd.conf檔案中,找到Virtual hosts虛擬主機)
一個ip繫結多個域名
-
一個ip繫結多個域名可以採用兩種方法:
- 通過埠來區分不同的站點
- 通過ServerName區分不同的域名
通過埠來區分不同的站點
-
配置站點。
- E:/apache3
-
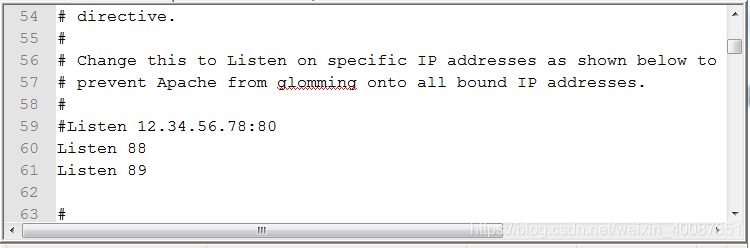
監聽埠。
-
配置httpd.conf檔案,啟動httpd-vhosts.conf(假設之前已經配置過網站可忽略此步驟)。
-
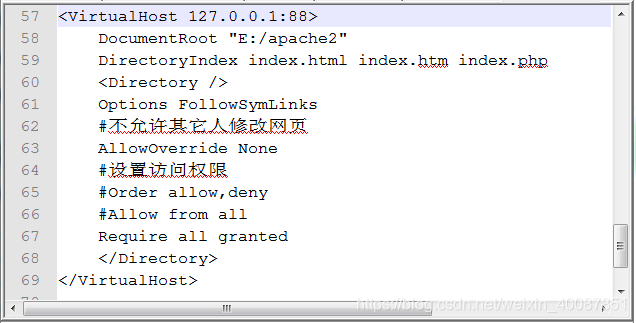
配置httpd-vhosts.conf檔案。
<VirtualHost 127.0.0.1:88>
    DocumentRoot "E:/apache2"
	DirectoryIndex index.html index.htm index.php
	<Directory />
	Options FollowSymLinks
	不允許其它人修改網頁
	AllowOverride None
	設定訪問許可權
	Order allow,deny
	Allow from all
	Require all granted
	</Directory>
</VirtualHost>

<VirtualHost 127.0.0.1:89>
    DocumentRoot "E:/apache3"
	DirectoryIndex index.html index.htm index.php
	<Directory />
	Options FollowSymLinks
	不允許其它人修改網頁
	AllowOverride None
	設定訪問許可權
	Order allow,deny
	Allow from all
	Require all granted
	</Directory>
</VirtualHost>
-
在hosts檔案中新增ip和域名的對應關係。

-
修改httpd.conf檔案

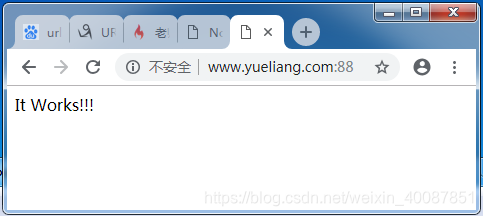
通過埠來區分不同的站點
-
配置站點。
- E:/apache3
-
配置httpd.conf檔案,啟動httpd-vhosts.conf(假設之前已經配置過網站可忽略此步驟)。
-
配置httpd-vhosts.conf檔案。
<VirtualHost *:88>
    DocumentRoot "E:/apache2"
	ServerName www.yueliang.com
	DirectoryIndex index.html index.htm index.php
	<Directory />
	Options FollowSymLinks
	#不允許其它人修改網頁
	AllowOverride None
	#設定訪問許可權
	#Order allow,deny
	#Allow from all
	Require all granted
	</Directory>
</VirtualHost>

<VirtualHost *:88>
    DocumentRoot "E:/apache3"
	ServerName www.yueliang2.com
	DirectoryIndex index.html index.htm index.php
	<Directory />
	Options FollowSymLinks
	#不允許其它人修改網頁
	AllowOverride None
	#設定訪問許可權
	#Order allow,deny
	#Allow from all
	Require all granted
	</Directory>
</VirtualHost>
- 在hosts檔案中新增ip和域名的對應關係。