
資料來源為Excel的解決方法
上次做專案時要求資料來源改為Excel,與專案一起打包執行。查了一下資料來源是否可以直接使用Excel的解決方案,雖然有提供可以連線Excel的驅動,但是以Excel直接操作資料實在是不方便,沒有資料庫的功能強大,因此想到了使用了內嵌式資料庫,再編寫一段上傳Excel把資料更新到資料庫的程式碼,即可同樣達到資料來源與專案打包的效果。
一、解決思路
要求:資料來源為Excel,與專案一起打包
方法:使用內嵌式資料庫,後臺處理上傳Excel資料至資料庫
內嵌式資料庫就是不需要像Mysql/Oracle一樣安裝啟動服務,而是在專案中直接引用它的jar包即可,它會以檔案的形式存在於資料庫中。在此專案中我使用了sqlite3。
上傳Excel資料至資料庫這一塊我使用了fileUpload和poi,前者是用於上傳檔案,後者用於從Excel中讀取資料;資料庫連線我採用了SpringJdbcTemplate。好啦,以下是詳細的步驟。
二、詳細步驟
1、安裝內建資料庫sqlite3
1)首先從官網下載,我是在Windows下開發的,雖然後續是在linux環境下執行,但是sqlite3它可以自己跨平臺,所以我直接下載windows版本就好了。

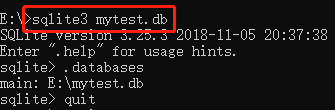
2)解壓,然後建立一個sqlite3型別的檔案,在命令提示符中使用sqlite3 DatabaseName.db的命令即可在當前目錄下建立一個sqlite3型別的資料庫

3)你可以用Navicat等視覺化工具連線資料庫,也可以把資料庫直接複製到專案中,然後在applicationContext配置檔案中配置連線資訊即可。我這裡採用了C3P0連線池。如果是放在resources下面,URL可以像我這樣寫,另外sqlite3的所使用的驅動是org.sqlite.JDBC。使用者名稱和密碼可以不使用。

測試一下,可發現數據庫能夠正常連線

2、Excel讀取資料並寫入資料庫
poi提供了Excel讀取的瞭解決方案,有一點要注意的是,分為HSSF和XSSF,其中HSSF是針對的office2007之前的版本xls,而XSSF針對的是office2007以後的版本xlsx,我這裡採用的是XSSF。
思路:上傳檔案存放至臨時地點——讀取Excel資料封裝成List——清空資料庫之前的資料——插入資料到資料庫
讀取Excel資料封裝成List,主要思想就是遍歷每個sheet,再在每個sheet中遍歷行,取列值,每行封裝成一個物件,每個sheet又封裝成一個list,批量插入資料庫,下面直接上程式碼。
讀取Excel.java
public class UploadExcel {
    public static List<Ammeter> readXlsx(String path) throws Exception {
        List<Ammeter> list = new ArrayList<Ammeter>();
        InputStream is = new FileInputStream(path);
        XSSFWorkbook xssfWorkbook = new XSSFWorkbook(is);
        for (Sheet xssfSheet : xssfWorkbook) {
            if (xssfSheet == null) {
                continue;
            }
            for (int rowNum = 1; rowNum <= xssfSheet.getLastRowNum(); rowNum++) {
                Row xssfRow = xssfSheet.getRow(rowNum);
                if (xssfRow == null) {
                    continue;
                }
                List<Ammeter> rowList = new ArrayList<Ammeter>();
                Ammeter ammeter = new Ammeter();
                int len=0;

                Cell cell = xssfRow.getCell(0);
                if (cell != null) {
                    cell.setCellType(Cell.CELL_TYPE_STRING);
                }
                ammeter.setTabNumber(cell.getStringCellValue());
                cell = xssfRow.getCell(1);
                if (cell != null) {
                    cell.setCellType(Cell.CELL_TYPE_STRING);
                }if((len=cell.getStringCellValue().length())>6){
                    ammeter.setActivePower(cell.getStringCellValue().substring(0,6));
                }else{
                    ammeter.setActivePower(cell.getStringCellValue());
                }

                cell = xssfRow.getCell(2);
                if (cell != null) {
                    cell.setCellType(Cell.CELL_TYPE_STRING);
                }if((len=cell.getStringCellValue().length())>6){
                    ammeter.setReactivePower(cell.getStringCellValue().substring(0,6));
                }else{
                    ammeter.setReactivePower(cell.getStringCellValue());
                }

                cell = xssfRow.getCell(3);
                if (cell != null) {
                    cell.setCellType(Cell.CELL_TYPE_STRING);
                }if((len=cell.getStringCellValue().length())>6){
                    ammeter.setCumulativePower(cell.getStringCellValue().substring(0,6));
                }else{
                    ammeter.setCumulativePower(cell.getStringCellValue());
                }

                cell = xssfRow.getCell(4);
                if (cell != null) {
                    cell.setCellType(Cell.CELL_TYPE_STRING);
                }if((len=cell.getStringCellValue().length())>6){
                    ammeter.setVoltage(cell.getStringCellValue().substring(0,6));
                }else{
                    ammeter.setVoltage(cell.getStringCellValue());
                }

                cell = xssfRow.getCell(5);
                if (cell != null) {
                    cell.setCellType(Cell.CELL_TYPE_STRING);
                }if((len=cell.getStringCellValue().length())>6){
                    ammeter.setElectricity(cell.getStringCellValue().substring(0,6));
                }else{
                    ammeter.setElectricity(cell.getStringCellValue());
                }

                cell = xssfRow.getCell(6);
                if (cell != null) {
                    cell.setCellType(Cell.CELL_TYPE_STRING);
                }
                ammeter.setCurrentTime(cell.getStringCellValue());

                list.add(ammeter);
            }
        }
        return list;


    }
}
這裡有幾個點要注意一下:
1)我直接跟業務耦合了,但其實可以抽取出來作為一個工具類的;
2)讀取的時候我直接將Excel單元格的型別強制轉換為字串型別,使用的cell.setCellType(Cell.CELL_TYPE_STRING),但是這個方法在新版的poi中的已經棄用了的,後續再看抽象出一個方法類的時候再寫,現在先過;
3)Excel中使用下拉填充的數字讀取出來有時會帶若干小數,在這裡我因為強制轉換為字元型別,所以採用的subString進行擷取,可以使用保留小數後再轉換為字串;如果使用我的subString的方法的話要先判斷下字串長度,避免產生index溢位的錯誤。
清空資料庫Dao.java
 //清空資料庫
    public void truncate(){
        String sql = "delete from ammeter";
        jdbcTemplate.execute(sql);
    }
這裡要注意的幾個點:
1)mysql中可以採用truncate table tableName進行清空資料庫,但是sqlite3裡是不支援這樣的命令的,只能使用delete from tabeName命令,但是這個命令是不能刪除自增ID的,即假如你有100條資料,雖然清空掉了,但是插入資料的ID是從101開始的;
2)在JdbcTemplate裡,execute()方法可用於執行任何sql語句,但是一般用來執行DDL語句。
插入資料庫Dao.java
//插入資料到資料庫
    public void insert(List<Ammeter> ammeters){
        final List<Ammeter> tempAmmeter=ammeters;
        String sql = "insert into ammeter(tabNumber,activePower,reactivePower,cumulativePower,electricity,voltage,currentTime) values (?,?,?,?,?,?,?)";
        jdbcTemplate.batchUpdate(sql, new BatchPreparedStatementSetter() {
            @Override
            public void setValues(PreparedStatement ps, int i) throws SQLException {
                String tabNumber=tempAmmeter.get(i).getTabNumber();
                String activePower=tempAmmeter.get(i).getActivePower();
                String reactivePower=tempAmmeter.get(i).getReactivePower();
                String cumulativePower=tempAmmeter.get(i).getCumulativePower();
                String electricity=tempAmmeter.get(i).getElectricity();
                String voltage=tempAmmeter.get(i).getVoltage();
                String currentTime=tempAmmeter.get(i).getCurrentTime();
                ps.setString(1, tabNumber);
                ps.setString(2, activePower);
                ps.setString(3, reactivePower);
                ps.setString(4, cumulativePower);
                ps.setString(5, electricity);
                ps.setString(6, voltage);
                ps.setString(7, currentTime);
            }

            @Override
            public int getBatchSize() {
                return tempAmmeter.size();
            }
        });
    }
這裡要注意的幾個點:
1)採用了JdbcTemplate的批量插入方法batchUpdate(),一般來說update()方法用來執行增加、修改和刪除等語句,batchUpdate()方法用來執行批處理相關的語句;這裡有個疑問,雖然我使用了該批量插入方法,但是在執行5500多條資料時扔用了3-5min時間,具體原因暫未知;
2)如果是想要批量更新資料的話,可以採用臨時資料庫,先上傳資料到臨時資料庫,再根據外來鍵更新正式資料庫,這樣速度會快點。
3、客戶端上傳Excel
思路:瀏覽器上傳Excel——存入專案的某個路徑下——UploadExcel讀取該路徑下的Excel——執行操作
由於牽涉到前端頁面,所以採用servlet和jsp;servet中用到了spring框架;上傳檔案的存放位置採用了相對路徑,不能寫死,避免了平臺問題。直接上程式碼。
上傳按鈕.jsp
<form action="${pageContext.request.contextPath}/servlet/UploadHandleServlet" method="post" enctype="multipart/form-data" >
    請選擇上傳檔案<input type="file" name="file"><br>
    <input type="submit" value="上傳">
</form>
處理上傳Servlet.java
@Controller
public class UploadHandleServlet extends HttpServlet {
    @Autowired
    private AmmeterDao ammeterDao;
    public void init() throws ServletException {
        /**
         * 利用init方法來呼叫Spring容器BeanFactory
         * 看看UserServlet是否能夠通過Spring容器獲取物件
         */
        WebApplicationContext wc = WebApplicationContextUtils.getRequiredWebApplicationContext(getServletContext()); //通過Web容器去得到BeanFactory物件
        AutowireCapableBeanFactory autowireCapableBeanFactory = wc.getAutowireCapableBeanFactory();
        autowireCapableBeanFactory.autowireBean(this);
    }
    protected void doPost(HttpServletRequest request, HttpServletResponse response) throws ServletException, IOException {
        String savePath = this.getServletContext().getRealPath("/WEB-INF/upload");
        File file = new File(savePath);
        if(!file.exists()&&!file.isDirectory()){
            System.out.println(savePath+"目錄不存在,需要建立");
            file.mkdir();
        }
        String message = "上傳成功";
        try {
            DiskFileItemFactory diskfactory = new DiskFileItemFactory();//建立工廠類物件
            ServletFileUpload fileUpload = new ServletFileUpload(diskfactory);//使用工廠建立解析器物件
            if(!ServletFileUpload.isMultipartContent(request)){
                return;
            }
            List<FileItem> fileItems = fileUpload.parseRequest(request);
            for(FileItem item:fileItems) {
                if(item.isFormField()) {
                    System.out.println(new String(item.getString().getBytes("ISO-8859-1"),"utf-8"));
                } else{
                    item.write(new File(savePath+"\\"+"temp.xlsx"));
                    System.out.println(message);
                }
            }
        } catch (FileUploadException e) {
            e.printStackTrace();
        } catch (Exception e) {
            e.printStackTrace();
        }
        List<Ammeter> temp= null;
        try {
            temp = UploadExcel.readXlsx(savePath+"\\"+"temp.xlsx");
            System.out.println(temp);
        } catch (Exception e) {
            e.printStackTrace();
        }
        ammeterDao.truncate();
        ammeterDao.insert(temp);

    }

    protected void doGet(HttpServletRequest request, HttpServletResponse response) throws ServletException, IOException {

    }
}
這裡要注意的幾個點:
1)由於Dao是使用了Spring框架用Autowired自動裝配的,所以使用new是不會呼叫的,要想在servlet裡使用自動裝配,需要利用init方法來呼叫Spring容器BeanFactory,然後使用@Autowired自動裝配;
2)使用fileupload的jar包。同時要有io
    <!-- https://mvnrepository.com/artifact/commons-fileupload/commons-fileupload -->
    <dependency>
      <groupId>commons-fileupload</groupId>
      <artifactId>commons-fileupload</artifactId>
      <version>1.3.1</version>
    </dependency>
    <!-- https://mvnrepository.com/artifact/commons-io/commons-io -->
    <dependency>
      <groupId>commons-io</groupId>
      <artifactId>commons-io</artifactId>
      <version>1.3.1</version>
    </dependency>
3)不要把路徑寫死,要用相對路徑; this.getServletContext().getRealPath("/WEB-INF/upload");這個路徑指的是專案執行的真實路徑,到時會在執行的Tomcat伺服器下的webapps\ROOT\WEB-INF\upload產生檔案;而且指定了檔名後覆蓋,不用擔心儲存問題;
以上。