
asp.net core 的使用者註冊功能——Identity上手
首先請using這個類庫。
using Microsoft.AspNetCore.Identity;
這個類庫老牛逼了,首先是包含了一個IdentityUser類。我們可以自己寫一個User類繼承IdentityUser,這樣一來,很多屬性我就不用手動建了。如你所見,我的User沒有Emai這個欄位,但是IdentityUser有這個欄位。
public class User:IdentityUser { public string Pass { get; set; } public string DisplayName { get; set; } public DateTime RegisteredTime { get; set; } }
如何把使用者發來的資料變成一個User並且存入資料庫?
顯然,我他媽得先建立並且連線一個數據庫。
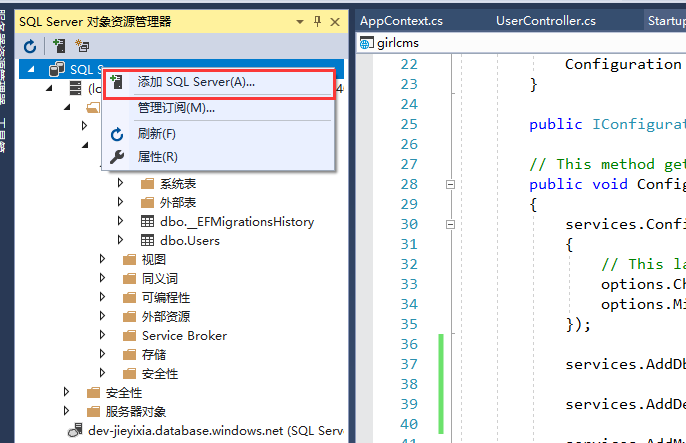
建立資料庫如果使用VSStudio是賊容易的一件事,只需要開啟'檢視選單',然後點開'SQL Server物件資源管理器'。然後你就看到下面這個圖。在上面點右鍵然後新增一個SQL伺服器,然後在伺服器上點右鍵檢視屬性,可以得到連結字串。
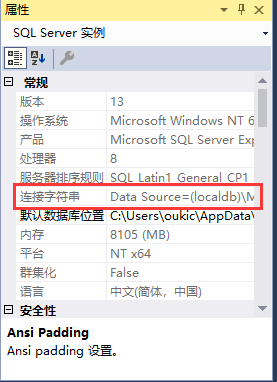
這種簡單的操作顯然難不住你。下一步把連線字串放到appsetting.json裡面,下面這是一種推薦做法。你當然可以直接貼上到你的startUp.cs檔案中。不過誰會這麼做呢?
"ConnectionStrings": {
    "DefaultConnection": "這裡就是你的連線字串"
}
下一步要用這個連線字串連上你的資料庫。注意帶顏色的字。很JB重要。
// This method gets called by the runtime. Use this method to add services to the container.public void ConfigureServices(IServiceCollection services) { services.Configure<CookiePolicyOptions>(options => { // This lambda determines whether user consent for non-essential cookies is needed for a given request. options.CheckConsentNeeded = context => true; options.MinimumSameSitePolicy = SameSiteMode.None; }); // 看到了麼,下面這行程式碼用來連線資料庫。這是EF提供的方法。 services.AddDbContext<AppContext>(options => options.UseSqlServer(Configuration.GetConnectionString("DefaultConnection"))); // 在這裡指定你的User類,然後再指定你的資料庫。這是Identity類庫提供的方法。 services.AddDefaultIdentity<User>().AddEntityFrameworkStores<AppContext>(); services.AddMvc().SetCompatibilityVersion(CompatibilityVersion.Version_2_1); }
public void Configure(IApplicationBuilder app, IHostingEnvironment env)
        {
            if (env.IsDevelopment())
            {
                app.UseDeveloperExceptionPage();
            }
            else
            {
                app.UseExceptionHandler("/Error");
                app.UseHsts();
            }

            app.UseHttpsRedirection();
            app.UseStaticFiles();
            app.UseCookiePolicy();
       // 這裡必須用上。
            app.UseAuthentication();
            app.UseMvc();
        }
經過上面的配置,controller裡面就可以注入很多方法。這下你看起來牛逼多了。
資料庫連上了,接下來是真槍實彈的建立一個使用者,是時候寫controller了。
建一個隨便什麼controller吧。我建的是UserController,你可以隨你的便。關我屌事呢?
在controller的建構函式裡面注入一個UserManager的類,這個類也是Identity提供的。
public class UserController : ControllerBase
    {
        private readonly UserManager<User> _userManager;

        public UserController(UserManager<User> userManager)
        {
            _userManager = userManager;
        }
......
這個UserManager有賊多的方法,這裡我只用一個,createAsync方法。
 // POST: api/User
 [HttpPost]
 public async Task PostAsync([FromBody]User _user)
 {
     //先建立一個user,不包括密碼
     var user = new User { Email = _user.Email , UserName = _user.UserName};
     //將user和密碼繫結入庫
     var result = await _userManager.CreateAsync(user, _user.Pass);
     if (result.Succeeded)
     {
         Console.Write("註冊成功!");
     }
 }
用Postman模擬一個請求。你注意到那個FromBody了嗎?這個標記可以把發過來的json請求解析成User格式。
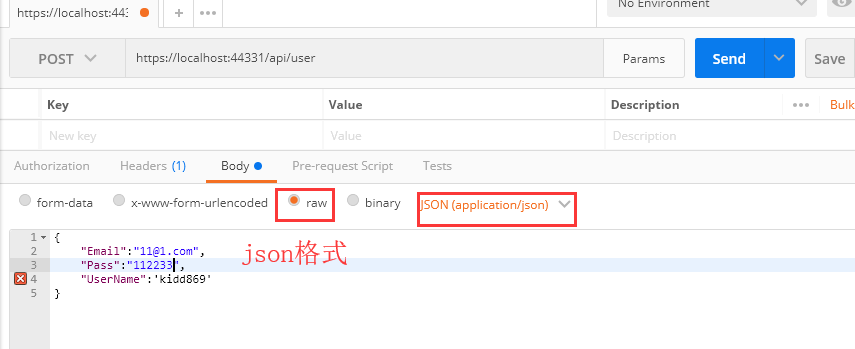
這裡有一個新手大坑。如果你的 [FromBody] User _user這裡寫的是[FromBody] string _user, 你就不能用json格式發。會報什麼json解析錯誤。
傳送請求以後去看看你的資料庫吧。已經建立好了一個User物件並且存到了你的資料庫裡。
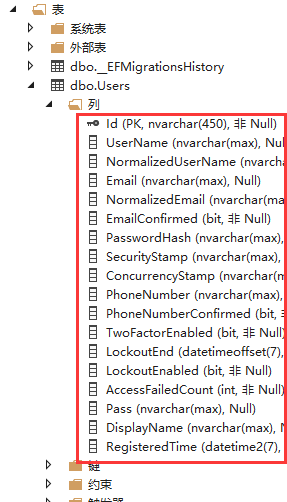
這麼多欄位都是來自IdentityUser類,其中只有那個pass欄位是我自己UserClass裡面的。