Spring Cloud學習筆記16——微服務的消費
微服務的消費模式
基於http的客戶端經常被用作微服務的消費者,因為http本身是平臺無關的、語言無關的,所以基於http的客戶端往往會被廣大的社群支援
服務直連模式
特點:
- 簡潔明瞭,只要傳入一個
URL,就能直接連過去,獲取到資源 - 平臺語言無關性,非常直白,不需要特定框架、技術,能實現平臺無關、語言無關
- 無法保證服務的可用性,當需要連結某個
IP下的某個資源時,如果這個IP地址或這個IP地址所繫結的主機宕機了,這個資源就無法拿到,因為服務直連模式無法做到負載均衡,也就無法保證服務的可用性 - 生產環境比較少用
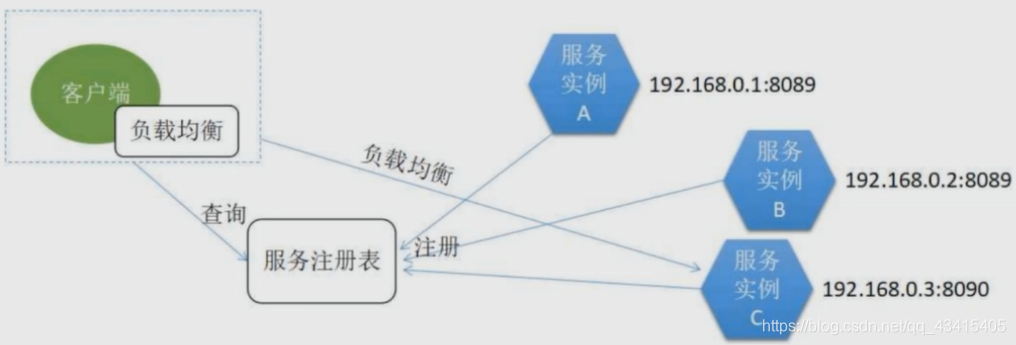
客戶端發現模式
- 服務例項啟動後,將自己的位置資訊提交到服務登錄檔
- 客戶端從服務登錄檔進行查詢,來獲取可用的服務例項
- 客戶端自行使用負載均衡演算法從多個服務例項中選擇出一個

服務端發現模式
與客戶端發現模式最大的區別在於:負載均衡不是由客戶端來做,而是在服務端實現,負載均衡器是獨立部署在服務端的

常見微服務的消費者
Apache HttpClient
用來提供高效、功能豐富的http協議的客戶端工具包,能支援http協議最新的版本和建議。Apache HttpClient能對JDK提供一些非常好的補充,方便開發人員測試基於http的介面,從而提高開發效率及程式碼健壯性
Apache HttpClient的用法
新增依賴
//依賴關係
dependencies {

	//新增Apache HttpClient依賴
	compile('org.apache.httpcomponents:httpclient:4.5.6')

}
注入restTemplate
import org.springframework.beans.factory.annotation.Autowired;
import org.springframework.boot.web.client.RestTemplateBuilder;
import org.springframework.context.annotation. 使用
@Service
public class WeatherDataServiceImpl implements WeatherDataService {

	@Autowired
	private RestTemplate restTemplate;

	private WeatherResponse doGetWeather(String uri) {
		ResponseEntity<String> respString = restTemplate.getForEntity(uri, String.class);
		//...
	}
	//...
}
Ribbon
Ribbon是Spring Cloud中的一個元件,是基於Netflix Ribbon實現客戶端負載均衡的一個工具,基於http和TCP來實現客戶端的負載均衡
Ribbon的每個負載均衡器一起協作,可以根據需要與遠端伺服器進行互動,來獲取包含命名客戶端名詞的集合,Ribbon經常與Eureka結合使用,在典型的分散式部署中,Eureka為所有的微服務例項提供服務註冊,Ribbon提供服務消費的客戶端
Ribbon有很多負載均衡的演算法
Ribbon的用法
新增依賴
//依賴關係
dependencies {

	//新增Spring Cloud Starter Netflix Ribbon依賴
	compile('org.springframework.cloud:spring-cloud-starter-netflix-ribbon')

}
build.gradle完整程式碼如下:
//buildscript程式碼塊中指令碼優先執行
buildscript {

    //ext用於定義動態屬性
	ext {
		springBootVersion = '2.0.0.M3'
	}

    //使用了Maven的中央倉庫及Spring自己的倉庫(也可以指定其他倉庫)
    repositories {
        //mavenCentral()
        maven{ url "https://repo.spring.io/snapshot" }
        maven{ url "https://repo.spring.io/milestone" }
        maven{ url "http://maven.aliyun.com/nexus/content/groups/public/" }
    }

    //依賴關係
	dependencies {
        //classpath聲明瞭在執行其餘的指令碼時,ClassLoader可以使用這些依賴項
		classpath("org.springframework.boot:spring-boot-gradle-plugin:${springBootVersion}")
	}
}

//使用外掛
apply plugin: 'java'
apply plugin: 'eclipse'
apply plugin: 'org.springframework.boot'
apply plugin: 'io.spring.dependency-management'

//指定了生成的編譯檔案的版本,預設是打成了jar包
group = 'com.study.spring.cloud'
version = '1.0.0'

//指定編譯.java檔案的JDK版本
sourceCompatibility = 1.8

//使用了Maven的中央倉庫及Spring自己的倉庫(也可以指定其他倉庫)
repositories {
    //mavenCentral()
    maven{ url "https://repo.spring.io/snapshot" }
    maven{ url "https://repo.spring.io/milestone" }
    maven{ url "http://maven.aliyun.com/nexus/content/groups/public/" }
}

ext {
    springCloudVersion = 'Finchley.M2'
}

//依賴關係
dependencies {

    //該依賴用於編譯階段
	compile('org.springframework.boot:spring-boot-starter-web')

	//Eureka Client
    compile('org.springframework.cloud:spring-cloud-starter-netflix-eureka-client')

	//新增Spring Cloud Starter Netflix Ribbon依賴
    compile('org.springframework.cloud:spring-cloud-starter-netflix-ribbon')

    //該依賴用於測試階段
    testCompile('org.springframework.boot:spring-boot-starter-test')
}

//Spring Cloud依賴管理
dependencyManagement{
    imports{
        mavenBom "org.springframework.cloud:spring-cloud-dependencies:${springCloudVersion}"
    }
}
注入
import org.springframework.beans.factory.annotation.Autowired;
import org.springframework.boot.web.client.RestTemplateBuilder;
import org.springframework.cloud.client.loadbalancer.LoadBalanced;
import org.springframework.cloud.netflix.ribbon.RibbonClient;
import org.springframework.context.annotation.Bean;
import org.springframework.context.annotation.Configuration;
import org.springframework.web.client.RestTemplate;

@Configuration
@RibbonClient(name = "ribbon-client",configuration = RibbonConfiguration.class)
public class RestConfiguration {

	@Autowired
	private RestTemplateBuilder builder;

	@Bean
	@LoadBalanced
	public RestTemplate restTemplate() {
		return builder.build();
	}

}
配置
import com.netflix.loadbalancer.IPing;
import com.netflix.loadbalancer.PingUrl;
import org.springframework.cloud.netflix.ribbon.ZonePreferenceServerListFilter;
import org.springframework.context.annotation.Bean;
import org.springframework.context.annotation.Configuration;

@Configuration
public class RibbonConfiguration {

	@Bean
	public ZonePreferenceServerListFilter serverListFilter(){
		ZonePreferenceServerListFilter filter = new ZonePreferenceServerListFilter();
		filter.setZone("myZone");
		return filter;
	}

	@Bean
	public IPing ribbonPing(){
		return new PingUrl();
	}
}
使用
import org.springframework.beans.factory.annotation.Autowired;
import org.springframework.web.bind.annotation.GetMapping;
import org.springframework.web.bind.annotation.RestController;
import org.springframework.web.client.RestTemplate;

@RestController
public class CityController {

	@Autowired
	private RestTemplate restTemplate;

	@GetMapping("/cities")
	public String listCity(){
		//通過應用名詞來查詢
		String body=restTemplate.getForEntity("http://msa-weather-city-eureka/cities", String.class).getBody();
		return body;
	}
}
應用配置application.properties
#應用名稱
spring.application.name=micro-weather-eureka-client-ribbon

#指定Eureka伺服器地址
eureka.client.service-url.defaultZone=http://localhost:8761/eureka/
Feign
Feign是一款宣告式的Web服務客戶端,這使得編寫Web服務客戶端更容易,同時它具有可拔插的註釋支援,Spring Cloud對Feign有整合,在使用Feign的時候,Spring Cloud同時會整合Ribbon和Eureka來提供負載均衡http客戶端
整合Feign
開發環境
JDK8+Gradle4+Redis 3.2.100Spring Boot 2.0.0.M3Spring Cloud Starter Netflix Eureka Client Finchley.M2Spring Cloud Starter OpenFeign Finchley.M2
建立專案
複製之前的micro-weather-eureka-client專案,將副本改名為micro-weather-eureka-client-feign

修改原始碼
修改build.gradle配置,新增Feign依賴:
//依賴關係
dependencies {

    //Eureka Client
    compile('org.springframework.cloud:spring-cloud-starter-netflix-eureka-client')

    //Feign
    compile('org.springframework.cloud:spring-cloud-starter-openfeign:2.0.0.M3')

    //該依賴用於測試階段
    testCompile('org.springframework.boot:spring-boot-starter-test')
}
此處要注意Feign依賴的版本,如果不加版本號,將預設下載2.0.0.M2版本,原始碼中是沒有LoadBalancedRetryFactory的,執行會導致以下報錯:
java.lang.ClassNotFoundException: org.springframework.cloud.client.loadbalancer.LoadBalancedRetryFactory
修改com.study.spring.cloud.weather包下的Application類,加入@EnableFeignClients註解:
package com.study.spring.cloud.weather;

import org.springframework.boot.SpringApplication;
import org.springframework.boot.autoconfigure.SpringBootApplication;
import org.springframework.cloud.client.discovery.EnableDiscoveryClient;
import org.springframework.cloud.netflix.feign.EnableFeignClients;

/*
 * @SpringBootApplication註解宣告Spring Boot應用
 * 作用等同於@Configuration, @EnableAutoConfiguration, @ComponentScan,
 * 簡化Spring配置
*/
@SpringBootApplication
//啟用可發現的客戶端
@EnableDiscoveryClient
//啟用Feign
@EnableFeignClients
//Application類一定要處於整個工程的根目錄下,這樣它才能根據配置去掃描子節點下的Spring的Bean
public class Application {

	public static void main(String[] args) {
		SpringApplication.run(Application.class, args);
	}
}
新建com.study.spring.cloud.weather.service包,在包下新建介面CityClient:
package com.study.spring.cloud.weather.service;

import org.springframework.cloud.netflix.feign.FeignClient;
import org.springframework.web.bind.annotation.GetMapping;

//指明服務地址
@FeignClient("mas-weather-city-eureka")
public interface CityClient {

	@GetMapping("/cities")
	String listCity();
}
在com.study.spring.cloud.weather.controller包下新建類CityController:
package com.study.spring.cloud.weather.controller;

import com.study.spring.cloud.weather.service.CityClient;
import org.springframework.beans.factory.annotation.Autowired;
import org.springframework.web.bind.annotation.GetMapping;
import org.springframework.web.bind.annotation.RestController;

//用於處理rest請求的controller
@RestController
public class CityController {

	@Autowired
	private CityClient cityClient;

	@GetMapping("/cities")
	public String listCity() {
		//通過Feign客戶端來查詢
		String body=cityClient.listCity();
		return body;
	}

}
修改application.properties配置檔案:
#應用名稱
spring.application.name=micro-weather-eureka-client-feign

#註冊伺服器的URL
eureka.client.service-url.defaultZone=http://localhost:8761/eureka/

#請求服務時的超時時間
feign.client.config.feignName.connect-timeout=5000

#讀資料時的超時時間
feign.client.config.feignName.read-timeout=5000
執行
- 先在
IDE上執行micro-weather-eureka-server - 再通過命令列執行
msa-weather-city-eureka:
因為之前已經編譯過,直接進入E:\workspace\workspace-study\springcloud-study\imooc-spring-cloud-study\msa-weather-city-eureka\build\libs目錄,
再通過命令java -jar msa-weather-city-eureka-1.0.0.jar --server.port=8081執行jar包即可 - 在
IDE上執行micro-weather-eureka-client-feign,執行結果如下:

- 訪問
http://localhost:8761頁面,可以看到Eureka的管理頁面:

- 訪問
http://localhost:8080/cities頁面:

