
Detecting Text in Natural Image + YOLOv3+crnn
本專案基於yolo3 與crnn 實現中文自然場景文字檢測及識別
專案地址:https://github.com/chineseocr/chineseocr
環境部署
python=3.6 pytorch==0.4.1
git clone https://github.com/chineseocr/chineseocr.git
cd chineseocr
sh setup.sh #(cpu sh setpu-cpu.sh)
下載編譯darknet(如果直接運用opencv dnn 可忽略darknet的編譯)
git clone https://github.com/pjreddie/darknet.git
mv darknet chineseocr/
##編譯對GPU、cudnn的支援 修改 Makefile
#GPU=1
#CUDNN=1
#OPENCV=0
#OPENMP=0
make
修改 darknet/python/darknet.py line 48
root = '/root/'##chineseocr所在目錄
lib = CDLL(root+"chineseocr/darknet/libdarknet.so", RTLD_GLOBAL)
注意:這裡我使用的是opencv3.4.3,所以我直接略過了darknet的編譯。
另外,我沒有直接執行 sh setup.sh #(cpu sh setpu-cpu.sh),而是根據情況分步執行其中的命令。
環境配置方面,我升級了opencv:
pip3 install --upgrade --user opencv-python -i https://pypi.tuna.tsinghua.edu.cn/simple/

升級了pytorch:
pip3 install --upgrade --user torch torchvision -i https://pypi.tuna.tsinghua.edu.cn/simple/
另外安裝了:
pip3 install Cython lmdb mahotas -i https://pypi.tuna.tsinghua.edu.cn/simple/下載模型檔案
模型檔案地址:
- baidu pan
- google drive(暫時無更新)
複製資料夾中的所有檔案到models目錄
也可將yolo3模型轉換為keras版本,詳細參考
或者直接運用opencv>=3.4 dnn模組呼叫darknet模型(參考 opencv_dnn_detect.py)。
上述環境佈置好後,記得執行:
pushd detector/utils && sh make.sh && popd這個是生成.so檔案,供後面呼叫,必須要走這步。
否則將出現以下情況;
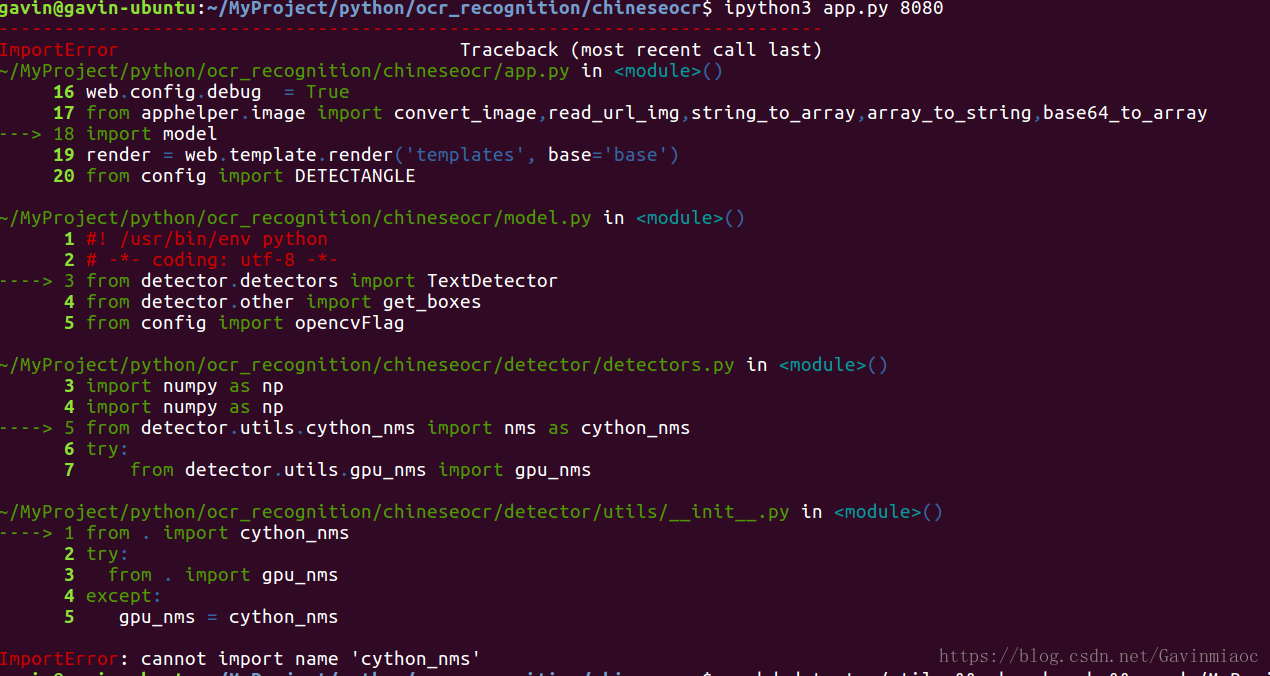
執行了後是這樣的:

接下來是
web服務啟動
cd chineseocr## 進入chineseocr目錄
ipython app.py 8080 ##8080埠號,可以設定任意埠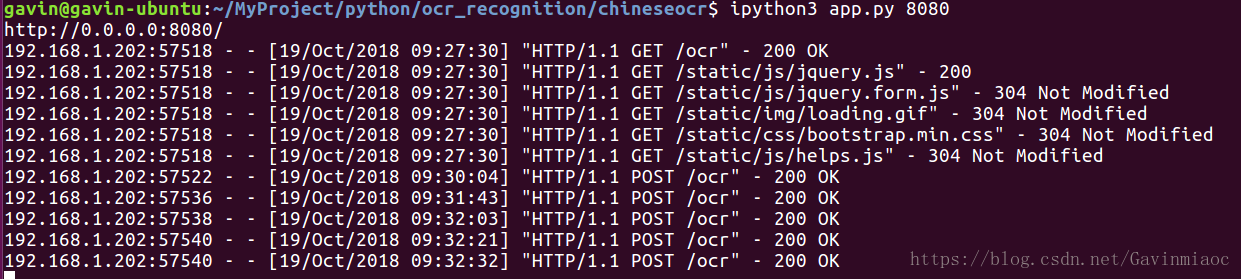
最後,在網頁輸入:
http://192.168.1.202:8080/ocr這裡ip要根據自己電腦實際情況修改。
識別結果展示
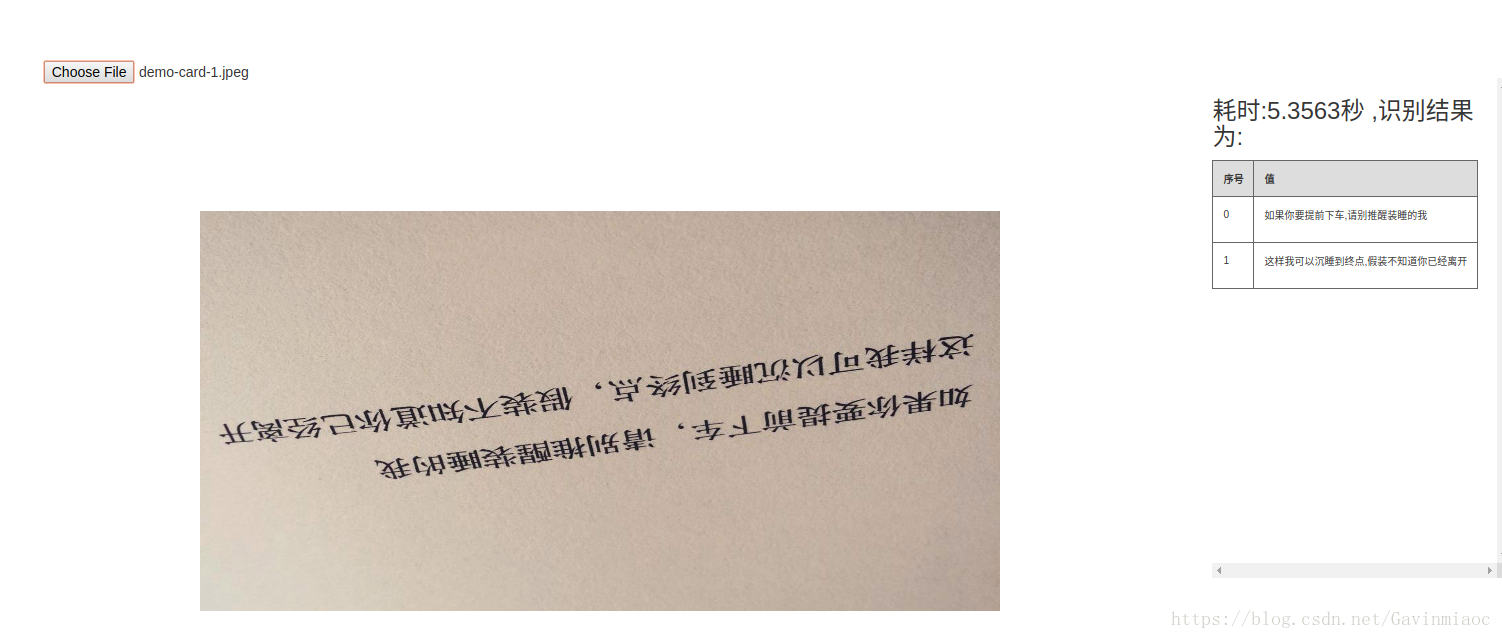
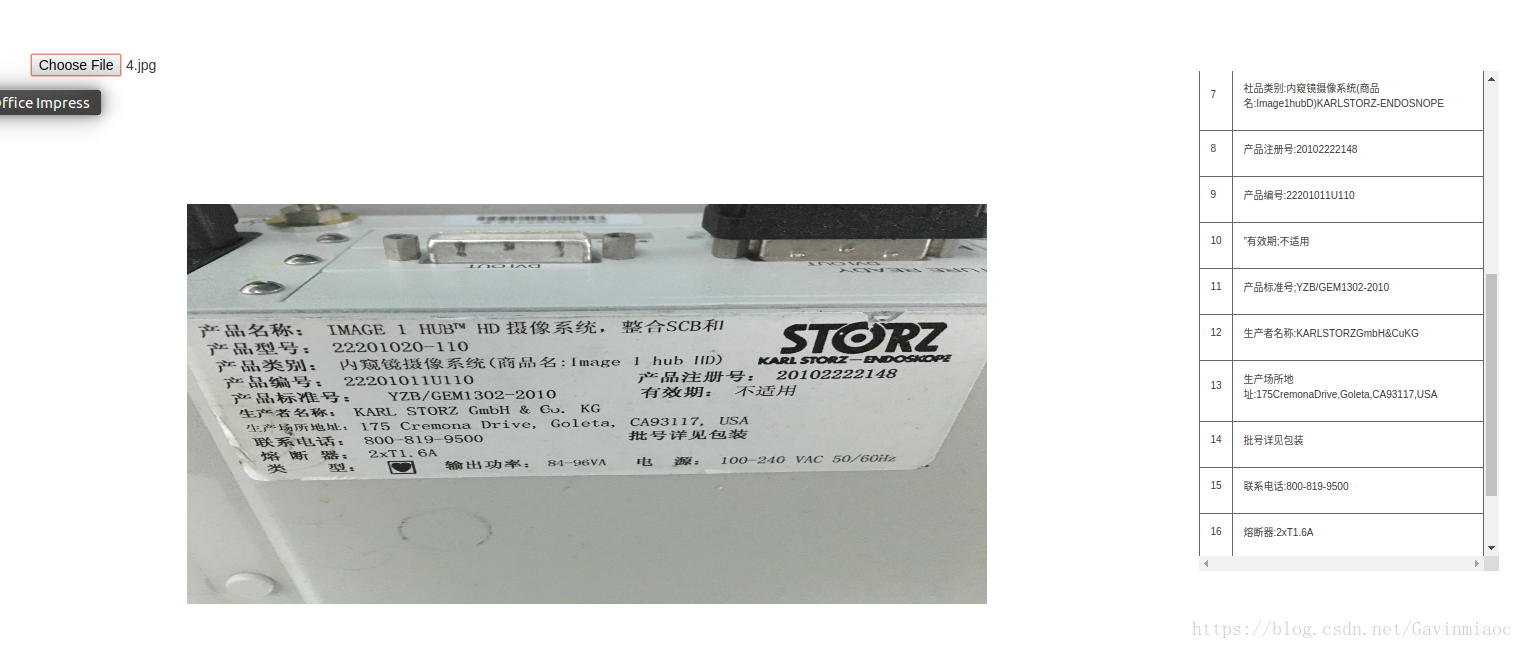
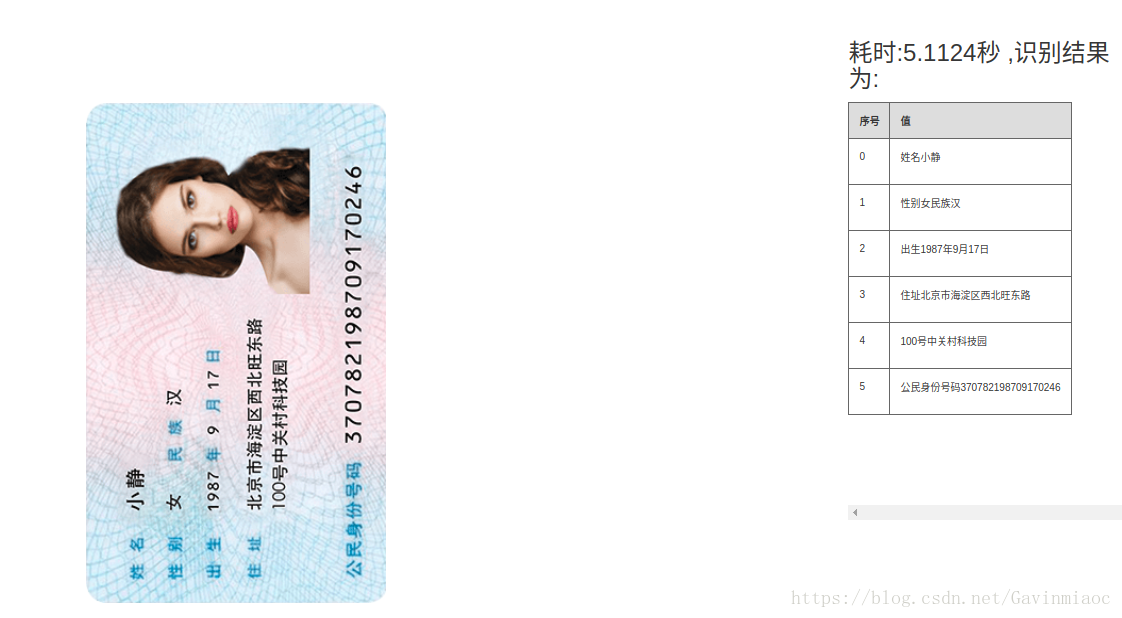
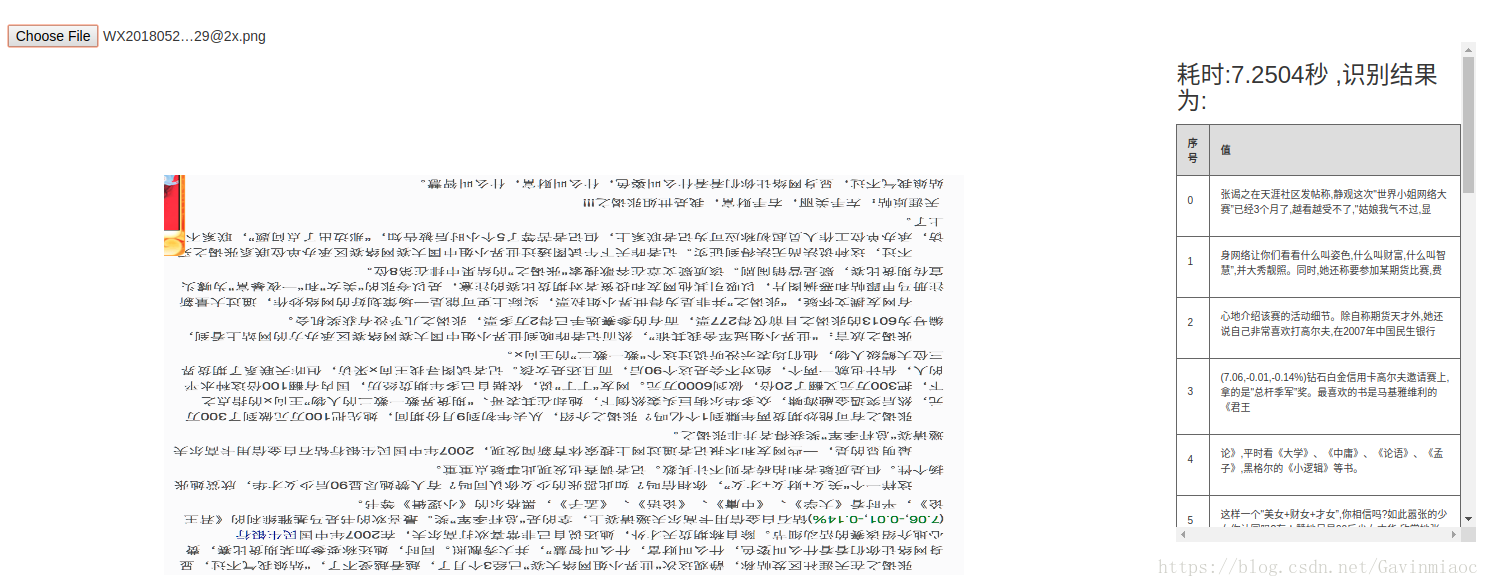
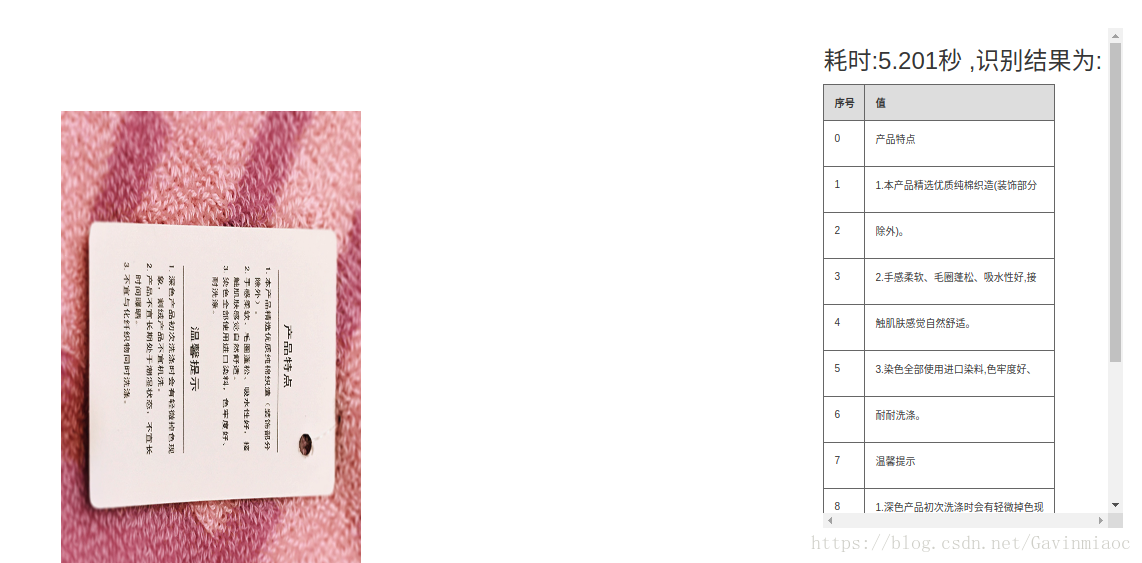
還是很強大的,注意這裡我沒有做任何優化,後期會考慮優化速度,並且重新訓練新一類的資料。
目前模型對儀表類數字識別不是很靠譜,對電影電視劇螢幕字型識別效果也不好,原因是沒有訓練過此類資料。
參考
- yolo3 https://github.com/pjreddie/darknet.git
- crnn https://github.com/meijieru/crnn.pytorch.git
- ctpn https://github.com/eragonruan/text-detection-ctpn
- CTPN https://github.com/tianzhi0549/CTPN
- https://github.com/qqwweee/keras-yolo3.git
擴充套件
附1.
1.重新訓練crnn的具體步驟:
需要準備 1.自己的資料集 2.自己資料集基於的詞典
詳見:這個crnn的實現https://github.com/Sierkinhane/crnn_chinese_characters_rec
重新訓練crnn的版本,train.py可以參考這裡:
https://github.com/meijieru/crnn.pytorch/blob/master/train.py
這個專案下訓練的model可以直接拿到本專案使用
但是注意:
修改keys.py alphabet='0123456789abcdefghijklmnopqrstuvwxyz',crnn.pytorch是識別英文的模型
需要修改crnn.pytorch 預設--alphabet ,用本專案中keys.py檔案的alphabet替換
2.如何在你訓練的基礎上增加訓練集? #43 from(https://github.com/chineseocr/chineseocr/issues/43)
如果你的模型字符集和本專案的不一致,根據下面的程式碼,調整模型進行訓練即可。
具體訓練可以參考crnn.pytorch專案https://github.com/meijieru/crnn.pytorch.git
import torch.nn as nn
import torch.nn as nn
import torch.nn.parallel

from crnn.models import utils
from collections import OrderedDict
from config import ocrModel,LSTMFLAG,GPU

def data_parallel(model, input, ngpu):
    if isinstance(input.data, torch.cuda.FloatTensor) and ngpu > 1:
        output = nn.parallel.data_parallel(model, input, range(ngpu))
    else:
        output = model(input)
    return output


class BidirectionalLSTM(nn.Module):

    def __init__(self, nIn, nHidden, nOut, ngpu):
        super(BidirectionalLSTM, self).__init__()
        self.ngpu = ngpu

        self.rnn = nn.LSTM(nIn, nHidden, bidirectional=True)
        self.embedding = nn.Linear(nHidden * 2, nOut)

    def forward(self, input):
        recurrent, _ = utils.data_parallel(
            self.rnn, input, self.ngpu)  # [T, b, h * 2]

        T, b, h = recurrent.size()
        t_rec = recurrent.view(T * b, h)
        output = utils.data_parallel(
            self.embedding, t_rec, self.ngpu)  # [T * b, nOut]
        output = output.view(T, b, -1)

        return output


class CRNN(nn.Module):

    def __init__(self, imgH, nc, nclass, nh, ngpu, n_rnn=2, leakyRelu=False):
        super(CRNN, self).__init__()
        self.ngpu = ngpu
        assert imgH % 16 == 0, 'imgH has to be a multiple of 16'

        ks = [3, 3, 3, 3, 3, 3, 2]
        ps = [1, 1, 1, 1, 1, 1, 0]
        ss = [1, 1, 1, 1, 1, 1, 1]
        nm = [64, 128, 256, 256, 512, 512, 512]

        cnn = nn.Sequential()

        def convRelu(i, batchNormalization=False):
            nIn = nc if i == 0 else nm[i - 1]
            nOut = nm[i]
            cnn.add_module('conv{0}'.format(i),
                           nn.Conv2d(nIn, nOut, ks[i], ss[i], ps[i]))
            if batchNormalization:
                cnn.add_module('batchnorm{0}'.format(i), nn.BatchNorm2d(nOut))
            if leakyRelu:
                cnn.add_module('relu{0}'.format(i),
                               nn.LeakyReLU(0.2, inplace=True))
            else:
                cnn.add_module('relu{0}'.format(i), nn.ReLU(True))

        convRelu(0)
        cnn.add_module('pooling{0}'.format(0), nn.MaxPool2d(2, 2))  # 64x16x64
        convRelu(1)
        cnn.add_module('pooling{0}'.format(1), nn.MaxPool2d(2, 2))  # 128x8x32
        convRelu(2, True)
        convRelu(3)
        cnn.add_module('pooling{0}'.format(2), nn.MaxPool2d((2, 2),
                                                            (2, 1),
                                                            (0, 1)))  # 256x4x16
        convRelu(4, True)
        convRelu(5)
        cnn.add_module('pooling{0}'.format(3), nn.MaxPool2d((2, 2),
                                                            (2, 1),
                                                            (0, 1)))  # 512x2x16
        convRelu(6, True)  # 512x1x16

        self.cnn = cnn
        self.rnn = nn.Sequential(
            BidirectionalLSTM(512, nh, nh, ngpu),
            BidirectionalLSTM(nh, nh, nclass, ngpu)
        )

    def forward(self, input):
        # conv features
        conv = data_parallel(self.cnn, input, self.ngpu)
        b, c, h, w = conv.size()
        assert h == 1, "the height of conv must be 1"
        conv = conv.squeeze(2)
        conv = conv.permute(2, 0, 1)  # [w, b, c]

        # rnn features
        output = utils.data_parallel(self.rnn, conv, self.ngpu)

        return output


def pre_model(nclass, ocrModelPath):
    # @@parm nclass:字元總數
    # @@預訓練模型檔案

    if torch.cuda.is_available() and GPU:
        model = CRNN(32, 1, nclass + 1, 256, 1).cuda()
    else:
        model = CRNN(32, 1, nclass + 1, 256, 1).cpu()

    state_dict = torch.load(ocrModelPath, map_location=lambda storage, loc: storage)
    new_state_dict = OrderedDict()
    for k, v in state_dict.items():
        name = k.replace('module.', '')  # remove `module.`
        new_state_dict[name] = v

    model.load_state_dict(new_state_dict)
    model.eval()

    return model


def new_model(nclass, preModel):
    # 定義你自己的模型

    if torch.cuda.is_available() and GPU:
        model = CRNN(32, 1, nclass + 1, 256, 1).cuda()
    else:
        model = CRNN(32, 1, nclass + 1, 256, 1).cpu()

    modelDict = model.state_dict()  ##
    preModelDict = preModel.state_dict()  ##
    preModelDict = {k: v for k, v in preModelDict.items() if 'rnn.1' not in k}
    modelDict.update(preModelDict)  ##更新權重
    model.load_state_dict(modelDict)  ##載入預訓練模型權重
    return model


nclass = 5530
ocrModelPath = 'ocr.pth'
model = pre_model(nclass, ocrModelPath)
##定義你自己的模型
nclass = 10  ##字符集大小
newmodel = new_model(10, model)
3.文字方向檢測
詳見:https://github.com/jiangxiluning/chinese-ocr
文字方向檢測
基於影象分類,在VGG16模型的基礎上,遷移訓練0、90、180、270度的文字方向分類模型,詳細程式碼參考angle/predict.py檔案,訓練圖片100000張,準確率95.10%。 模型地址百度雲下載
文字檢測
支援CPU、GPU環境,一鍵部署, 文字檢測訓練參考(https://github.com/eragonruan/text-detection-ctpn)
4.如何訓練yolo文字檢測 及 crnn ocr文字識別 #59
1)yolo文字訓練和其他物件檢測訓練方式類似,唯一不同的是,後續有一個box聚類,原理參考了ctpn相關程式碼。此專案標註了“text”,'None'(無用,只是在於增加一個分類,實際中沒有用的none),的目的在於如果只訓練一個分類,yolo3無法收斂。
2)crnn+ctc訓練就是支援不定長識別,訓練可以定長與非定長訓練,如果你按照crnn.pytorch網路訓練,那麼輸出的最大字元與影象的長度是存在如下關係:nchars = [imgW/4]-2,比如你訓練的是10的字,那麼其實ctc自動給你填充了很多的補位符,詳細可以參考ctc相關原理。如果只是用演算法生成訓練影象,模型的泛化能力會很弱,可能需要加入一部分真實場景的訓練集。
資料標定如何進行的
和ctpn訓練類似,只是將ctpn替換為darknet而已
yolo文字檢測訓練程式碼很簡單哈,訓練完全是按照darknet訓練方式訓練,也可以用https://github.com/qqwweee/keras-yolo3.git
還有很多地方需要優化,比如anchors,後面優化了,會一起放出來哈。box聚類程式碼在detector目錄中,可以自己看看。
如果自己準備業務資料的話,只需要準備ocr訓練資料即可(行文字及行圖片)
注意:對於分隔比較開的字,現在的yolov3還不能識別到一行,調整model函式中alph引數即可,預設是0.1,你可以設定大一點
5.液晶顯示器字元和數碼管字元檢測效果如何提升? #44
液晶顯示器顯示的字元應該輸入點式(針式列印),不是常規列印字型,你可以找一些這方面的字型,訓練一下。或者先對檢測出的影象做一下影象處理,可能效果會好一些
根據字型生成圖片 ,可以參考 https://github.com/JarveeLee/SynthText_Chinese_version.git
字型、字號你可以任意模擬、背景也可以任意生成,這樣泛化能力也會更好。更復雜,你還可以運用對抗網路,去構造更復雜的訓練集
也可以參考另一個專案,用於文字識別的合成數據生成器:https://github.com/Belval/TextRecognitionDataGenerator
6.中文ocr的訓練資料集如何生成呢? #4
一部分演算法合成,另外一部分通過呼叫商業API(百度、微軟等等),然後採用驗證的方式(對於用一張圖片,同一位置,nms大於0.8,如果兩個API的識別結果一樣,那麼就取用,反之捨棄)獲取資料,比例控制在8:2就可以。
7.效果不好的時候,需要定位問題出現在文字檢測還是識別
文字檢測測試
import opencv_dnn_detect
#import darknet_detect
from PIL import Image
import numpy as np
import cv2
##
img = cv2.imread('/home/gavin/Desktop/id_card.jpg')
boxes, scores = opencv_dnn_detect.text_detect(np.array(img))

for bbox in boxes:
    cv2.rectangle(img, (bbox[0], bbox[1]), (bbox[2], bbox[3]), color=(0, 255, 0), thickness=1)

print(len(boxes))
cv2.imshow('tested_1',img)
cv2.waitKey(0)
cv2.imwrite('/home/gavin/Desktop/tested_id_card.jpg',img)
ocr測試
from crnn.crnn import crnnOcr as crnnOcr
from PIL import Image
partImg = Image.open('line.jpg')##單行文字影象
partImg = partImg.convert('L')
simPred = crnnOcr(partImg)##識別的文字
print(simPred)
附2.
1.重新訓練crnn
資料集製作:參見這裡
執行:
python3 run.py -w 2 -r -f 64 -wd 280 -bl 2 -rbl -b 3 -t 2 -rs -num -sym -na 2 -k 5 -rk -c 200000 -i texts/lcdisplay.txt其中引數-na 2 表示按照下面格式生成資料
2: [ID].[EXT] + one file labels.txt containing id-to-label mappings
這裡我只選擇了num和部分sym隨機合成的圖片如下(你當然可以選擇漢字或者其他字元組合,甚至手寫字型都可以):

當然也可以指定生成的格式:
import random
import re
import string
import os

pool = ''
pool += "0123456789"

with open("texts/lcdisplay.txt", 'w', encoding="utf8") as f:
    for i in range(200000):
        current_string = ""
        #for _ in range(0, random.randint(1, 10)):
        seq_len = random.randint(1, 5)
        current_string += ''.join([random.choice(pool) for _ in range(seq_len)])
        f.write("{}.{}\n".format(current_string,random.choice(pool)))
這個時候run執行需要指定-i引數
至此圖片資料集是已經準備好。接下來移步另一個工作,製作lmdb資料,訓練crnn。
需要安裝 lmdb +wrap_ctc,過程都很簡單。
專案原始碼可以參考這個
注意,getLmdb.py must run in python2.x
# -*- coding: utf-8 -*-
import os
import lmdb  # install lmdb by "pip install lmdb"
import cv2
import numpy as np
import glob

def checkImageIsValid(imageBin):
    if imageBin is None:
        return False
    imageBuf = np.fromstring(imageBin, dtype=np.uint8)
    img = cv2.imdecode(imageBuf, cv2.IMREAD_GRAYSCALE)
    if img is None:
        return False
    imgH, imgW = img.shape[0], img.shape[1]
    if imgH * imgW == 0:
        return False
    return True


def writeCache(env, cache):
    with env.begin(write=True) as txn:
        for k, v in cache.items():
            #txn.put(str(k).encode(), str(v).encode()) #python3
            txn.put(k, v)


def createDataset(outputPath, imagePathList, labelList, lexiconList=None, checkValid=True):
    """
    Create LMDB dataset for CRNN training.
    ARGS:
        outputPath    : LMDB output path
        imagePathList : list of image path
        labelList     : list of corresponding groundtruth texts
        lexiconList   : (optional) list of lexicon lists
        checkValid    : if true, check the validity of every image
    """
    assert (len(imagePathList) == len(labelList))
    nSamples = len(imagePathList)
    print('...................')
    # map_size=1099511627776 定義最大空間是1TB
    env = lmdb.open(outputPath, map_size=1099511627776)

    cache = {}
    cnt = 1
    for i in range(nSamples):
        imagePath = imagePathList[i]
        label = labelList[i]
        if not os.path.exists(imagePath):
            print('%s does not exist' % imagePath)
            continue
        with open(imagePath, 'rb') as f:
            imageBin = f.read()
        if checkValid:
            if not checkImageIsValid(imageBin):
                print('%s is not a valid image' % imagePath)
                continue

        imageKey = 'image-%09d' % cnt
        labelKey = 'label-%09d' % cnt
        cache[imageKey] = imageBin
        cache[labelKey] = label

        if lexiconList:
            lexiconKey = 'lexicon-%09d' % cnt
            cache[lexiconKey] = ' '.join(lexiconList[i])
        if cnt % 1000 == 0:
            writeCache(env, cache)
            cache = {}
            print('Written %d / %d' % (cnt, nSamples))
        cnt += 1
    nSamples = cnt - 1
    cache['num-samples'] = str(nSamples)
    writeCache(env, cache)
    print('Created dataset with %d samples' % nSamples)


def read_text(path):
    with open(path) as f:
        text = f.read()
    text = text.strip()

    return text


if __name__ == '__main__':

    outputPath = './data/lmdb/train'
    imgdata = open("./data/trainlabels.txt")
    imagePathList = []
    imgLabelLists = []
    for line in list(imgdata):
        label = line.split()[1]
        image = line.split()[0]
        imgLabelLists.append(label)
        imagePathList.append('/home/gavin/Dataset/train_images/' + image)

    print(len(imagePathList))
    print(len(imgLabelLists))
    createDataset(outputPath, imagePathList, imgLabelLists, lexiconList=None, checkValid=True)
train和val需要分別生成,修改上面的程式碼即可。完成後得到.mdb檔案:

完成後可以進行訓練,訓練前現檢查各個引數情況,記得alphabet要改成你自己的,比如我的:
alphabet = '0123456789%.°C'
最後,送上例項:
python3 crnn_main.py --adadelta --ngpu 1 --crnn ./expr/model.pth

python3 demo.py  --model_path ./expr/model.pth