chapter2.2、react技術
React
簡介
React是Facebook開發並開源的前端框架。
當時他們的團隊在市面上沒有找到合適的MVC框架,就自己寫了一個Js框架,用來架設Instagram(圖片分享社交網路)。2013年React開源。
React解決的是前端MVC框架中的View檢視層的問題。
Virtual DOM
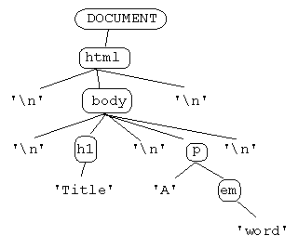
DOM(文件物件模型Document Object Model)
文件
<html>
    <body>
        <h1>Title</h1>
     <p>A <em>word</em></p>
    </body>
</html>
將網頁內所有內容對映到一棵樹型結構的層級物件模型上,瀏覽器提供對DOM的支援,使用者可以是用指令碼呼叫DOM API來動態的修改DOM結點,從而達到修改網頁的目的,這種修改是瀏覽器中完成,瀏覽器會根據DOM的改變重繪改變的DOM結點部分。
修改DOM重新渲染代價太高,前端框架為了提高效率,儘量減少DOM的重繪,提出了Virtual DOM,所有的修改都是現在Virtual DOM上完成的,通過比較演算法,找出瀏覽器DOM之間的差異,使用這個差異操作DOM,瀏覽器只需要渲染這部分變化就行了。
React實現了DOM Diff演算法可以高效比對Virtual DOM和DOM的差異。
支援JSX語法
JSX是一種JavaScript和XML混寫的語法,是JavaScript的擴充套件。
React.render(
    <div>
        <div>
            <div>content</div>
        </div>
    </div>,
document.getElementById('example')
);
測試程式
替換 /src/index.js 為下面的程式碼
import React from "react"; import ReactDom from"react-dom"; class Root extends React.Component{ render() { return <div>Hello World</div>; } } ReactDom.render(<Root/>,document.getElementById("root"));
儲存後就會自動編譯,並重新裝載重新整理瀏覽器端頁面
程式解釋
import React from 'react'; 匯入react模組
import ReactDOM from 'react-dom'; 匯入react的DOM模組
class Root extends React.Component 元件類定義,從React.Component類上繼承。這個類生成JSXElement物件即React元素。
render() 渲染函式。返回元件中渲染的內容。注意,只能返回唯一 一個頂級元素回去。
ReactDom.render(<Root/>, document.getElementById('root')); 第一個引數是JSXElement物件,第二個是DOM的Element元素。將React元素新增到DOM的Element元素中並渲染。
還可以使用React.createElement建立react元素,第一引數是React元件或者一個HTML的標籤名稱(例如div、span)。
return React.createElement('div', null, 'why are you so cool.');
ReactDom.render(React.createElement(Root), document.getElementById('root'));
改寫的程式碼為
import React from "react";
import ReactDom from "react-dom";

class Root extends React.Component{
    render() {
        // return <div>Hello World</div>;
        return React.createElement('div', null, 'why are you so cool.');
    }
}

// ReactDom.render(<Root/>,document.getElementById("root"));
ReactDom.render(React.createElement(Root),document.getElementById("root"));
使用JSX更簡潔易懂,推薦使用JSX語法。
增加一個子元素
import React from "react";
import ReactDom from "react-dom";

class Sub extends React.Component{
    render() {
        return <div>Sub content</div>
    }
}

class Root extends React.Component{
    render() {
        return (<div>
            <h2>hello, I'm Riper</h2>
            <br />
            <Sub />
        </div>);
    }
}

ReactDom.render(<Root/>,document.getElementById("root"));
注意:
1、React元件的render函式return,只能是一個頂級元素
2、JSX語法是XML,要求所有元素必須閉合,注意 <br /> 不能寫成 <br>
JSX規範
- 約定標籤中首字母小寫就是html標記,首字母大寫就是元件
- 要求嚴格的HTML標記,要求所有標籤都必須閉合。br也應該寫成 <br /> ,/前留一個空格。
- 單行省略小括號,多行請使用小括號
- 元素有巢狀,建議多行,注意縮排
- JSX表示式:表示式使用{}括起來,如果大括號內使用了引號,會當做字串處理,例如 <div>{'2>1?true:false'}</div> 裡面的表示式成了字串了
元件狀態state **
每一個React元件都有一個狀態屬性state,它是一個JavaScript物件,可以為它定義屬性來儲存值。
如果狀態變化了,會觸發UI的重新渲染。使用setState()方法可以修改state值。
注意:state是每個元件自己內部使用的,是元件自己的屬性。
依然修改/src/index.js
import React from "react"
import ReactDom from "react-dom"

class Root extends React.Component{
    state = {
        p1 : "hello ",
        p2 : "world."
    };
    render () {
        this.state.p1 = "where is "; //不推薦在render中修改state
        // this.setState({p1: "where is"}) // 遞迴了,不可以對還在更新中的state使用setState
        console.log("!!!!!!!!!!!!!!!!")
        // setTimeout(() => this.setState({p1:"where is "}),5000)
        //控制檯會每隔五秒列印一次!!!!!!!!!!!,因為setState會導致render重繪,這裡還是會迴圈
        return (
            <div>
                <div>this say {this.state.p1}{this.state.p2}</div>
            </div>);
    }
}

ReactDom.render(<Root />,document.getElementById("root"));
如果將 this.state.p1 = 'where is ' 改為 this.setState({p1:'where is '}); 就會出警告。
可以使用延時函式 setTimeout(() => this.setState({ p1: 'where is ' }), 5000); 即可。如果網頁需要每一段時間更新一次,也可以使用該方法。
import React from "react"
import ReactDom from "react-dom"

class Root extends React.Component{
    state = {
        count : 0
    };

    handleClick(event) {
        console.log(event)
        console.log(event.target);
        this.setState({'count': ++this.state.count})
    };
    render () {
        return (
            <div onClick={this.handleClick.bind(this)}> // 繫結,否則會有傳遞的this的坑
                {this.state.count}
            </div>);
    }
}

ReactDom.render(<Root />,document.getElementById("root"));
複雜狀態
將指令碼放在網頁中,傳統網頁實現
<html>

<head>
    <script type="text/javascript">
        function getEventTrigger(event) {
            x = event.target; // 從事件中獲取元素
            alert("觸發的元素的id是:" + x.id);
        }
    </script>
</head>

<body>
    <div id="t1" onmousedown="getEventTrigger(event)">
        點選這句話,會觸發一個事件,並彈出一個警示框
    </div>
</body>

</html>
div的id是t1,滑鼠按下事件捆綁了一個函式,只要滑鼠按下就會觸發呼叫getEventTrigger函式,瀏覽器會送給它一個引數event。event是事件物件,當事件觸發時,event包含觸發這個事件的物件。
HTML DOM的JavaScript事件
屬性 此事件發生在何時
onabort 影象的載入被中斷
onblur 元素失去焦點
onchange 域的內容被改變
onclick 當用戶點選某個物件時呼叫的事件控制代碼
ondblclick 當用戶雙擊某個物件時呼叫的事件控制代碼
onerror 在載入文件或影象時發生錯誤
onfocus 元素獲得焦點
onkeydown 某個鍵盤按鍵被按下
onkeypress 某個鍵盤按鍵被按下並鬆開
onkeyup 某個鍵盤按鍵被鬆開
onload 一張頁面或一幅影象完成載入
onmousedown 滑鼠按鈕被按下
onmousemove 滑鼠被移動
onmouseout 滑鼠從某元素移開
onmouseover 滑鼠移到某元素之上
onmouseup 滑鼠按鍵被鬆開
onreset 重置按鈕被點選
onresize 視窗或框架被重新調整大小
onselect 文字被選中
onsubmit 確認按鈕被點選
onunload 使用者退出頁面
使用React實現上面的傳統的HTML
import React from 'react';
import ReactDom from 'react-dom';

class Toggle extends React.Component {
    state = {flag : true};
    handleClick(event) {
        console.log(event.targer === this, event.target.id);
        console.log(this, this.state);
        this.setState({flag: !this.state.flag})
    };
    render() {
        return <div id="t1" onClick={this.handleClick.bind(this)}>
            點選按鈕會發生事件 {this.state.flag.toString()}
        </div>
    }
}

class Root extends React.Component {
    state = {p1: "Are you kidding me"}
    render () {
        setTimeout(() => this.setState({p1: "Yes!"}),5000)
        return (
            <div>
                <div>{this.state.p1}</div>
                <br />
                <Toggle />
            </div>
        )
    }
}

ReactDom.render(<Root />, document.getElementById('root'));
分析:
Toggle類,有自己的state屬性
當render完成後,網頁上有一個div標籤,div標籤物件捆邦了一個click事件,div標籤內有文字內容。
點選左鍵後,觸發了click方法關聯的handleClick函式,改變了狀態值。
狀態的改變會導致render的重繪。
元件的state變化只會導致自己的render方法重繪。
注意:
{this.handleClick.bind(this)},不能外加引號
this.handleClick.bind(this) 一定要繫結this,否則當觸發捆綁的函式時,this是函式執行的上下文決定的,this已經不是觸發事件的物件了。
console.log(event.target.id),取回的產生事件的物件的id,但是這不是我們封裝的元件物件。所以,console.log(event.target===this)是false。所以這裡一定要用this,而這個this是通過繫結來的。
React中的事件
使用小駝峰命名
使用JSX表示式,表示式中指定事件處理函式
不能使用return false,如果要阻止事件預設行為,使用event.preventDefault()
屬性props **
props就是元件的屬性properties。
把React元件當做標籤使用,可以為其增加屬性,如下
<Toggle name="school" parent={this} />
為上面的Toggle元素增加屬性:
1、 name = "school" ,這個屬性會作為一個單一的物件傳遞給元件,加入到元件的props屬性中
2、 parent = {this} ,注意這個this是在Root元素中,指的是Root元件本身
3、在Root中為使用JSX語法為Toggle增加子元素,這些子元素也會被加入Toggle元件的props.children中
import React from 'react';
import ReactDom from 'react-dom';
class Toggle extends React.Component {
    state = { flag: true }; // 類中定義state
    handleClick(event) {
        // event.preventDefult()
        console.log(event.target.id);
        console.log(event.target === this);
        console.log(this);
        console.log(this.state);
        this.setState({ flag: !this.state.flag });
    }
    render() {/* 注意一定要繫結this onClick寫成小駝峰 */
        return <div id="t1" onClick={this.handleClick.bind(this)}>
        點選這句話,會觸發一個事件。{this.state.flag.toString()}<br />
        {this.props.name} : {this.props.parent.state.p1 + this.props.parent.state.p2}<br />
        {this.props.children}
        </div>;
    }
}
class Root extends React.Component {
    // 定義一個物件
    state = { p1: '會發生', p2: '變化' }; // 建構函式中定義state
    // handleClick(event) {
    //     console.log(this.state)
    // };

    render() {
        // setTimeout(() => this.setState({ p1: '已經' }), 5000);
        setInterval(() => this.setState({ p1: '已經' }), 5000);
        return (
            <div>
                <div>這裡5秒 {this.state.p1}{this.state.p2}</div>
                <br />
                <Toggle name="teststr" parent={this}>
                <hr />
                <span>我是Toggle元素的子元素</span>
                </Toggle>
            </div>);
    }
}
ReactDom.render(<Root />, document.getElementById('root'));
有了props,可以在子元件中控制父元件中的state。
嘗試修改props中的屬性值,會丟擲 TypeError: Cannot assign to read only property 'name' of object '#<Object>' 異常。
應該說,state是私有private的屬於元件自己的屬性,元件外無法直接訪問。可以修改state,但是建議使用setState方法。
props是公有public屬性,元件外也可以訪問,但只讀。
在修改state屬性時,注意
react在處理事件時,會在傳遞給子元件後,再傳遞給父元件。比如子元件和父元件都綁了onclick事件。一般不會同時接受。
構造器constructor
使用ES6的構造器,要提供一個引數props,並把這個引數使用super傳遞給父類
import React from 'react';
import ReactDom from 'react-dom';
class Toggle extends React.Component {
    constructor(prpos){
        super(prpos)
    this.state = { flag: true }; // 類中定義state
    }
    handleClick(event) {
        this.setState({ flag: !this.state.flag });
        console.log(this.props.parent);
        let r = this.props.parent;
        r.setState({p1:"hello !!!"})
    }
    render() {/* 注意一定要繫結this onClick寫成小駝峰 */
        return <div style={{padding:"20px"}}>
        <span id="t1" onClick={this.handleClick.bind(this)} >點選這句話,會觸發一個事件。{this.state.flag.toString()}</span>
        <br />
        {this.props.name} : {this.props.parent.state.p1 + this.props.parent.state.p2}<br />
        {this.props.children}
        </div>;
    }
}
class Root extends React.Component {
    constructor(prpos){
        super(prpos)
    this.state = { p1: '會發生', p2: '變化' }; // 建構函式中定義state
    }

    render() {
        // setTimeout(() => this.setState({ p1: '已經' }), 5000);
        setInterval(() => this.setState({ p1: '已經' }), 5000);
        return (
            <div>
                <div>這裡5秒 {this.state.p1}{this.state.p2}</div>
                <br />
                <Toggle name="teststr" parent={this}>
                <hr />
                <span style={{backgroundColor:"white"}}>我是Toggle元素的子元素</span>
                </Toggle>
            </div>);
    }
}
ReactDom.render(<Root />, document.getElementById('root'));
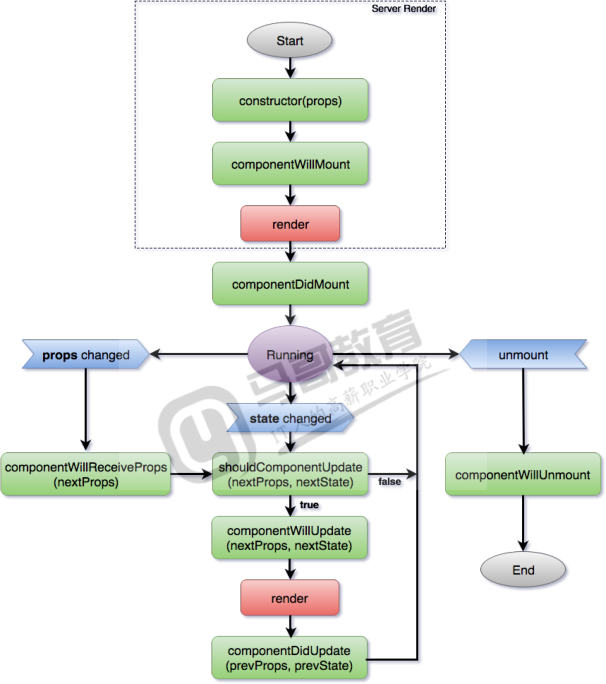
元件的生命週期 *
元件的生命週期可分成三個狀態:
- Mounting:已插入真實 DOM
- Updating:正在被重新渲染
- Unmounting:已移出真實 DOM
元件的生命週期的方法
裝載時觸發
componentWillMount: 渲染前呼叫,只在裝載前呼叫一次,在客戶端和服務端都執行
componentDidMount: 在第一次渲染後執行,只在客戶端執行,之後元件已經生成了對應的DOM結構,可以通過this.getDOMNode()來進行訪問。 如果你想和其他JavaScript框架一起使用,可以在這個方法中呼叫setTimeout, setInterval或者傳送AJAX請求等操作(防止異部操作阻塞UI)。只在裝載完成後呼叫一次,在render之後
更新時觸發,不會再首次render時呼叫
componentWillReceiveProps(nextProps) 在元件接收到一個新的prop時被呼叫。這個方法在初始化render時不會被呼叫
shouldComponentUpdate(nextProps, nextState) 返回一個布林值。在元件接收到新的props或者state時被呼叫。在初始化時或者使用forceUpdate時不被呼叫。
可以在你確認不需要更新元件時使用。
如果設定為false,就是不允許更新元件,那麼componentWillUpdate、componentDidUpdate不會執行。
componentWillUpdate(nextProps, nextState) 在元件接收到新的props或者state但還沒有render時被呼叫。在初始化時不會被呼叫。
componentDidUpdate(prevProps, prevState) 在元件完成更新後立即呼叫。在初始化時不會被呼叫。
解除安裝元件觸發
componentWillUnmount在元件從 DOM 中移除的時候立刻被呼叫。

由圖可知
constructor構造器是最早執行的函式。
觸發 更新生命週期函式 ,需要更新state或props。
因此,重新編寫/src/index.js。
構造兩個元件,在子元件Sub中,加入所有生命週期函式。
下面的例子新增是裝載、解除安裝元件的生命週期函式
import React from 'react';
import ReactDom from 'react-dom';
class Sub extends React.Component {
    constructor(props) {
        console.log('Sub constructor')
        super(props); // 呼叫父類構造器
        this.state = { count: 0 };
    }
    handleClick(event) {
        this.setState({ count: this.state.count + 1 });
    }
    render() {
        console.log('Sub render');
        return (<div style={{ height: 200 + 'px', color: 'red', backgroundColor: '#f0f0f0' }}>
            <a id="sub" onClick={this.handleClick.bind(this)}>
                Sub's count = {this.state.count}
            </a>
        </div>);
    }
    componentWillMount() {
        // constructor之後,第一次render之前
        console.log('Sub componentWillMount');
    }
    componentDidMount() {
        // 第一次render之後
        console.log('Sub componentDidMount');
    }
    componentWillUnmount() {
        // 清理工作
        console.log('Sub componentWillUnmount');
    }
    componentWillReceiveProps(nextProps) {
        // props變更時,接到新props了,交給shouldComponentUpdate。
        // props元件內只讀,只能從外部改變
        console.log(this.props);
        console.log(nextProps);
        console.log('Sub componentWillReceiveProps', this.state.count);
    }
    shouldComponentUpdate(nextProps, nextState) {
        // 是否元件更新,props或state方式改變時,返回布林值,true才會更新
        console.log('Sub shouldComponentUpdate', this.state.count, nextState);
        return true; // return false將攔截更新
    }
    componentWillUpdate(nextProps, nextState) {
        // 同意更新後,真正更新前,之後呼叫render
        console.log('Sub componentWillUpdate', this.state.count, nextState);
    }
    componentDidUpdate(prevProps, prevState) {
        // 同意更新後,真正更新後,在render之後呼叫
        console.log('Sub componentDidUpdate', this.state.count, prevState);
    }
}
class Root extends React.Component {
    constructor(props) {
        console.log('Root Constructor')
        super(props); // 呼叫父類構造器
        // 定義一個物件
        this.state = { flag: true, name: 'root' };
    }
    handleClick(event) {
        this.setState({
            flag: !this.state.flag,
            name: this.state.flag ? this.state.name.toLowerCase() : this.state.name.toUpperCase()
        });
    }
    render() {
        return (
            <div id="root" onClick={this.handleClick.bind(this)}>
                My Name is {this.state.name}
                <hr />
                <Sub /> {/*父元件的render,會引起下一級元件的更新流程,導致props重新發送,即使子元件props沒有
改變過*/}
            </div>);
    }
}
ReactDom.render(<Root />, document.getElementById('root'));
componentWillMount 第一次裝載,在首次render之前。例如控制state、props
componentDidMount 第一次裝載結束,在首次render之後。例如控制state、props
componentWillReceiveProps 在元件內部,props是隻讀不可變的,但是這個函式可以接收到新的props,可以對props做一些處理,this.props = {name:'roooooot'};這就是偷樑換柱。componentWillReceiveProps觸發,也會走shouldComponentUpdate。
shouldComponentUpdate 判斷是否需要元件更新,就是是否render,精確的控制渲染,提高效能。
componentWillUpdate 在除了首次render外,每次render前執行,componentDidUpdate在render之後呼叫。
不過,大多數時候,用不上這些函式,這些鉤子函式是為了精確的控制。shouldComponentUpdate可以在程式中攔截,控制屬性的值。
無狀態元件
import React from "react";
import ReactDom from "react-dom"

let Root = props => <div>{props.schoolName}</div>

ReactDom.render(<Root schoolName="magedu" />, document.getElementById('root'));
無狀態元件,也叫函式式元件
開發中,很多情況下,元件其實很簡單,不需要state狀態,也不需要使用生命週期函式。無狀態元件很好的滿足了需要。
無狀態元件函式應該提供一個引數props,返回一個React元素。
無狀態元件函式本身就是render函式。
