跟著iMX28x開發套件學linux-10
十、linux應用程式設計之八:執行緒
執行緒是包含在程序內部的順序執行流,是程序中的實際運作單位,也是作業系統能夠進行排程的最小單位。一個程序中可以併發多條執行緒,每條執行緒並行執行不同的任務。
簡單來說,程序是由執行緒組成的,執行緒是系統排程的最小單位,程序是擁有資源的基本單位而執行緒共享程序的資源。
執行緒的內容有點複雜,分執行緒建立與終止,連線與分離,執行緒屬性,互斥量,條件變數五部分做筆記。
1.執行緒建立與終止
1) 函式原型:int pthread_create(pthread_t *thread, const pthread_attr_t *attr,void *(*start_routine) (void *), void *arg);
輸入引數:thread,執行緒ID,實際上是個結構體。attr,屬性物件,暫時先置為NULL。start_routine, 函式指標,指向執行緒執行函式。arg,執行緒執行函式的輸入引數。
返 回 值:成功返回0,失敗返回一個非零錯誤碼。
示 例:rc = pthread_create(&threadID, NULL, PrintHello, (void *)t);
2) 函式原型:void pthread_exit(void *retval);
輸入引數:retval,執行緒終止時向主執行緒返回的引數。
返
示 例:pthread_exit(0);
3) 虛擬碼:void* 執行函式{... pthread_exit(NULL);}
main{
pthread_create(&執行緒ID, NULL, 執行函式, (void*)引數);
pthread_exit(NULL); //一定不要忘了這裡要退出主執行緒
}
4) 程式碼示例:
#include <stdio.h> #include <stdlib.h> #include <pthread.h> #defineNUM_THREAD 5 void* PrintHello(void* threadid){ long id; id = (long)threadid; printf("Thread#%ld : Hello World! It's me, thread #%ld\n", id, id); pthread_exit(NULL); } int main(){ pthread_t threads[NUM_THREAD]; int rc; long i; for(i=0; i<NUM_THREAD; i++){ printf("main : creating thread %ld\n", i); rc = pthread_create(&threads[i], NULL, PrintHello, (void*)i); if(rc){ fprintf(stderr,"create thread #%ld error\n",i); exit(-1); } } printf("main : main exit!\n"); pthread_exit(NULL); return 0; }
執行結果:

2.連線與分離
執行緒分為分離執行緒和非分離執行緒,分離執行緒在退出時會立即釋放系統資源並返回,而非分離執行緒在退出時不會立即釋放資源,需要另一個執行緒為它呼叫pthread_join()函式。這樣的意義是:當執行緒A退出時,為其呼叫join函式的執行緒B可以獲得執行緒A的返回值。但是這樣會導致一個問題,如果沒有一個執行緒A為執行緒B呼叫join函式,那執行緒B就一直無法退出,也就無法釋放資源,只能等到程序終止時,執行緒B才能退出。對於長時間運作的程式來說,完成工作的執行緒長期不退出會導致佔用資源過多的現象。因此,對於長時間執行的程式,最好將執行緒設定為分離執行緒或者為執行緒呼叫join函式,當然,設定為分離執行緒的執行緒將無法返回值。
1) 函式原型:int pthread_detach(pthread_t thread);
輸入引數:thread,執行緒ID,由變數定義以及create函式得到。
返 回 值:int,成功返回0,失敗返回非零錯誤碼。
示 例:pthread_detach(pthread_self());
2) 函式原型:int pthread_join(pthread_t thread, void **retval);
輸入引數:thread,執行緒ID。retval,返回值存放地址。
返 回 值:int,成功返回0,失敗返回非零錯誤碼。
示 例:void *status; rc = pthread_join(threadID, &status);
說 明:viod **retval作為要被終止執行緒返回值的存放地址,這裡用了&(void*)status,但是實 際上要檢查或者引用這個返回值時,可以直接用(long)status來引用,保留疑問,待解 決。因為執行函式的返回值類 型為void*,也就是說void*型別才是有效資料,又因為 C語言中沒有引用型別,因而要通過引數獲得函式返回值只能通過指標,所以出現了 void** retval。
3) 虛擬碼:void* 執行函式(void *引數){...pthread_exit(要返回的引數);}
main(){
void* status;
rc = pthread_create(&執行緒ID, NULL, 執行函式, (void*)要輸入的引數);
rc = pthread_join(執行緒ID, &status); //用status時,用(long)status即可。
}
4) 程式碼示例:
#include <stdio.h>
#include <stdlib.h>
#include <pthread.h>

void* PrintHello(void* threadid){
    long id = (long)threadid;
    printf("thread #%ld : it is #%ld ,hello!!!\n", id, id);
    pthread_exit((void*)5);
}

int main(){
    pthread_t threadID;
    int rc;
    void* status;

    rc = pthread_create(&threadID, NULL, PrintHello, (void*)1);
    if(rc){
        perror("create thread error\n");
        exit(-1);
    }

    rc = pthread_join(threadID, &status);
    if(rc){
        perror("join thread error\n");
        exit(-1);
    }
    printf("main thread : return value = %ld\n", (long)status);
    pthread_exit(NULL);
    return 0;
}
執行結果:

3.執行緒屬性
之前使用create()函式時,第二個引數屬性物件att總是使用NULL,其實是有實際作用的。執行緒是有屬性的,上文說到的分離執行緒和非分離執行緒就是執行緒的屬性之一,稱為執行緒狀態。執行緒的基本屬性包括:執行緒狀態,調整策略和棧大小。
1) 屬性物件arr
初始化屬性物件:int pthread_attr_init(pthread_attr_t *attr);
arrt是屬性物件,成功返回0,失敗返回非零錯誤碼。
銷燬屬性物件:int pthread_attr_destroy(pthread_attr_t *attr);
arrt是屬性物件,成功返回0,失敗返回非零錯誤碼。
2) 執行緒狀態
獲取執行緒狀態:int pthread_attr_getdetachstate(pthread_attr_t *attr, int *detachstate);
arrt為屬性物件,detachstate是所獲取狀態值的指標。
設定執行緒狀態:int pthread_attr_setdetachstate(pthread_attr_t *attr, int detachstate);
arrt為屬性物件,detachstate是要設定的狀態值。
3) 執行緒棧
獲取執行緒棧:int pthread_attr_getstacksize(pthread_attr_t *attr, size_t *stacksize);
arrt為屬性物件,stacksize 是儲存所獲取棧大小的指標。
設定執行緒棧:int pthread_attr_setstacksize(pthread_attr_t *attr, size_t stacksize);
arrt為屬性物件,stacksize 是要設定的棧大小。
4) 屬性物件使用虛擬碼:
int main(){
pthread_attr_t attr;
pthread_attr_init(&attr);
pthread_attr_getstacksize(&attr, stacksize);
pthread_create(&thread, &attr, 執行函式, (void *)arg);
pthread_attr_destroy(&attr);
}
5) 程式碼例項:程式碼中涉及到getopt(),calloc(),strdup()等函式需要注意。
#include <stdio.h>
#include <stdlib.h>
#include <unistd.h>
#include <pthread.h>
#include <string.h>
#include <ctype.h>

//extern char* optarg;
//extern int optind;
//extern int opterr;
//extern int optopt;
struct thread_info{
    pthread_t pthreadID;
    int number_id;
    char* argv_string;
};

void* fun(void* var){
    char* p;
    struct thread_info* thread_point = var;
    static char* uargv;
    printf("Thread #%d : top of stack near %p; argv_string = %s\n",
           thread_point->number_id, &p, thread_point->argv_string);
    uargv = strdup(thread_point->argv_string);
    p = uargv;
    while(*p != '\0'){
        *p = toupper(*p);
        p++;
    }
    return(uargv);
}

int main(int argc, char* argv[]){

    int ch, thread_num;
    int stack_size = -1;
    int ret;
    pthread_attr_t attr;
    void* status;
    struct thread_info* threads = NULL;

    while((ch=getopt(argc, argv, "s:")) != -1){
        switch(ch){
            case 's':
                printf("HAVE option : -s\n");
                stack_size = strtoul(optarg, NULL, 0);
                printf("thread's stack size = %d\n", stack_size);
                break;
            default:
                fprintf(stderr, "Usage:%s [-s stack-size] arg...\n", argv[0]);
                exit(-1);
                break;
        }
    }
    thread_num = argc - optind;
    printf("thread_num = %d\n", thread_num);


    ret = pthread_attr_init(&attr);
    if(ret){
        perror("init attr error\n");
        exit(-1);
    }


    if(stack_size > 0){
        ret = pthread_attr_setstacksize(&attr, stack_size);
        if(ret){
            perror("set stack size error\n");
            exit(-1);
        }
    }
    else{
        perror("stack size < 0\n");
        exit(-1);
    }


    threads = calloc(thread_num, sizeof(struct thread_info));
    if(threads == NULL){
        perror("calloc error\n");
        exit(-1);
    }

    for(int i=0; i<thread_num; i++){
        threads[i].number_id = i;
        threads[i].argv_string = argv[optind + i];
        ret = pthread_create(&threads[i].pthreadID, &attr, fun, (void*)&threads[i]);
        if(ret){
            perror("create thread error\n");
            exit(-1);
        }
    }
    pthread_attr_destroy(&attr);

    for(int i=0; i<thread_num; i++){
        ret = pthread_join(threads[i].pthreadID, &status);
        if(ret){
            perror("join thread error\n");
            exit(-1);
        }
        printf("Join with thread #%d; return value was %s \n",
               threads[i].number_id, (char*)status);
    }

    pthread_exit(NULL);
    free(threads);
    return 0;
}
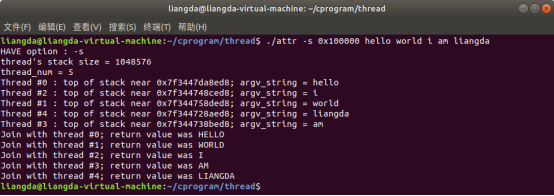
程式碼稍微有點長,實際上是有一條脈絡下來的。首先程式碼的目的是:在執行程式時用-s選項輸入執行緒堆疊的大小,接著輸入其他字串引數。然後輸出結果是字串引數的大寫形式。要實現這個目標首先一點就是要建立執行緒create(),建立執行緒需要執行緒ID,執行緒屬性物件,執行緒執行函式,執行函式輸入引數。執行緒ID通過變數宣告得到,執行緒屬性物件也是變數宣告+初始化得到,但是要修改棧大小。棧大小從-s選項來,因而需要getopt()函式解析選項。得到棧大小之後需要呼叫pthread_attr_setstacksize()函式設定棧大小。屬性物件得到之後,接下來就是編寫執行函式,獲取執行函式的輸入引數。這樣整個程式碼就寫完了。
需要注意的是,在呼叫pthread_attr_setstacksize()函式設定棧大小之前,必須先初始化屬性物件。-s輸入棧大小時,棧大小不能小於16K。
執行結果:

4.互斥量
程式中有一些程式碼一次只能由一個執行緒訪問,因此要對這些程式碼進行保護,這些程式碼叫臨界區程式碼,臨界區程式碼必須以互斥的方式訪問。互斥量(也叫互斥鎖),是一種用來保護臨界區的特殊變數,有鎖定和解鎖兩種狀態,當互斥量處於鎖定狀態時,說明某個執行緒正在持有這個互斥量,其他執行緒想要對這個互斥量加鎖的時候,將會阻塞,直到持有互斥量的執行緒解鎖這個互斥量。互斥量常用來做臨界區保護和程式碼同步。
1) 互斥量建立與銷燬
建立方式①:pthread_mutex_t mutex = PTHREAD_MUTEX_INITIALIZER;(常用)
建立方式②:pthread_mutex_t mutex;
int pthread_mutex_init(pthread_mutex_t *restrict mutex, constpthread_mutexattr_t *restrict attr);
銷燬互斥量:int pthread_mutex_destroy(pthread_mutex_t *mutex);
2) 互斥量加鎖和解鎖
加鎖:int pthread_mutex_lock(pthread_mutex_t *mutex);
int pthread_mutex_trylock(pthread_mutex_t *mutex);(嘗試加鎖,無法加鎖也不會阻塞)
解鎖:int pthread_mutex_unlock(pthread_mutex_t *mutex);
3) 互斥量使用虛擬碼:
pthread_mutex_t mylock = PTHREAD_MUTEX_INITIALIZER;
pthread_mutex_lock(&mylock);
臨界區程式碼
pthread_mutex_unlock(&mylock);
4) 程式碼示例:
 1 #include <stdio.h>
 2 #include <stdlib.h>
 3 #include <unistd.h>
 4 #include <pthread.h>
 5
 6 pthread_mutex_t mylock = PTHREAD_MUTEX_INITIALIZER;
 7
 8 void* doPrint(void* var){
 9
10     long id = (long)var;
11
12     pthread_mutex_lock(&mylock);
13     for(int i=0; i<5; i++){
14         printf("thread #%ld : it's me #%ld!!\n", id, id);
15         usleep(100);
16     }
17     pthread_mutex_unlock(&mylock);
18     pthread_exit(NULL);
19 }
20
21 int main(){
22
23     pthread_t pthreadID[3];
24     int ret;
25     for(long i=0; i<3; i++){
26         ret = pthread_create(&pthreadID[i], NULL, doPrint, (void*)i);
27         if(ret){
28             perror("create thread error\n");
29             exit(-1);
30         }
31     }
32     pthread_exit(NULL);
33     return 0;
34 }
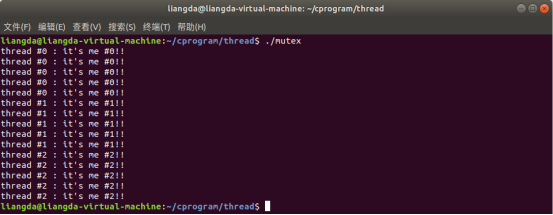
使用了互斥鎖後,每個執行緒都執行結束之後再執行下一個執行緒,輸出是整齊的,如下圖:

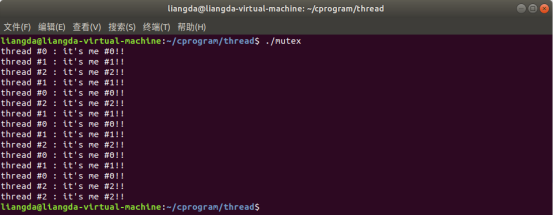
假設將程式碼的第12行和第17行註釋掉,輸出變得參差不齊了,如下:

5) 死鎖現象以及避免死鎖
死鎖現象指的是:兩個或兩個以上的執行緒在執行過程中,因爭奪資源而造成互相等待的情況。例如,執行緒A已經對互斥鎖a加鎖,而且想要對互斥鎖b加鎖。執行緒B已經對互斥鎖b加鎖,而且想要對互斥鎖a加鎖。那就會導致,執行緒A阻塞等待執行緒B解鎖互斥鎖b,執行緒B阻塞等待執行緒A解鎖互斥鎖a,但是兩個執行緒都已經阻塞,無法解鎖任何一個互斥鎖,所以執行緒A和執行緒B就死鎖了。
避免死鎖:加鎖應按照一定的順序進行加鎖。比如上面的例子中,加鎖順序為互斥鎖a->互斥鎖b。執行緒A已經對互斥鎖a加鎖,想要對互斥鎖b加鎖,這符合加鎖順序。而執行緒B此時不應該處於已經對互斥鎖b加鎖,而想要對互斥鎖a加鎖的狀態,這是不符合加鎖順序的。正確的加鎖順序應該是先對互斥鎖a加鎖,再對互斥鎖b加鎖。
5.條件變數
條件變數也是程式同步的一種。與互斥鎖不同,條件變數是通過 等待-通知 的方式進行同步的,同步方式比較高效。實際上使用條件變數要有互斥鎖的前提。
1) 建立和銷燬
靜態初始化:pthread_cond_t cond = PTHREAD_COND_INITIALIZER;(常用)
動態初始化:pthread_cond_t cond;
int pthread_cond_init(pthread_cond_t *restrict cond,const pthread_condattr_t *restrict attr);
銷燬:int pthread_cond_destroy(pthread_cond_t *cond);
2) 等待與通知
等待:int pthread_cond_wait(pthread_cond_t *restrict cond, pthread_mutex_t *restrict mutex);
int pthread_cond_timedwait(pthread_cond_t *restrict cond,pthread_mutex_t *restrict mutex, const struct timespec *restrict abstime);(阻塞一段時間後繼續執行)
通知:int pthread_cond_signal(pthread_cond_t *cond);(喚醒一個等待執行緒)
int pthread_cond_broadcast(pthread_cond_t *cond);(喚醒所有等待執行緒)
3) 條件變數使用虛擬碼:
| 執行緒A(等待) |
執行緒B(通知) |
| pthread_mutex_lock(&mutex) while(a < b) pthread_cond_wait(&cond, &mutex) pthread_mutex_unlock(&mutex) |
if(a<b) pthread_cond_signal(&cond) |
4) 程式碼示例:
#include <stdio.h>
#include <stdlib.h>
#include <unistd.h>
#include <pthread.h>

pthread_mutex_t mylock = PTHREAD_MUTEX_INITIALIZER;
pthread_cond_t mycond = PTHREAD_COND_INITIALIZER;
long sum = 0;

void* fun12(void* var){
    long id = (long)var;

    for(int i=0; i<60; i++){
        usleep(1);
        pthread_mutex_lock(&mylock);
        sum++;
        printf("thread #%ld : sum + 1, \t sum = %ld\n", id, sum);
        pthread_mutex_unlock(&mylock);
        if(sum>100){
            pthread_cond_signal(&mycond);
        }
    }
    pthread_exit(NULL);
}

void* fun3(void* var){
    long id = (long)var;

    pthread_mutex_lock(&mylock);
    while(sum < 100)
        pthread_cond_wait(&mycond, &mylock);
    sum = 0;
    printf("thread #%ld : sum alread > 100, \t clear sum\n", id);
    pthread_mutex_unlock(&mylock);
    pthread_exit(NULL);
}

int main(){

    pthread_t pthreadID[3];
    int ret;
    for(long i=0;i<3;i++){
        if(i<2)
            ret = pthread_create(&pthreadID[i], NULL, fun12, (void*)i);
        else
            ret = pthread_create(&pthreadID[i], NULL, fun3, (void*)i);

        if(ret){
            perror("create thread error!!\n");
            exit(-1);
        }
    }

    pthread_exit(NULL);
    return 0;
}
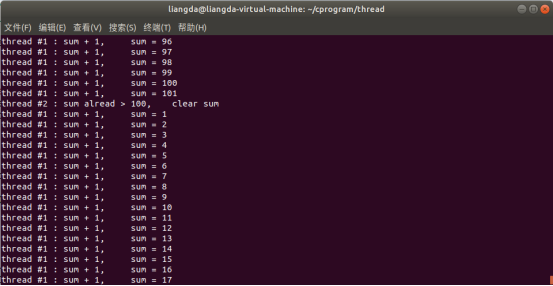
執行緒0和執行緒1對sum進行+1,並且檢測sum是否超過100,如果超過100即通知執行緒3繼續執行。執行結果如下:

這樣做的好處是,執行緒3只需要執行1次,而不用反覆執行執行緒3檢測sum是否超過100
