
C++沉思錄__函式物件與函式物件介面卡
所謂的函式物件,就是過載了類的()作用符的類物件,其行為類似於函式,因而又叫做仿函式。函式物件提供了一種方法,把將要呼叫的函式與準備遞給這個函式的隱式引數綁定了起來。這樣,我們就可以用簡單的語法建立起復雜的表示式。
與一般程式相比,函式物件允許我們把組合操作作為執行程式的一部分,之所以可以進行這種組合,是因為函式物件可以把函式當做值處理,因而帶來了極大的靈活性。這段話我還沒有理解。
/*
以標準函式庫中的find_if()為例 講解所謂的仿函式
*/
#include<vector>
template <class InputIterator, class Predict>
InputIterator find_if(InputIterator first,InputIterator last,Predict pred)
{

while(first != last && !pred(*first))
{
    ++first;
}
return  first;
}
template<class T>
class Greater
{
    public:
 bool operator()(const T & n)
 {
     if(n >50)
     return true;
     else
     return false;
 }

};
測試:
int main(int argc, char const *argv[])
{
/*
測試程式
*/
vector<int> vct_test;
for(int i =0;i<10000;i++ )
    vct_test.push_back(rand()%1000);
    vector<int>::iterator start =vct_test.begin();
     vector<int>::iterator end =vct_test.end();
      Binder1sts<less_equal<int> > binder1 = bind1sts(less_equal<int>(),60);//==>binder1st(less,60);
     size_t n1 = count_if(vct_test.begin(), vct_test.end(), binder1);
     cout << n1 <<endl;
    return 0;
}
int main(int argc, char const *argv[])
{
/*
本例測試仿函式
*/
vector<int> vct_test;
for(int i =0;i<10000;i++ )
    vct_test.push_back(rand()%1000);
    vector<int>::iterator start =vct_test.begin();
     vector<int>::iterator end =vct_test.end();
       cout<<*find_if(start,end,Greater<int>())<<endl;

    return 0;
}
通過上述例子,我們很容易發現函式物件所解決的問題之一就是把迭代器範圍內資料,通過函式體的處理,傳遞到判斷式之中,並獲取我們想要的資訊。這樣我們便可以理解這句話 :函式物件提供了一種方法,將要呼叫的函式,和準備傳遞給這個函式的引數隱式的綁定了在一起。find_if()演算法,將迭代器範圍內的資料,傳遞給了判斷式,並進行判斷,最終獲得我們所想要的資訊。其將迭代器中要處理的資料和函式物件進行了繫結,函式物件的引數值就是迭代器所指向的值。
當然,函式指標也可以實現這樣的功能,同樣是上面的程式,我們也可是使用函式指標實現,也就是回撥函式實現(如果你把函式的指標(地址)作為引數傳遞給另一個函式,當這個指標被用來呼叫其所指向的函式時,我們就說這是回撥函式。)相對於函式指標,編譯器可以內聯執行函式物件 函式物件內部可以保持狀態。
什麼是函式介面卡呢,函式物件介面卡,就是對
什麼是函式配接器呢,所謂的函式配接器就是對原有的配接器進行改造,使其滿足先前已有的演算法,因而也叫做函式介面卡。
函式介面卡分為兩類:繫結器 與 求反器;
1. 繫結器:bind1st:將給定值繫結到二元函式物件的第一個實參; bind2nd:將給定值繫結到二元函式物件的第二個實參;他們的返回值都是一元函式物件;
下面從繫結器的實現出發,瞭解bind2nd的工作過程。
/*
函式配接器的實現的例子
Typename關鍵字 告訴編譯把一個特殊的名字解釋成一個型別,在下列情況下必須對一個name使用typename關鍵字:
    一個唯一的name(可以作為型別理解),巢狀在另一個型別中;
   依賴於一個模板引數,就是說模板引數在某種程度上包含這個name,當模板引數是編譯器在指認一個型別時便會產生誤解
   為了保險起見,應該在所有編譯可能錯把一個type當成一個變數的地方使用typename,如果你的型別在模板引數中是有限制的,那就必須使用typename
*/
template <class Operation, class T>
inline binder2nd<Operation> bind2nd(const Operation& op, const T& x) {
    typedef typename Operation::second_argument_type arg2_type;
    //也就是說在operation類中要定義這樣一種型別和物件
    // 呼叫binder2nd
    return binder2nd<Operation>(op, arg2_type(x));
}

// binder2nd是一個一元仿函式(本身可以搭配函式介面卡一起使用)
template <class Operation>
class binder2nd
  : public unary_function<typename Operation::first_argument_type,
                          typename Operation::result_type>
{
protected:
    // 傳進來的二元仿函式
    Operation op;
    // 傳進來的第二個引數  因為仿函式內部可以typedef  而函式指標則不行
    // 因此只能適配仿函式  而不能適配函式指標
    typename Operation::second_argument_type value;
public:
    // 建構函式
    binder2nd(const Operation& x,
            const typename Operation::second_argument_type& y)
       : op(x), value(y) {}

    // 直接呼叫二元仿函式
    typename Operation::result_type
    operator()(const typename Operation::first_argument_type& x) const {
        return op(x, value);
    }
};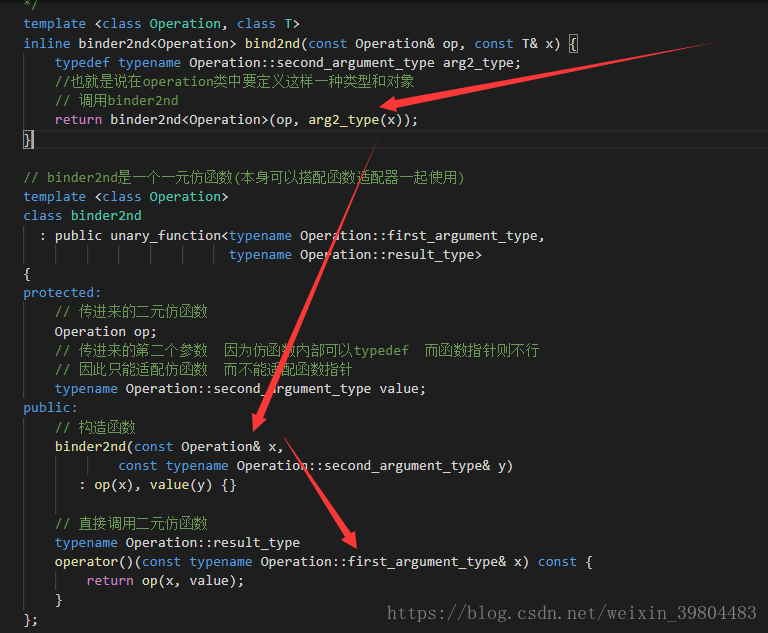
繫結器的工作過程如上圖所示,首先呼叫 bind2nd(const Operation& op, const T& x)函式, 呼叫binder2nd有參建構函式,
生成一個物件,該物件也就是函式物件呼叫過載後的operator()方法,這樣實現了對原有函式物件的改造,實現了第二個引數設定成為固定值,第一個引數設定為可變值的操作,也就是繫結操作。
再如:
測試:
int main(int argc, char const *argv[])
{
/*
測試程式
*/
vector<int> vct_test;
for(int i =0;i<10000;i++ )
    vct_test.push_back(rand()%1000);
    vector<int>::iterator start =vct_test.begin();
     vector<int>::iterator end =vct_test.end();
      Binder1sts<less_equal<int> > binder1 = bind1sts(less_equal<int>(),60);//==>binder1st(less,60);
     size_t n1 = count_if(vct_test.begin(), vct_test.end(), binder1);
     cout << n1 <<endl;
    return 0;
}
2. 求反器:not1:對一元函式物件的結果取反; not2:對二元函式物件的結果取反;
size_t n1 = count_if(ivec.begin(), ivec.end(), not1(bind2nd(less_equal<int>(), 5)));求反介面卡的作用也很簡單,就是對原有的比較結果取反就OK了。這裡不再贅述。